Brother International ULT-2003D driver and firmware
Drivers and firmware downloads for this Brother International item

Related Brother International ULT-2003D Manual Pages
Download the free PDF manual for Brother International ULT-2003D and other Brother International manuals at ManualOwl.com
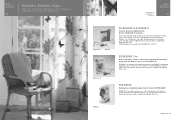
Accessory Catalog - Page 5
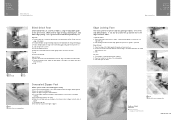
...guide screw, adjust the fabric guide to the edge of the fabric, and lower
the presser foot. 3. Sew.
SA133 ABCDEFJKMN
SA134 GHILOP
SA128 All Brother home-use sewing machines
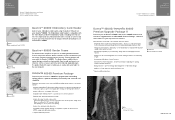
Concealed Zipper Foot
Allows you to install.... 2. Place the fold at the left side of the center guide. 3. Sew and open the fabric.
SA184 All Brother home-use sewing machines
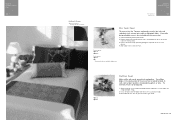
Ring Bearer Pillow & Hankerchief
Innov-is Project...
Accessory Catalog - Page 7
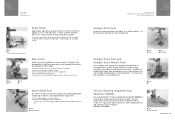
... be used with all Brother presser feet. Can be used for stitching heavy fabrics together.
1. Attach the seam guide on the needle plate with the thumbscrew of the seam guide. 2. Adjust the distance...stitching especially on thin fabrics or small pieces of patchworks. Installing the Straight Stitch Needle Plate automatically sets the needle position to the center straight stitching position on selected...
Accessory Catalog - Page 13
....)
Brother Embellishment
Feet
Pin Tuck Foot
24
Ruffler Foot
Pin Tuck Foot
This presser foot has 7 grooves and produces perfect pin tucks and corded pin tucks using a twin needle on lightweight fabric. A specially designed bobbin cover is also included with this presser foot.
1. Install and manually thread a twin needle. 2. Draw a reference line to guide...
Accessory Catalog - Page 16
... own unique embroidery patterns in the easy steps. Comes with USB card writer, 4M blank memory card and software compatible with Windows 2000 or later. SAVR8.0 Upgrade kit is compatible with PE-DESIGN 5.0, 6.0 & 7.0.
PE-DESIGN® Lite
New to embroidery software? Master basic digitizing and embroidery design work with Brother's easy to use PE-DESIGN® Lite.
PE-DESIGN®...
Accessory Catalog - Page 17
... QuattroTM 6000D
SAVR4000D Innov-is 4000D
QuattroTM 6000D Embroider y Card Reader
Connect your embroidery card reader using the built-in USB port on your QuattroTM 6000D. This Embroidery Card Reader is compatible with the entire library of Brother Embroidery Cards, including licensed content. The simple and easy USB attachment takes seconds to connect and ensures your treasured collection...
Users Manual - English - Page 4
... assure correct installation.
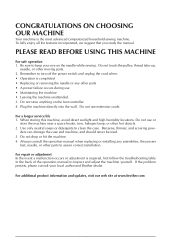
For repair or adjustment In the event a malfunction occurs or adjustment is required, first follow the troubleshooting table in the back of the operation manual to inspect and adjust the machine yourself. If the problem persists, please consult your local authorized Brother dealer.
For additional product information and updates, visit our...
Users Manual - English - Page 13

...power switch 2 Power cord
1 -
CAUTION • When leaving the machine unattended, the main
switch of the machine should be switched off or the plug must be removed from the socket-outlet.
• When servicing the machine, or when removing covers or changing bulbs, the machine or the electrical set...a qualified electrician to install the proper outlet. Do not modify the plug in ...
Users Manual - English - Page 31
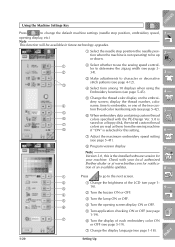
... machine
8
if "ON" is selected for this setting.
7 Adjust the maximum embroidery speed setting (see page 5-41).
8 Program version display
Note Version 3.0, this is the installed software version for your machine. Check with your local authorized Brother dealer or at www.brother.com for notification of an available updates.
1 - 2 - 3 - 4 - 5 - 6 - 7 - 8 -
1
Press
to go to the next screen...
Users Manual - English - Page 48

... with metallic thread.
1. Insert the vertical spool pin into the end of the bobbin
3
winder shaft.
2
2. Install the spool felt and the thread spool in that order,
and then thread the upper thread.
1
1 Insert the ... the end of the bob-
bin winder shaft
2 Spool felt
3 Thread spool
* When setting the thread spool, set it so that the thread winds off from the front of the spool.
* If using...
Users Manual - English - Page 54
...tighten the screw firmly.
Note If the presser foot holder is not installed correctly, the thread tension may loosen due to improper presser foot holder... 5 -
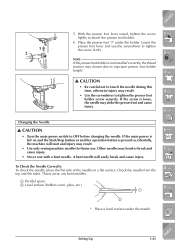
Changing the Needle
CAUTION
• Turn the main power switch to OFF before changing the needle. If the main power is left on and the Start/Stop button or another operation ...
* Place a level surface under the needle
Index
Setting Up
1-43
Users Manual - English - Page 55
...6
CONTENTS
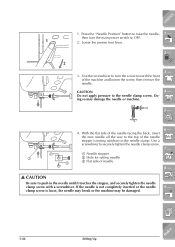
1. Press the "Needle Position" button to raise the needle, then turn the main power switch to OFF.
2. Lower the presser foot lever.
1 -
2 -
2
3. Use...the way to the top of the needle stopper (viewing window) in the needle clamp. Use a screwdriver to securely tighten the needle clamp screw.
6 - 7 -
1 Needle stopper
2 Hole for setting needle
3
3 Flat side of needle
8 -
CAUTION
...
Users Manual - English - Page 58

...setting before continuing sew-
ing. Otherwise, the needle may break and cause injury.
1. Turn on the main power... switch, and push the "Needle Position" button to raise the needle.
2. Press a stitch selection key to select a stitch.
3. Install the correct presser foot. The symbol of the correct presser foot will be displayed...speed with the speed control lever.
* You can use this lever to ...
Users Manual - English - Page 62
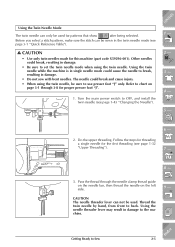
... set... presser foot "J".
1. Turn the main power switch to OFF, and install the twin needle (see page 1-43 ..."Changing the Needle").
6
1 - 2 - 3 - 4 - 5 -
6 -
2. Do the upper threading. Follow the steps for threading a single needle for the first threading (see page 1-32 "Upper Threading").
7 -
8 -
3. Pass the thread through the needle clamp thread guide...
Users Manual - English - Page 177
... with a built-in floppy disk drive, you can receive an upgrade service for your machine, so that it can use floppy disks at your authorized dealer.
• If floppy disks containing data other than those ...over the limit for number of stitches or colors can not be displayed. Edit the data with the embroidery design software system so the pattern is within the regulations noted above, and then...
Users Manual - English - Page 178
...
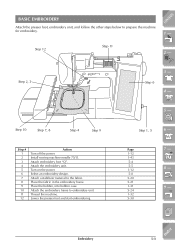
Step 11
2 -
Step 2, 3
Step 6
3 - 4 -
5 -
Step 10
Step 7, 8
Step 4
Step 9
Step # 1 2 3 4 5 6 7 8 9 10 11 12
Action Turn off the power. Install sewing machine needle 75/11. Attach embroidery foot "Q". Attach the embroidery unit. Turn on the power. Select an embroidery design. Attach a stabilizer material to the fabric. Place the fabric in the embroidery frame. Place...
Users Manual - English - Page 180
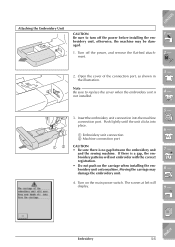
...power before installing the embroidery unit, otherwise, the machine may be damaged.
1. Turn off the power, and remove the flat-bed attachment.
1 - 2 -
2. Open the cover of the connection port... not push on the carriage when installing the embroidery unit onto machine. Moving the carriage may damage the embroidery unit.
4. Turn on the main power switch. The screen at left will display.
5 - 6 - 7 -...
Users Manual - English - Page 183
...
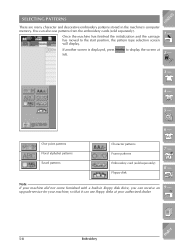
If another screen is displayed, press left.
to display the screen at
CONTENTS 1 -
2 -
3 -
4 -
5 -
6 -
One point patterns Floral alphabet patterns Saved patterns
Character patterns Frame patterns Embroidery card (sold separately) Floppy disk
7 - 8 -
Note
If your machine did not come furnished with a built-in floppy disk drive, you can receive an 9 -
upgrade service for your machine, so...
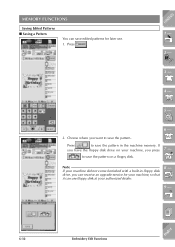
Users Manual - English - Page 226
...
to save the pattern in the machine's memory.
If you have the proper floppy disks,after inserting a floppy disk
you can press
to save the pattern to a floppy disk.
Note • If your machine did not come furnished with a built-in floppy
disk drive, you can receive an upgrade service for your machine, so that it can use...
Users Manual - English - Page 241
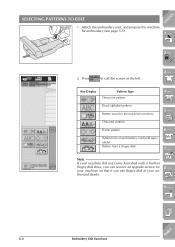
... at the left.
3 -
Key Display
Pattern Type One point pattern
4 -
Floral alphabet pattern Pattern saved in the machine's memory
5 -
Character pattern Frame pattern
6 -
Pattern from an embroidery card (sold separately) Pattern from a floppy disk
7 -
Note If your machine did not come furnished with a built-in floppy disk drive, you can receive an upgrade service for your machine, so...
Users Manual - English - Page 271
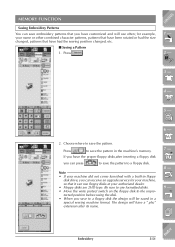
... pattern.
Press
to save the pattern in the machine memory. If
you have the floppy disk drive on your machine, you press 7 -
to save the pattern on a floppy disk.
Note If your machine did not come furnished with a built-in floppy disk drive, you can receive an upgrade service for your machine, so that it can use floppy...