Brother International XL-2610 driver and firmware
Drivers and firmware downloads for this Brother International item

Related Brother International XL-2610 Manual Pages
Download the free PDF manual for Brother International XL-2610 and other Brother International manuals at ManualOwl.com
Users Manual - English - Page 4
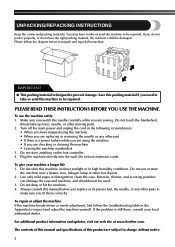
... machine to be repaired.
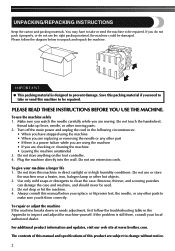
PLEASE READ THESE INSTRUCTIONS BEFORE YOU USE THE MACHINE.
To use...or other moving parts. 2. Turn off the main power and unplug the cord in the following circumstances:
...machine unattended 3. Do not store anything on the foot controller. 4. Plug the machine directly into the wall. Do ...updates, visit our web site at www.brother.com.
The contents of this manual and specifications of...
Users Manual - English - Page 9
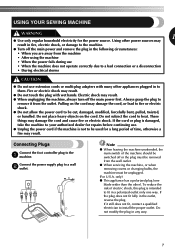
...cords or multi-plug adapters with many other appliances ... foot controller plug to the 1 machine.
Connect the power supply ...plug to a wall 2 outlet.
Note
● When leaving the machine unattended, the main switch of the machine should be switched off or the plug must be removed from the wall outlet.
● When servicing...install the proper outlet. Do not modify the plug in any way.
7
Users Manual - English - Page 12
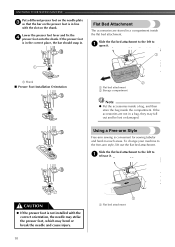
... attachment to the left to 1 open it.
1
1
1 Shank
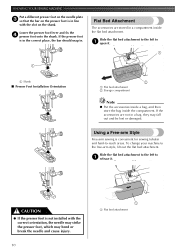
■ Presser Foot Installation Orientation
2
1 Flat bed attachment 2 Storage compartment
Note
● Put the accessories inside a bag, and then store the bag inside ... to the left to 1 release it.
CAUTION
● If the presser foot is not installed with the correct orientation, the needle may strike the presser foot, which may bend or break...
Users Manual - English - Page 36

...plastic insert at the
front of the frame.
CAUTION
● If the presser foot is not installed with the correct orientation, the needle may strike the presser foot, which may bend or break ... the presser foot.
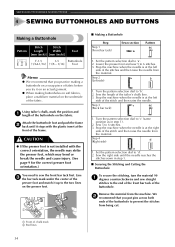
■ Making a Buttonhole
Step
Step 1 (Front bar tack)
Sewn section a
Pattern
1. Set the pattern selection dial to 'a'. 2. Lower the presser foot and sew 5 to 6 stitches. 3. Stop the ...
Users Manual - English - Page 47
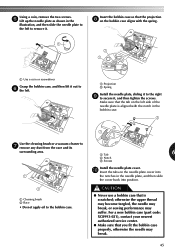
...vacuum cleaner to
7 remove any dust from the race and its
surrounding area.
1 Tab
6
2 Notch
3 Screws
Install the needle plate cover. 0 Insert the tabs on the needle plate cover into
the notches in the needle plate, ... bobbin case (part code: XC8993-021), contact your nearest authorized service center.
● Make sure that you fit the bobbin case properly, otherwise the needle may break.
45
Owner's Manual (Español) - Spanish - Page 4
... machine to be repaired.
PLEASE READ THESE INSTRUCTIONS BEFORE YOU USE THE MACHINE.
To use...or other moving parts. 2. Turn off the main power and unplug the cord in the following circumstances:
...machine unattended 3. Do not store anything on the foot controller. 4. Plug the machine directly into the wall. Do ...updates, visit our web site at www.brother.com.
The contents of this manual and specifications of...
Owner's Manual (Español) - Spanish - Page 9
...cords or multi-plug adapters with many other appliances ... foot controller plug to the 1 machine.
Connect the power supply ...plug to a wall 2 outlet.
Note
● When leaving the machine unattended, the main switch of the machine should be switched off or the plug must be removed from the wall outlet.
● When servicing...install the proper outlet. Do not modify the plug in any way.
7
Owner's Manual (Español) - Spanish - Page 12
... attachment to the left to 1 open it.
1
1
1 Shank
■ Presser Foot Installation Orientation
2
1 Flat bed attachment 2 Storage compartment
Note
● Put the accessories inside a bag, and then store the bag inside ... to the left to 1 release it.
CAUTION
● If the presser foot is not installed with the correct orientation, the needle may strike the presser foot, which may bend or break...
Owner's Manual (Español) - Spanish - Page 36
...plastic insert at the
front of the frame.
CAUTION
● If the presser foot is not installed with the correct orientation, the needle may strike the presser foot, which may bend or break ... the presser foot.
■ Making a Buttonhole
Step
Step 1 (Front bar tack)
Sewn section a
Pattern
1. Set the pattern selection dial to 'a'. 2. Lower the presser foot and sew 5 to 6 stitches. 3. Stop the ...
Owner's Manual (Español) - Spanish - Page 47

...vacuum cleaner to
7 remove any dust from the race and its
surrounding area.
1 Tab
6
2 Notch
3 Screws
Install the needle plate cover. 0 Insert the tabs on the needle plate cover into
the notches in the needle plate, ... bobbin case (part code: XC8993-021), contact your nearest authorized service center.
● Make sure that you fit the bobbin case properly, otherwise the needle may break.
45