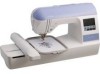
Brother International PE770 - Computerized Embroidery Machine driver and firmware
Drivers and firmware downloads for this Brother International item
Related Brother International PE770 Manual Pages
Download the free PDF manual for Brother International PE770 and other Brother International manuals at ManualOwl.com
Users Manual - English - Page 3
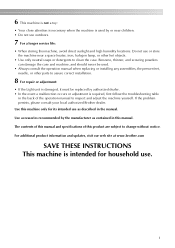
... use as described in the manual. Use accessories recommended by the manufacturer as contained in this manual. The contents of this manual and specifications of this product are subject to change without notice. For additional product information and updates, visit our web site at www.brother.com
SAVE THESE INSTRUCTIONS This machine is intended for household use...
Users Manual - English - Page 5

... unit precautions ...15 Attaching the embroidery unit ...15 Removing the embroidery unit ...16
Turning the Machine On/Off 18
Power supply precautions ...18
Turning on the machine ...19 Turning off the machine ...19
LCD (Liquid Crystal Display) Operation 20
Viewing the LCD...20
Changing the machine settings ...21
Checking machine operating procedures ...23
Winding/Installing the Bobbin 24
Bobbin...
Users Manual - English - Page 10
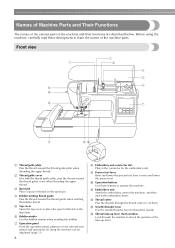
... Place a spool of thread on the spool pin.
d Bobbin winding thread guide Pass the thread around this thread guide when winding the bobbin thread.
e Top cover Open the top cover to place... be selected and edited, and operations for using the machine can be displayed (page 11).
8
h Embroidery unit connector slot Plug in the connector for the embroidery unit.
i Presser foot lever Raise and lower the ...
Users Manual - English - Page 15
... the Embroidery Unit 15
Embroidery unit precautions 15 Attaching the embroidery unit 15 Removing the embroidery unit 16 Turning the Machine On/Off 18 Power supply precautions 18 Turning on the machine 19 Turning off the machine 19 LCD (Liquid Crystal Display) Operation 20 Viewing the LCD 20 Changing the machine settings 21 Checking machine operating procedures 23 Winding/Installing the...
Users Manual - English - Page 16
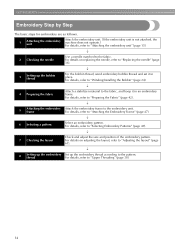
... embroidery are as follows.
1
Attaching the embroidery unit
Attach the embroidery unit. (If the embroidery unit is not attached, the machine does not operate.) For details, refer to "Attaching the embroidery...page 36).
↓
3
Setting up the bobbin thread
For the bobbin thread, wind embroidery bobbin thread and set it in place. For details, refer to "Winding/Installing the Bobbin" (page 24...
Users Manual - English - Page 21
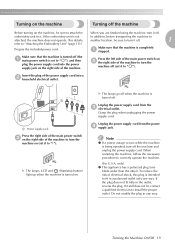
... the Embroidery Unit" (page 15).)
Prepare the included power cord.
Make sure that the machine is completely a stopped.
Make sure that the machine is turned off (the a main power switch is set to " "), and then
plug the power supply cord into the power supply .... If it still does not fit, contact a qualified electrician to install the proper outlet. Do not modify the plug in any way.
Turning the...
Users Manual - English - Page 25
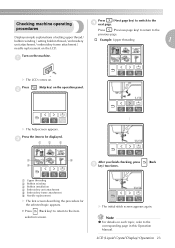
...page.
procedures
Press
(Previous page key) to return to the
previous page.
Displays simple explanations of setting upper thread / bobbin winding / setting bobbin thread / embroidery
† Example: Upper threading
1
unit attachment / embroidery frame attachment /
needle replacement on the LCD.
Turn on the machine.
a
X The LCD comes on.
Press
b
(Help key) on the operation panel.
X The...
Users Manual - English - Page 26
GETTING READY
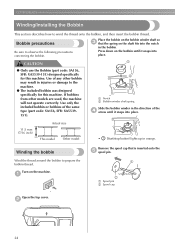
Winding/Installing the Bobbin
This section describes how to wind the thread onto the bobbin, and then insert the bobbin thread.
...button) lights up in orange.
Winding the bobbin
Wind the thread around the bobbin to prepare the bobbin thread.
Turn on the machine.
a
Remove the spool cap that is inserted onto the e spool pin.
1
2
a Spool pin b Spool cap
Open the top cover.
b
...
Users Manual - English - Page 27
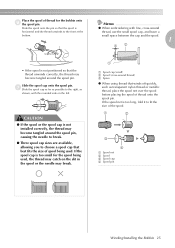
...to the right, as shown, with the rounded side on the left.
CAUTION
● If the spool or the spool cap is not installed correctly, the thread may become tangled around the spool pin, causing the needle to break.
● Three spool cap sizes are available, ... is too long, fold it to fit the size of the spool.
1
2
3
4
a Spool net b Spool c Spool cap d Spool pin
Winding/Installing the Bobbin 25
Users Manual - English - Page 29

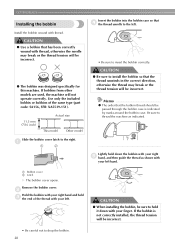
... n wound around the bobbin.
1
1
a Guide slit in bobbin winder seat (with built-in ...machine will make a clicking sound; this is not a malfunction.
1
a Start/stop button
• When the bobbin winding becomes slow, press (Start/stop button) once to stop the machine.
CAUTION
● When the bobbin winding becomes slow, stop the machine, otherwise the machine may be damaged.
Winding/Installing...
Users Manual - English - Page 30
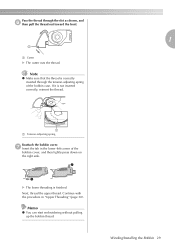
...case. Be sure to thread the machine as indicated.
Slide the bobbin cover latch to the right.
a
1
2
Lightly hold down the bobbin with your right e hand, and then guide the thread as shown with
your ... thread with your left.
CAUTION
● When installing the bobbin, be sure to hold it down with your finger. If the bobbin is not correctly installed, the thread tension will be incorrect.
•...
Users Manual - English - Page 31
..., thread the upper thread. Continue with the procedure in "Upper Threading" (page 30).
Memo
z You can start embroidering without pulling up the bobbin thread.
Winding/Installing the Bobbin 29
Users Manual - English - Page 34
... embroidery foot and open the shutter.
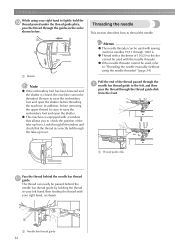
z This machine is equipped with a window that allows you to check the position of the take-up lever. Look through this window ...manually (without using the needle threader)" (page 34).
Pull the end of the thread passed through the a needle bar thread guide to the left, and then
pass the thread through the thread guide disk from the front.
1
a Thread guide disk...
Users Manual - English - Page 43
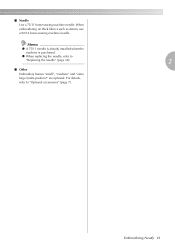
.... When embroidering on thick fabrics such as denim, use a 90/14 home sewing machine needle.
Memo
z A 75/11 needle is already installed when the
machine is purchased.
z When replacing the needle, refer to
"Replacing the needle" (page 36).
2
■ Other Embroidery frames "small", "medium" and "extra large (multi-position)" are optional. For details, refer...
Users Manual - English - Page 49
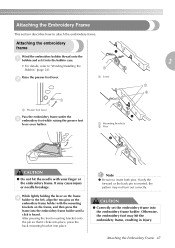
... describes how to attach the embroidery frame.
Attaching the embroidery frame
Wind the embroidery bobbin thread onto the a bobbin and set it into the bobbin case.
• For details, refer to "Winding/Installing the Bobbin" (page 24).
Raise the presser foot lever.
b
1
1
a Lever
a
2
1 2
a Presser foot lever
Pass the embroidery frame under the c embroidery foot while raising the...
Users Manual - English - Page 70

... Adjustment
The bobbin case installed in this machine can be adjusted, if necessary, to accommodate the bobbin tension for embroidering. The insertion below describes how to adjust the bobbin tension for embroidery use. Using a small slotted screwdriver, turn the slotted-head (b) screw to adjust the bobbin case tension.
Bobbin thread is tight
Upper...
Users Manual - English - Page 73
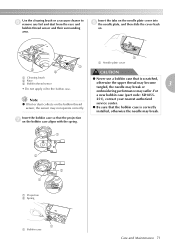
... lint or dust collects on the bobbin thread sensor, the sensor may not operate correctly.
251), contact your nearest authorized service center. ● Be sure that the bobbin case is correctly installed, otherwise the needle may break.
Insert the bobbin case so that the projection g on the bobbin case aligns with the...
Users Manual - English - Page 76
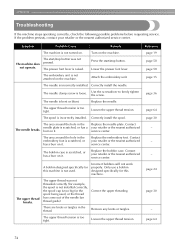
... the presser foot lever.
The embroidery unit is not attached on the machine.
Attach the embroidery unit.
The needle is incorrectly installed. Correctly install the needle.
The needle clamp ...nearest authorized service center.
A bobbin designed specifically for this machine is not used.
Incorrect bobbins will not work properly. Only use a bobbin designed specifically for this machine.
The ...
Users Manual - English - Page 77
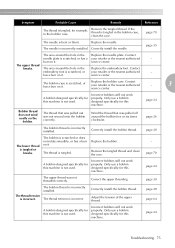
...needle is incorrectly installed. Correctly install the needle.
...embroidery foot. Contact
embroidery foot is scratched, or your retailer or the nearest authorized
-
has a burr on it.
service center.
The bobbin case is scratched, or has a burr on it.
Replace the bobbin case. Contact your retailer or the nearest authorized service center.
-
3
A bobbin designed specifically for this machine...
USB GUIDE - Multi - Page 7
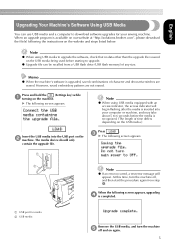
....brother.com", please download the file(s) following the instructions on the website and steps listed below.
Note
z When using USB media to upgrade the software, check that no data other than the upgrade file is saved on the USB media being used before starting to upgrade.
z Upgrade file can be recalled from a USB flash drive (USB flash memory) of any size.
Memo
z When the machine's software...