Dell Inspiron 660 driver and firmware
Related Dell Inspiron 660 Manual Pages
Download the free PDF manual for Dell Inspiron 660 and other Dell manuals at ManualOwl.com
View - Page 2
...)
DVI VGA (optional)
HDMI HDMI
HDMI DVI
NOTE: If you ordered your computer with an optional discrete graphics card, connect the display to the port on your discrete graphics card
4 Connect the power cable and press the power button
5 Complete Windows setup
完成 Windows Windows 設定 Windows Windows
Record your Windows password here...
Owners Manual - Page 2
... information that helps you make better use of your computer.
CAUTION: A CAUTION indicates potential damage to hardware or loss of data if instructions are not followed.
WARNING: A WARNING indicates a ... Dell Inc. is strictly forbidden.
Trademarks used in this text: Dell™, the DELL logo, and Inspiron™ are trademarks of Dell Inc.; Microsoft®, Windows®, and the Windows start...
Owners Manual - Page 4
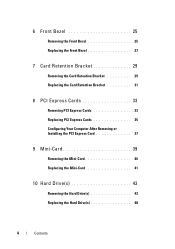
... Bracket 29
Removing the Card Retention Bracket 29 Replacing the Card Retention Bracket 31
8 PCI Express Cards 33
Removing PCI Express Cards 33 Replacing PCI Express Cards 35 Configuring Your Computer After Removing or Installing the PCI Express Card 37
9 Mini-Card 39
Removing the Mini-Card 40 Replacing the Mini-Card 41
10 Hard Drive(s 43
Removing the Hard Drive(s 43 Replacing the Hard...
Owners Manual - Page 9
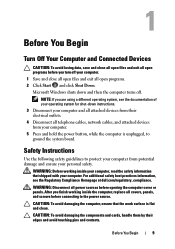
... of your operating system for shut-down instructions.
3 Disconnect your computer and all attached devices from their electrical outlets.
4 Disconnect all telephone cables, network cables, and attached devices from your computer.
5 Press and hold the power button, while the computer is unplugged, to ground the system board.
Safety Instructions
Use the following safety guidelines to protect...
Owners Manual - Page 10
....
CAUTION: To disconnect a network cable, first unplug the cable from your computer and then unplug the cable from the network device.
Recommended Tools
The procedures in this document may require the following tools:
• Small flat-blade screwdriver
• Small Phillips screwdriver
• Plastic scribe
• Flash BIOS executable update program available at support.dell.com
10
Before...
Owners Manual - Page 22

... the original memory module(s) from your computer during a memory upgrade, keep them separate from any new memory module(s) that you may have, even if you purchased the new memory module(s) from Dell. If possible, do not pair an original memory module with a new memory module. Otherwise, your computer may not start properly.
CAUTION: Do not install ECC or DDR3U memory modules.
Procedure...
Owners Manual - Page 23
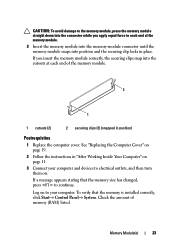
... Inside Your Computer" on page 11.
3 Connect your computer and devices to electrical outlets, and then turn them on.
If a message appears stating that the memory size has changed, press to continue.
Log on to your computer. To verify that the memory is installed correctly, click Start→ Control Panel→ System. Check the amount of memory (RAM) listed.
Memory Module...
Owners Manual - Page 35
... out of your computer.
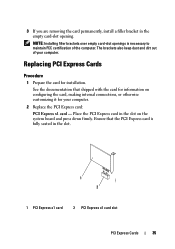
Replacing PCI Express Cards
Procedure
1 Prepare the card for installation. See the documentation that shipped with the card for information on configuring the card, making internal connections, or otherwise customizing it for your computer.
2 Replace the PCI Express card: PCI Express x1 card - Place the PCI Express card in the slot on the system board and press down firmly...
Owners Manual - Page 36
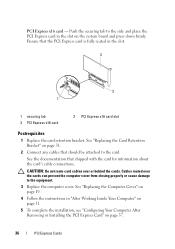
... the cards. Cables routed over the cards can prevent the computer cover from closing properly or cause damage to the equipment.
3 Replace the computer cover. See "Replacing the Computer Cover" on page 19.
4 Follow the instructions in "After Working Inside Your Computer" on page 11.
5 To complete the installation, see "Configuring Your Computer After Removing or Installing the PCI Express Card" on...
Owners Manual - Page 37
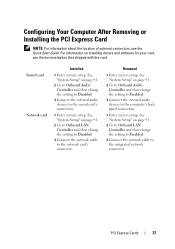
... drivers and software for your card, see the documentation that shipped with the card.
Sound card Network card
Installed
1 Enter system setup. See "System Setup" on page 91.
2 Go to Onboard Audio Controller and then change the setting to Disabled.
3 Connect the external audio devices to the sound card's connectors.
1 Enter system setup. See "System Setup" on page 91.
2 Go to Onboard LAN...
Owners Manual - Page 39
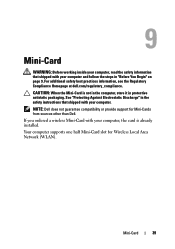
...Protecting Against Electrostatic Discharge" in the safety instructions that shipped with your computer.
NOTE: Dell does not guarantee compatibility or provide support for Mini-Cards from sources other than Dell.
If you ordered a wireless Mini-Card with your computer, the card is already installed.
Your computer supports one half Mini-Card slot for Wireless Local Area Network (WLAN).
Mini-Card
39
Owners Manual - Page 41
... board. 4 Connect the appropriate antenna cables to the Mini-Card you are installing. The Mini-Card has two triangles marked on the label (black and white): • Connect the black cable to the connector marked with a
black triangle. • Connect the white cable to the connector marked with a
white triangle.
Postrequisites
1 Replace the computer cover. See "Replacing the Computer...
Owners Manual - Page 44
... secondary hard-drive:
a Disconnect the power cable from the primary and secondary hard-drives.
b Disconnect the data cable from the secondary hard-drive.
NOTE: If you are not replacing the hard drive at this time, disconnect the other end of the data cable from the system board connector and set it aside. You can use the data cable to install a hard drive at...
Owners Manual - Page 50
... removing the secondary optical-drive:
a Disconnect the power cable from the primary and secondary optical-drives.
b Disconnect the data cable from the secondary optical-drive.
NOTE: If you are not replacing the optical drive at this time, disconnect the other end of the data cable from the system board connector and set it aside. You can use the data cable to install an optical drive at a later...
Owners Manual - Page 54
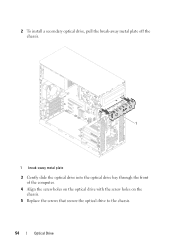
2 To install a secondary optical drive, pull the break-away metal plate off the chassis.
1
1 break-away metal plate
3 Gently slide the optical drive into the optical drive bay through the front of the computer.
4 Align the screw holes on the optical drive with the screw holes on the chassis.
5 Replace the screws that secure the optical drive to the chassis.
54
Optical Drive
Owners Manual - Page 58
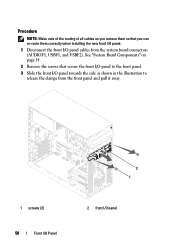
... you remove them so that you can re-route them correctly when installing the new front I/O panel.
1 Disconnect the front I/O panel cables from the system board connectors (AUDIOF1, USBF1, and USBF2). See "System Board Components" on page 14.
2 Remove the screws that secure the front I/O panel to the front panel.
3 Slide the front I/O panel...
Owners Manual - Page 91
System Setup
Overview
Use the system setup to: • Get information about the hardware installed on your computer, such as
the amount of RAM, the size of the hard drive, and so on • Change the system configuration information • Set or change a user-selectable option, such as the user password, type of
hard drive installed, enabling or disabling base devices, and...
Owners Manual - Page 92
... of your computer, including installed hardware, power conservation, and security features.
Scroll up and down the list with the up- and down-arrow keys. As an option is highlighted, the Help Screen displays more information about that option and available settings.
Help Screen - This field appears on the right side of the system setup window and contains...
Owners Manual - Page 101
..., to boot from the CD/DVD/CD-RW drive to run Dell Diagnostics from the Drivers and Utilities disc. On completion of the diagnostic tests, the previous boot sequence is restored.
1 If you are booting from a USB device, connect the USB device to a USB port.
2 Turn on (or restart) your computer. 3 When F2 Setup, F12 Boot Options appears in the lower...
Owners Manual - Page 107
Flashing the BIOS
The BIOS may require flashing when an update is available or when replacing the system board. To flash the BIOS:
1 Turn on the computer.
2 Go to support.dell.com/support/downloads.
3 Locate the BIOS update file for your computer:
NOTE: The Service Tag for your computer is located on a label at the bottom of your computer. For more information, see the Quick Start Guide that ...