Dell Latitude 3440 driver and firmware
Related Dell Latitude 3440 Manual Pages
Download the free PDF manual for Dell Latitude 3440 and other Dell manuals at ManualOwl.com
Owners Manual - Page 2
...™ are trademarks of Advanced Micro Devices, Inc. Microsoft®, Windows®, MS-DOS®, Windows Vista®, the Windows Vista start button, and Office Outlook®...players. The Bluetooth® word mark is a registered trademark and owned by the Bluetooth® SIG, Inc. and any use of such mark by Dell Inc. is under license. Wi-Fi® is a registered trademark of Wireless Ethernet...
Owners Manual - Page 3
... Module...14 Installing the Memory Module...14 Removing the Hard Drive...14 Installing the Hard Drive...16 Removing the Optical Drive...16 Installing the Optical Drive...17 Removing the Keyboard...17 Installing the Keyboard...19 Removing the WLAN Card...19 Installing the WLAN Card...20 Removing the Palmrest...20 Installing the Palmrest...23 Removing the I/O Board...23 Installing the I/O Board...24...
Owners Manual - Page 4
...Removing the Display Panel...33 Installing the Display Panel...34 Removing the Display Hinges...35 Installing the Display Hinges...36 Removing the Camera Module...36 Installing the Camera Module...38
3 System Setup...39
Boot Sequence...39 Navigation Keys...39 System Setup Options...40 Updating the BIOS ...43 System and Setup Password...43
Assigning a System Password and Setup Password 44 Deleting...
Owners Manual - Page 5

... Turn off your computer (see Turning Off Your Computer). 3. If the computer is connected to a docking device (docked) such as the optional Media Base or Battery Slice,
undock it.
CAUTION: To disconnect a network cable, first unplug the cable from your computer and then unplug the cable from the network device. 4. Disconnect all network cables from the computer. 5. Disconnect your computer and all...
Owners Manual - Page 6
... internal components.
11. Remove any installed ExpressCards or Smart Cards from the appropriate slots.
Turning Off Your Computer
CAUTION: To avoid losing data, save and close all open files and exit all open programs before you turn off your computer.
1. Shut down the operating system: - In Windows 8: * Using a touch-enabled device: a. Swipe in from the right...
Owners Manual - Page 9
2
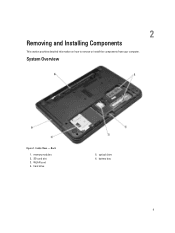
Removing and Installing Components
This section provides detailed information on how to remove or install the components from your computer.
System Overview
Figure 1. Inside View - Back
1. memory modules 2. SD card slot 3. WLAN card 4. hard drive
5. optical drive 6. battery bay
9
Owners Manual - Page 10
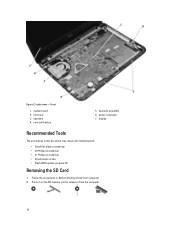
...6. power connector 7. display
Recommended Tools
The procedures in this document may require the following tools:
• Small flat-blade screwdriver • #0 Phillips screwdriver • #1 Phillips screwdriver • Small plastic scribe • Flash BIOS update program CD
Removing the SD Card
1. Follow the procedures in Before Working Inside Your Computer. 2. Press in on the SD memory card...
Owners Manual - Page 11
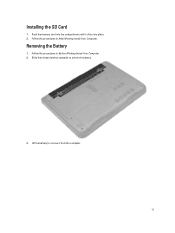
Installing the SD Card
1. Push the memory card into the compartment until it clicks into place. 2. Follow the procedures in After Working Inside Your Computer.
Removing the Battery
1. Follow the procedures in Before Working Inside Your Computer. 2. Slide the release latches outwards to unlock the battery.
3. Lift the battery to remove it from the computer.
11
Owners Manual - Page 12
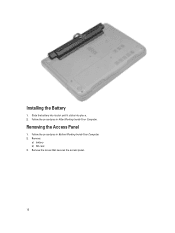
Installing the Battery
1. Slide the battery into its slot until it clicks into place. 2. Follow the procedures in After Working Inside Your Computer.
Removing the Access Panel
1. Follow the procedures in Before Working Inside Your Computer. 2. Remove:
a) battery b) SD card 3. Remove the screw that secures the access panel.
12
Owners Manual - Page 14
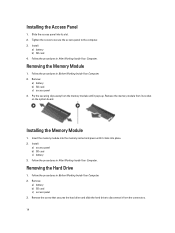
... until it pops up. Remove the memory module from its socket on the system board.
Installing the Memory Module
1. Insert the memory module into the memory socket and press until it clicks into place. 2. Install:
a) access panel b) SD card c) battery 3. Follow the procedures in After Working Inside Your Computer.
Removing the Hard Drive
1. Follow the procedures in Before Working Inside...
Owners Manual - Page 16
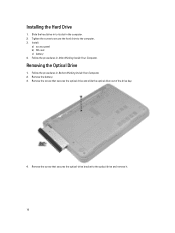
... screw to secure the hard drive to the computer. 3. Install:
a) access panel b) SD card c) battery 4. Follow the procedures in After Working Inside Your Computer.
Removing the Optical Drive
1. Follow the procedures in Before Working Inside Your Computer. 2. Remove the battery. 3. Remove the screw that secures the optical drive and slide the optical drive out of the drive bay.
4. Remove the screw...
Owners Manual - Page 17
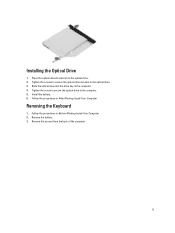
Installing the Optical Drive
1. Place the optical-drive bracket on to the optical drive. 2. Tighten the screws to secure the optical-drive bracket to the optical drive. 3. Slide the optical drive into the drive bay in the computer. 4. Tighten the screw to secure the optical drive to the computer. 5. Install the battery. 6. Follow the procedures in After Working Inside Your Computer.
Removing the ...
Owners Manual - Page 19
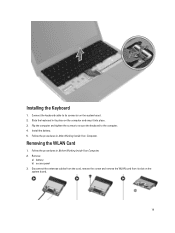
... to secure the keyboard to the computer. 4. Install the battery. 5. Follow the procedures in After Working Inside Your Computer.
Removing the WLAN Card
1. Follow the procedures in Before Working Inside Your Computer. 2. Remove:
a) battery b) access panel 3. Disconnect the antennae cables from the card, remove the screw and remove the WLAN card from its slot on the system board.
19
Owners Manual - Page 20
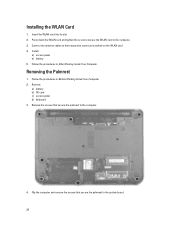
... screw to secure the WLAN card to the computer. 3. Connect the antenna cables to their respective connectors marked on the WLAN card. 4. Install:
a) access panel b) battery 5. Follow the procedures in After Working Inside Your Computer.
Removing the Palmrest
1. Follow the procedures in Before Working Inside Your Computer. 2. Remove:
a) battery b) SD card c) access panel d) keyboard 3. Remove the...
Owners Manual - Page 23
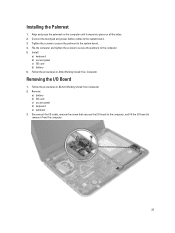
... snaps into place on all the sides. 2. Connect the touchpad and power-button cables to the system board. 3. Tighten the screws to secure the palmrest to the system board. 4. Flip the computer and tighten the screws to secure the palmrest to the computer. 5. Install:
a) keyboard b) access panel c) SD card d) battery 6. Follow the procedures in After Working Inside Your...
Owners Manual - Page 24
Installing the I/O Board
1. Place the I/O board in its slot. 2. Tighten the screw to secure the I/O board to the computer. 3. Connect the I/O cable to the I/O board. 4. Install:
a) palmrest b) keyboard c) access panel d) SD card e) battery 5. Follow the procedures in After Working Inside Your Computer.
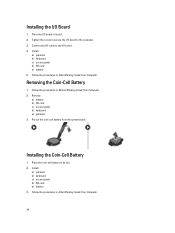
Removing the Coin-Cell Battery
1. Follow the procedures in Before Working Inside Your Computer. ...
Owners Manual - Page 27

...Tighten the screw to secure the system board to the computer. 3. Connect the following cables:
a) display b) DC-In Port c) speaker d) I/O board 4. Affix the tape to secure the display cable to the system board. 5. Install: a) coin-cell battery b) palmrest c) keyboard d) optical drive e) hard drive f) memory module g) WLAN card h) access panel i) SD card j) battery 6. Follow the procedures in After...
Owners Manual - Page 28
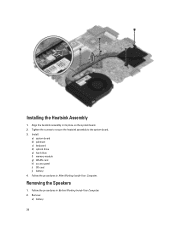
... heatsink assembly in its place on the system board. 2. Tighten the screws to secure the heatsink assembly to the system board. 3. Install:
a) system board b) palmrest c) keyboard d) optical drive e) hard drive f) memory module g) WLAN card h) access panel i) SD card j) battery 4. Follow the procedures in After Working Inside Your Computer.
Removing the Speakers
1. Follow the procedures in Before...
Owners Manual - Page 29
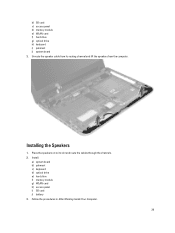
... d) memory module e) WLAN card f) hard drive g) optical drive h) keyboard i) palmrest j) system board 3. Unroute the speaker cable from its routing channel and lift the speakers from the computer.
Installing the Speakers
1. Place the speakers on to its slot and route the cables through the channels. 2. Install:
a) system board b) palmrest c) keyboard d) optical drive e) hard drive f) memory module...
Owners Manual - Page 43
... your preferred download method in the Please select your download method below window; click Download
File. The File Download window appears. 12. Click Save to save the file on your computer. 13. Click Run to install the updated BIOS settings on your computer. Follow the instructions on the screen.
System and Setup Password
You can create a system password and a setup password to secure your...