Dell Latitude 6430u driver and firmware
Related Dell Latitude 6430u Manual Pages
Download the free PDF manual for Dell Latitude 6430u and other Dell manuals at ManualOwl.com
Owners Manual - Page 2
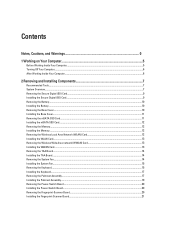
... the Base Cover...11 Removing the mSATA SSD Card...11 Installing the mSATA SSD Card...12 Removing the Memory...12 Installing the Memory...12 Removing the Wireless Local Area Network (WLAN) Card 12 Installing the WLAN Card...13 Removing the Wireless Wide Area network (WWAN) Card 13 Installing the WWAN Card...13 Removing the TAA Board...14 Installing the TAA Board...14 Removing the System Fan...14...
Owners Manual - Page 3
... the Display Assembly...31 Installing the Display Assembly...33 Removing the Power Connector...33 Installing the Power Connector...34 Removing the System Board...34 Installing the System Board...36 Removing the Thermal Module...36 Installing the Thermal Module...37
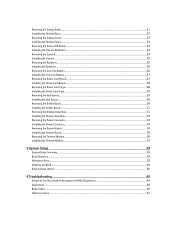
3 System Setup...39
System Setup Overview...39 Boot Sequence...39 Navigation Keys...39 Updating the BIOS ...40 System Setup Option...
Owners Manual - Page 5
... Off Your Computer). CAUTION: To disconnect a network cable, first unplug the cable from your computer and then unplug the cable from the network device.
3. Disconnect all network cables from the computer.
4. Disconnect your computer and all attached devices from their electrical outlets.
5. Press and hold the power button while the computer is unplugged to ground the system board.
6. Remove the...
Owners Manual - Page 6
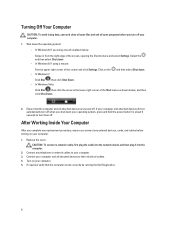
... system, press and hold the power button for about 6 seconds to turn them off.
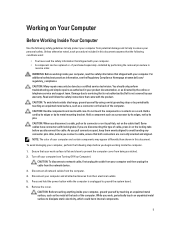
After Working Inside Your Computer
After you complete any replacement procedure, ensure you connect any external devices, cards, and cables before turning on your computer.
1. Replace the cover.
CAUTION: To connect a network cable, first plug the cable into the network device and then plug it into the...
Owners Manual - Page 7
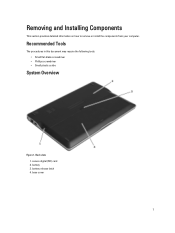
... section provides detailed information on how to remove or install the components from your computer.
Recommended Tools
The procedures in this document may require the following tools: • Small flat-blade screwdriver • Phillips screwdriver • Small plastic scribe
System Overview
Figure 1. Back view 1. secure digital (SD) card 2. battery 3. battery release latch 4. base cover...
Owners Manual - Page 9
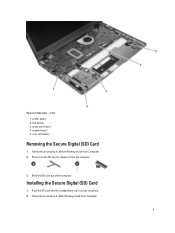
...Inside view - front 1. sniffer board 2. hall sensor 3. smart card board 4. system board 5. coin-cell battery
Removing the Secure Digital (SD) Card
1. Follow the procedures in Before Working Inside Your Computer. 2. Press in on the SD card to release it from the computer.
3. Slide the SD card out of the computer.
Installing the Secure Digital (SD) Card
1. Push the SD card into the compartment until...
Owners Manual - Page 10
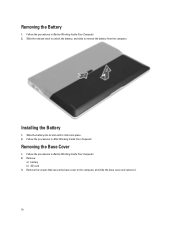
... slide to remove the battery from the computer.
Installing the Battery
1. Slide the battery into its slot until it clicks into place. 2. Follow the procedures in After Working Inside Your Computer.
Removing the Base Cover
1. Follow the procedures in Before Working Inside Your Computer. 2. Remove:
a) battery b) SD card 3. Remove the screws that secure the base...
Owners Manual - Page 11

... to align with the screw holes on the computer. 2. Tighten the screws to secure the base cover to the computer. 3. Install:
a) SD card b) battery 4. Follow the procedures in After Working Inside Your Computer.
Removing the mSATA SSD Card
1. Follow the procedures in Before Working Inside Your Computer. 2. Remove:
a) battery b) SD card c) base cover 3. Remove the screw that secures...
Owners Manual - Page 12
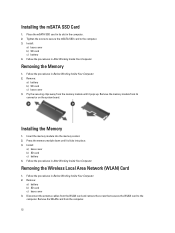
... module from its connector on the system board.
Installing the Memory
1. Insert the memory module into the memory socket. 2. Press the memory module down until it clicks into place. 3. Install:
a) base cover b) SD card c) battery 4. Follow the procedures in After Working Inside Your Computer.
Removing the Wireless Local Area Network (WLAN) Card
1. Follow the procedures in Before Working Inside...
Owners Manual - Page 13
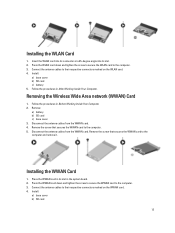
... connectors marked on the WLAN card. 4. Install:
a) base cover b) SD card c) battery 5. Follow the procedures in After Working Inside Your Computer.
Removing the Wireless Wide Area network (WWAN) Card
1. Follow the procedures in Before Working Inside Your Computer. 2. Remove:
a) battery b) SD card c) base cover 3. Disconnect the antenna cables from the WWAN card. 4. Remove the screw that secures...
Owners Manual - Page 14
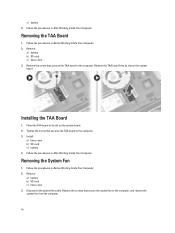
... slot on the system board. 2. Tighten the screw that secures the TAA board to the computer. 3. Install:
a) base cover b) SD card c) battery 4. Follow the procedures in After Working Inside Your Computer.
Removing the System Fan
1. Follow the procedures in Before Working Inside Your Computer. 2. Remove:
a) battery b) SD card c) base cover 3. Disconnect the system fan cable. Remove the screws that...
Owners Manual - Page 15
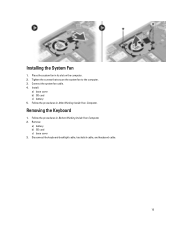
...in its slot on the computer. 2. Tighten the screws that secure the system fan to the computer. 3. Connect the system fan cable. 4. Install:
a) base cover b) SD card c) battery 5. Follow the procedures in After Working Inside Your Computer.
Removing the Keyboard
1. Follow the procedures in Before Working Inside Your Computer. 2. Remove:
a) battery b) SD card c) base cover 3. Disconnect the keyboard...
Owners Manual - Page 17
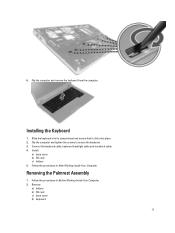
... into its compartment and ensure that it clicks into place. 2. Flip the computer and tighten the screws to secure the keyboard. 3. Connect the keyboard cable, keyboard-backlight cable and trackstick cable. 4. Install:
a) base cover b) SD card c) battery 5. Follow the procedures in After Working Inside Your Computer.
Removing the Palmrest Assembly
1. Follow the procedures in Before Working Inside...
Owners Manual - Page 19
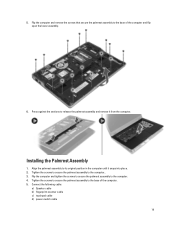
... the computer until it snaps into place. 2. Tighten the screws to secure the palmrest assembly to the computer.. 3. Flip the computer and tighten the screws to secure the palmrest assembly to the computer. 4. Tighten the screws to secure the palmrest assembly to the base of the computer. 5. Connect the following cable:
a) Speaker cable b) fingerprint-scanner cable c) touchpad cable d) power-switch...
Owners Manual - Page 20
e) media-board cable 6. Install:
a) keyboard b) base cover c) SD card d) battery
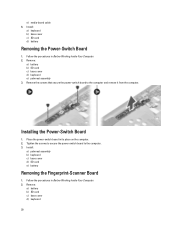
Removing the Power-Switch Board
1. Follow the procedures in Before Working Inside Your Computer. 2. Remove:
a) battery b) SD card c) base cover d) keyboard e) palmrest assembly 3. Remove the screws that secure the power-switch board to the computer and remove it from the computer.
Installing the Power-Switch Board
1. ...
Owners Manual - Page 21
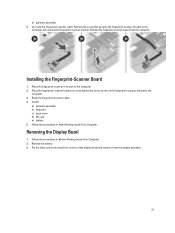
... the fingerpint-scanner board from the computer
Installing the Fingerprint-Scanner Board
1. Place the fingerprint-scanner in its slot on the computer. 2. Place the fingerprint-scanner bracket on it and tighten the screw to secure the fingerprint-scanner bracket to the
computer. 3. Route the fingerprint scanner cable. 4. Install:
a) palmrest assembly b) keyboard c) base cover d) SD card e) battery...
Owners Manual - Page 22
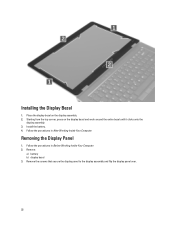
... around the entire bezel until it clicks onto the
display assembly. 3. Install the battery. 4. Follow the procedures in After Working Inside Your Computer.
Removing the Display Panel
1. Follow the procedures in Before Working Inside Your Computer. 2. Remove:
a) battery b) display bezel 3. Remove the screws that secure the display panel to the display assembly and flip the display panel over.
22
Owners Manual - Page 23
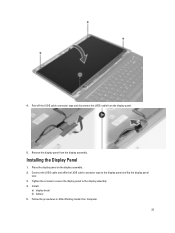
...the display assembly.
Installing the Display Panel
1. Place the display panel on the display assembly. 2. Connect the LVDS cable and affix the LVDS cable connector tape to the display panel and flip the display panel
over. 3. Tighten the screws to secure the display panel to the display assembly. 4. Install:
a) display bezel b) battery 5. Follow the procedures in After Working Inside Your Computer...
Owners Manual - Page 24
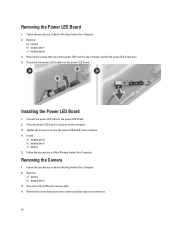
... power LED board in its place on the computer. 3. Tighten the screws to secure the power LED board to the computer. 4. Install:
a) display panel b) display bezel c) battery 5. Follow the procedures in After Working Inside Your Computer.
Removing the Camera
1. Follow the procedures in Before Working Inside Your Computer. 2. Remove:
a) battery b) display bezel 3. Disconnect the LVDS and camera cable...
Owners Manual - Page 40
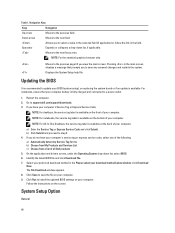
...Updating the BIOS
It is recommended to update your BIOS (system setup), on replacing the system board or if an update is available. For notebooks, ensure that your computer battery is fully charged and connected to a power outlet
1. Restart the computer. 2. Go to support.dell.com/support/downloads. 3. If you have your computer's Service Tag or Express Service Code:
NOTE: For desktops, the service...