Dell OptiPlex SX270N driver and firmware

Related Dell OptiPlex SX270N Manual Pages
Download the free PDF manual for Dell OptiPlex SX270N and other Dell manuals at ManualOwl.com
Setup and Quick Reference Guide - Page 4
... see the "Glossary" in the User's Guide.
If you purchased a Dell™ n Series computer, any references in this document to Microsoft® Windows® operating systems are not applicable.
Information... of Dell Computer Corporation is strictly forbidden.
Trademarks used in this text: Dell, OptiPlex, and the DELL logo are trademarks of Dell Computer Corporation; Microsoft and Windows are ...
Setup and Quick Reference Guide - Page 5
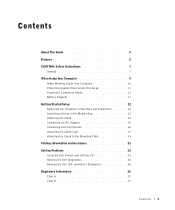
... 11 Getting Started/Setup 12 Determine the Computer's Placement and Orientation 12 Installing a Device in the Module Bay 13 Attaching the Stand 14 Connecting the AC Adapter 14 Connecting External Devices 16 Attaching the Cable Cover 17 Attaching the Stand to the Mounting Plate 19 Finding Information and Assistance 21 Solving Problems 23 Using the Dell Drivers and Utilities...
Setup and Quick Reference Guide - Page 6
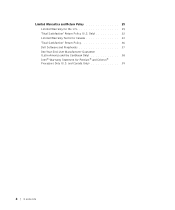
... Return Policy 29 Limited Warranty for the U.S 29 "Total Satisfaction" Return Policy (U.S. Only 32 Limited Warranty Terms for Canada 33 "Total Satisfaction" Return Policy 36 Dell Software and Peripherals 37 One-Year End-User Manufacturer Guarantee (Latin America and the Caribbean Only 38 Intel® Warranty Statement for Pentium® and Celeron...
Setup and Quick Reference Guide - Page 9
...8226; Do not attempt to service the computer yourself unless you are a trained service technician. Always follow installation instructions closely.
• To help prevent electric shock, plug the computer and device power cables into properly grounded electrical outlets. These cables are equipped with 3-prong plugs to help ensure proper grounding. Do not use adapter plugs or remove the grounding...
Setup and Quick Reference Guide - Page 12
...in your online Dell™ documentation or in instructions otherwise provided to you by Dell. Always follow installation and service instructions closely.
NOTICE: To help avoid possible damage to the system board, wait 5 seconds after turning off the computer before removing a component from the system board or disconnecting a device from the computer.
1 Perform an orderly computer shutdown using...
Setup and Quick Reference Guide - Page 13
...material until you are ready to
install the component in your computer. Just before unwrapping the antistatic packaging... in your User's Guide when setting up and using your computer.
Battery Disposal
Your computer uses a lithium coin...Guide. Do not dispose of the battery along with household waste. Contact your local waste disposal agency for the address of the nearest battery deposit site.
Setup...
Setup and Quick Reference Guide - Page 14
www.dell.com | support.dell.com
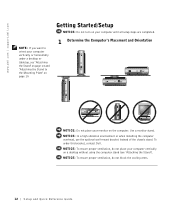
NOTE: If you want to orient your computer vertically or horizontally under a desktop or tabletop, see "Attaching the Stand" on page 14 and "Attaching the Stand to the Mounting Plate" on page 19.
Getting Started/Setup
NOTICE: Do not turn on your computer until all setup steps are completed.
1 Determine the Computer's Placement and...
Setup and Quick Reference Guide - Page 15
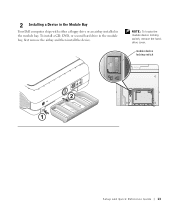
2 Installing a Device in the Module Bay
Your Dell computer ships with either a floppy drive or an airbay installed in the module bay. To install a CD, DVD, or second hard drive in the module bay, first remove the airbay and then install the device.
NOTE: To locate the module device locking switch, remove the harddrive cover.
module device locking switch
Setup and Quick Reference Guide 13
Setup and Quick Reference Guide - Page 16
... instead of the computer stand.
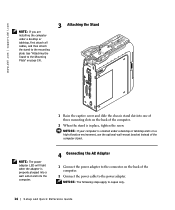
NOTE: The power adapter LED will light when the adapter is properly plugged into a wall outlet and into the computer.
4 Connecting the AC Adapter
1 Connect the power adapter to the connector on the back of the computer.
2 Connect the power cable to the power adapter. NOTICE: The following steps apply to Japan only.
14 Setup and Quick Re ference Guide
Setup and Quick Reference Guide - Page 19

... you are installing the computer under a desktop or tabletop, do not attach the cable cover until the computer is firmly attached to the mounting plate (see Step 7, "Attaching the Stand to the Mounting Plate" on page 19). NOTICE: If you use the stand on your computer, attach the stand before attaching the cable cover.
security cable slot
Do...
Setup and Quick Reference Guide - Page 20
www.dell.com | support.dell.com
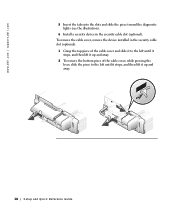
5 Insert the tabs into the slots and slide the piece toward the diagnostic lights (see the illustration).
6 Install a security device in the security cable slot (optional). To remove the cable cover, remove the device installed in the security cable slot (optional).
1 Grasp the top piece of the cable cover and slide it to the left until...
Setup and Quick Reference Guide - Page 21
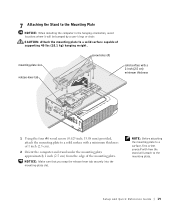
...the Stand to the Mounting Plate
NOTICE: When installing the computer in the hanging orientation, avoid locations where it will be bumped by a user's legs or chair.
CAUTION: Attach the mounting plate to a solid surface capable of supporting 40 lbs (18.1 kg) hanging weight.
...to a surface, first orient yourself with how the stand will attach to the mounting plate.
Setup and Quick Reference Guide 19
Setup and Quick Reference Guide - Page 22
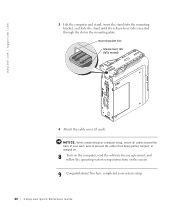
... used). NOTICE: When completing your computer setup, secure all cables toward the back of your work area to prevent the cables from being pulled, tangled, or stepped on.
8 Turn on the computer, read the software license agreement, and follow the operating system setup instructions on the screen.
9 Congratulations! You have completed your system setup.
20 Setup and Quick Re ference Guide
Setup and Quick Reference Guide - Page 23
... reinstall drivers, or run diagnostics tools.
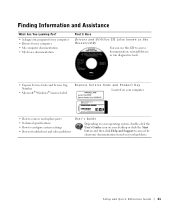
• Express Service Code and Service Tag Number
• Microsoft® Windows® License Label
Express Service Code and Product Key Located on your computer.
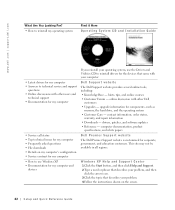
• How to remove and replace parts • Technical specifications • How to configure system settings • How to troubleshoot and solve problems
User's Guide
Depending...
Setup and Quick Reference Guide - Page 24
...Dell
customers • Upgrades - upgrade information for components, such as
memory, the hard drive, and the operating system • Customer Care - contact information, order status,
warranty, and repair information • Downloads - drivers, patches, and software updates • Reference - computer documentation, product
specifications, and white papers
Dell Premier Support website
The Dell...
Setup and Quick Reference Guide - Page 26
...; operating system, perform the following steps:
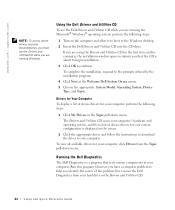
1 Turn on the computer and allow it to boot to the Windows desktop.
2 Insert the Dell Drivers and Utilities CD into the CD drive.
If you are using the Drivers and Utilities CD for the first time on this computer, the installation window opens to inform you that the CD is about to begin...
Setup and Quick Reference Guide - Page 27
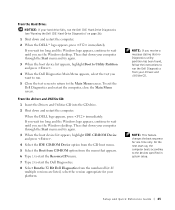
... the CD drive.
2 Shut down and restart the computer.
When the DELL logo appears, press immediately. If you wait too long and the Windows logo appears, continue to wait until you see the Windows desktop. Then shut down your computer through the Start menu and try again.
3 When the boot device list appears, highlight IDE CD-ROM Device and press...
Setup and Quick Reference Guide - Page 34
...applications software or an operating system that has been installed by Dell, you must return the entire computer. A different return policy applies to nondefective products purchased through Dell's Software and... and Software and Peripherals division return policy are not available for Dell | EMC storage products, EMCbranded products, or enterprise software.
32 Setup and Quick Re ference Guide
Setup and Quick Reference Guide - Page 39
... be in as-new condition, and all of the manuals, floppy disk(s), CD(s), power cables, and other items included with a product must be returned with it. For customers who want to return, for refund or credit only, either application or operating system software that has been installed by Dell, the whole system must be returned, along with...
Setup and Quick Reference Guide - Page 40
... user must always supply proof of purchase, indicating name and address of the seller, date of purchase, model and serial number, name and address of the customer, and details of symptoms and configuration at the time of malfunction, including peripherals and software used. Otherwise, Dell may refuse the guarantee claim. Upon diagnosis of a warranted defect...