Dell PowerApp 200 driver and firmware

Related Dell PowerApp 200 Manual Pages
Download the free PDF manual for Dell PowerApp 200 and other Dell manuals at ManualOwl.com
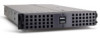
Rack
Installation Guide - Page 6
... to service your computer or storage system equipment and trained to deal with products capable of producing hazardous energy levels.
‡ When connecting or disconnecting power to hot-pluggable power supplies, if
offered with your Dell product, observe the following guidelines: — Install the power supply before connecting the power cable to the power
supply.
— Unplug the power cable...
Rack
Installation Guide - Page 7
...Dell’s servers, storage systems, and appliances are certified as components for use in Dell’s rack cabinet using the Dell customer rack kit. The final installation of Dell...installed in a Dell rack by trained service tech-
nicians. If you install the kit in any other rack, be sure that the rack meets the specifications of a Dell... provides power to the rack. The
total rack load should not...
Rack
Installation Guide - Page 8
... shock from lightning.
‡ Never connect or use a modem or telephone in a wet environment. ‡ Do not plug a modem or telephone cable into the network interface controller
(NIC) receptacle.
‡ Disconnect the modem cable before opening a product enclosure, touching or
installing internal components, or touching an uninsulated modem cable or jack.
‡ Do not use a telephone line...
Rack
Installation Guide - Page 9
...computer and devices from their power sources. Also, disconnect any telephone or telecommunication lines from the computer.
Doing so reduces the potential for personal injury or shock.
In addition, take note of these safety guidelines when appropriate:
‡ When you disconnect a cable, pull on its connector or on its strain-relief loop, not
on the cable...to install the component in your computer. ...
Rack
Installation Guide - Page 10
...computer system:
‡ Position your system so that the monitor and keyboard are directly in front of you
as you work. Special shelves are available (from Dell and other sources) to help you correctly position your keyboard.
‡ Set... or blinds on nearby windows) to minimize reflections and glare on the monitor screen.
‡ Use a chair that provides good lower back support. ‡ Keep your...
Rack
Installation Guide - Page 13
&RQWHQWV
,QGH[ )LJXUHV
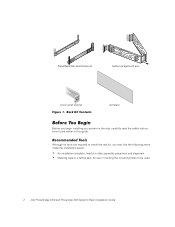
Rack Kit Contents 1 Before You Begin 2
Recommended Tools 2 Installing the Rack Kit 3
Removing the Doors From a 24-U or 42-U Rack 3 Installing the Slide Assemblies in the Rack 8 Installing the Systems in the Rack 11 Installing the Cable-Management Arm 13 Replacing the Doors 15
Figure 1. Figure 2. Figure 3. Figure 4. Figure 5. Figure 6. Figure 7. Figure 8. Figure...
Rack
Installation Guide - Page 15
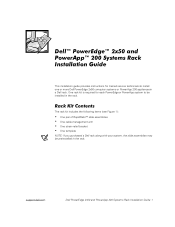
...(GJHŒ[DQG 3RZHU$SSŒ6\VWHPV5DFN ,QVWDOODWLRQ*XLGH
This installation guide provides instructions for trained service techniciansto install one or more Dell PowerEdge 2x50 computer systems or PowerApp 200 appliances in a Dell rack. One rack kit is required for each PowerEdge or PowerApp system to be installed in the rack.
5DFN.LW&RQWHQWV
The rack kit includes the following...
Rack
Installation Guide - Page 16
RapidRailsslide assemblies (2)
cable-management arm
strain-relief bracket )LJXUH5DFN.LW&RQWHQWV
template
%HIRUH
Rack
Installation Guide - Page 17
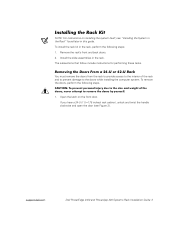
...instructions on installing the system itself, see “Installing the System in the Rack” found later in this guide.
To install the rack kit in the rack, perform the following steps:
1. Remove the rack’s front and back doors.
2. Install... twist the handle clockwise and open the door (see Figure 2).
support.dell.com
Dell PowerEdge 2x50 and PowerApp 200 Systems Rack Installation Guide 3
Rack
Installation Guide - Page 19
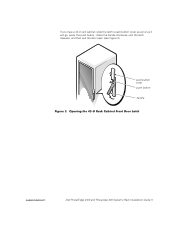
If you have a 42-U rack cabinet, slide the latch's push-button cover up as far as it will go, press the push button, rotate the handle clockwise until the latch releases, and then pull the door open (see Figure 3).
push-button cover push button handle )LJXUH2SHQLQJWKH85DFN&DELQHW)URQW'RRU/DWFK
support.dell.com
Dell PowerEdge 2x50 and PowerApp 200 Systems Rack Installation Guide 5
Rack
Installation Guide - Page 20
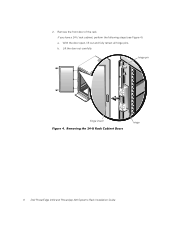
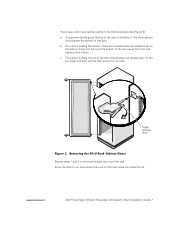
2. Remove the front door of the rack. If you have a 24-U rack cabinet, perform the following steps (see Figure 4): a. With the door open, lift out and fully retract all hinge pins. b. Lift the door out carefully.
hinge pin
hinge insert )LJXUH5HPRYLQJWKH85DFN&DELQHW'RRUV
hinge
6 Dell PowerEdge 2x50 and PowerApp 200 Systems Rack Installation Guide
Rack
Installation Guide - Page 21
... Repeat steps 1 and 2 to remove the back door from the rack. Store the doors in an area where they will not fall over while you install the kit.
support.dell.com
Dell PowerEdge 2x50 and PowerApp 200 Systems Rack Installation Guide 7
Rack
Installation Guide - Page 22
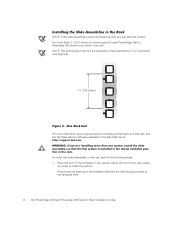
... 2x50 or PowerApp 200 system you install in the rack. NOTE: The vertical rails of the rack are marked by small indentations in 1-U increments (see Figure 6).
1 U (1.75 inches)
)LJXUH2QH5DFN8QLW For more information about requirements for installing components in a Dell rack, see the Dell Rack Advisor software available on the Dell Web site at http://support.dell.com...
Rack
Installation Guide - Page 23
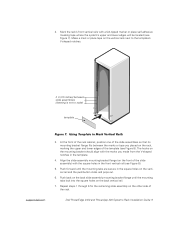
... to the template’s V-shaped notches.
2 U (3.5 inches) between slide assemblies (drawing is not to scale)
template
support.dell.com
)LJXUH8VLQJ7HPSODWHWR0DUN9HUWLFDO5DLOV
3. At the front of the rack cabinet, position one of the slide ...1 through 6 for the remaining slide assembly on the other side of the rack.
Dell PowerEdge 2x50 and PowerApp 200 Systems Rack Installation Guide 9
Rack
Installation Guide - Page 24
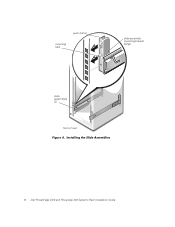
push button
mounting tabs
slide-assembly mounting-bracket flange
slide assemblies (2)
front of rack )LJXUH,QVWDOOLQJWKH6OLGH$VVHPEOLHV
10 Dell PowerEdge 2x50 and PowerApp 200 Systems Rack Installation Guide
Rack
Installation Guide - Page 25
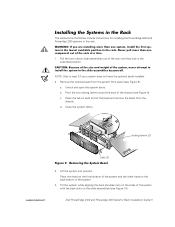
,QVWDOOLQJWKH6\VWHPVLQWKH5DFN
The subsections that follow include instructions for installing the PowerEdge 2x50 and PowerApp 200 systems in the rack.
:$51,1*
,I\RXDUHLQVWDOOLQJPRUHWKDQRQHV\VWHPLQVWDOOWKH...on the sides of thesystem with the back slots on the slide assemblies (see Figure 10).
support.dell.com
Dell PowerEdge 2x50 and PowerApp 200 Systems Rack Installation Guide11
Rack
Installation Guide - Page 26
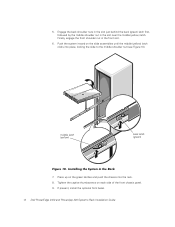
... on the green latches and push the chassis into the rack. 8. Tighten the captive thumbscrews on each side of the front chassis panel. 9. If present, install the optional front bezel.
12 Dell PowerEdge 2x50 and PowerApp 200 Systems Rack Installation Guide
Rack
Installation Guide - Page 27
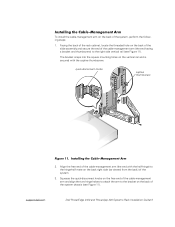
... viewed from the back) of the system.
3. Squeeze the quick-disconnect knobs on the free end of the cable-management arm and align the two hinge halves to attach the arm to the bracket on the back of the system chassis (see Figure 11).
support.dell.com
Dell PowerEdge 2x50 and PowerApp 200 Systems Rack Installation Guide13
Rack
Installation Guide - Page 28
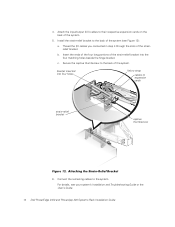
...of the system.
bracket inserted into four holes
Velcro strap
cables to expansion cards
strain-relief bracket
captive thumbscrew
)LJXUH$WWDFKLQJWKH6WUDLQ5HOLHI%UDFNHW 6. Connect the remaining cables to the system.
For details, see your system’s Installation and Troubleshooting Guide or the User’s Guide.
14 Dell PowerEdge 2x50 and PowerApp 200 Systems Rack Installation Guide
Rack
Installation Guide - Page 29
...forward to the fully extended position.
c. Route the cables along the cable-management arm, allowing some additional cable slack at the hinge positions, and secure the cables to the cable-management arm with the Velcro straps attached to the ...the hinge release levers lock the hinges into position.
support.dell.com
Dell PowerEdge 2x50 and PowerApp 200 Systems Rack Installation Guide15