Dell PowerEdge 2850 driver and firmware
Related Dell PowerEdge 2850 Manual Pages
Download the free PDF manual for Dell PowerEdge 2850 and other Dell manuals at ManualOwl.com
Upgrade the BIOS Before
Upgrading Your System (.pdf) - Page 1
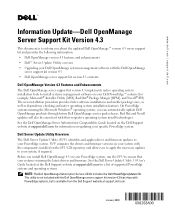
... drivers and firmware. See the Dell Server Update Utility 1.0 User's Guide located at the Dell Support website at support.dell.com for a list of supported PowerEdge systems and operating systems.
NOTE: The Dell OpenManage Subscription Service CD Kit includes the Dell PowerEdge Updates CD. This utility is not included with the Dell OpenManage server support kit version 4.3 that ships with PowerEdge...
Upgrade the BIOS Before
Upgrading Your System (.pdf) - Page 2
... not upgrade Dell OpenManage versions prior to version 4.3, Dell highly recommends upgrading your Dell OpenManage products to version 4.3. The installation procedure saves your current system settings and upgrades your PowerEdge systems to Dell OpenManage 4.3. This process ensures that your PowerEdge systems are running the latest software and firmware updates.
Dell OpenManage Server Support Kit...
Upgrade the BIOS Before
Upgrading Your System (.pdf) - Page 3
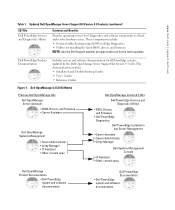
... the latest BIOS, drivers, and firmware NOTE: See the Dell Support website at support.dell.com for the latest updates.
Dell PowerEdge Product Documentation
Includes system and software documentation for all PowerEdge systems updated by the Dell OpenManage Server Support Kit Version 4.3 CDs. This documentation includes: • Installation and Troubleshooting Guides
• User's Guides
•...
Upgrade the BIOS Before
Upgrading Your System (.pdf) - Page 5
...
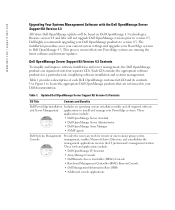
Management Software •Dell OpenManage Server Support Kit 版本 4.3 内容
Dell OpenManage 版本 4.3
Dell OpenManage Server Support Kit 版本 4.3 Dell PowerEdge Microsoft® Installer Utility [MSI]、Red Hat® Package Manger [RPM] 和 Novell® IPS Microsoft Windows PowerEdge Dell OpenManage Service Pack Dell OpenManage...
Upgrade the BIOS Before
Upgrading Your System (.pdf) - Page 17
... Management Software を Dell PowerEdge Microsoft® Installer Utility [MSI]、Red Hat® Package Manger [RPM Novell® IPS Microsoft Windows PowerEdge Dell OpenManage Service Pack Dell OpenManage Red Hat と Novell PowerEdge Web support.dell.com Dell OpenManage Server Administrator
Dell Server Update Utility の概要
Dell Server Update Utility...
Activating the Integrated RAID Controller (.pdf) - Page 1

www.dell.com | support.dell.com
Updating Dell™ Diagnostics
This document provides information about resolving an issue when using a USB keyboard connected to the front-panel USB connector and running Dell diagnostics. If you are running Dell diagnostics with a USB keyboard, use the back-panel USB connector. To use the front-panel USB connector with the keyboard, download the latest ...
Processor Upgrade Installation
Guide - Page 5
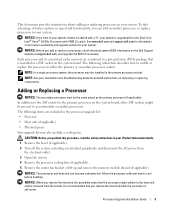
... add or replace a processor, check the latest system BIOS information on the Dell Support website at support.dell.com, and upgrade the BIOS if necessary. Each processor and its associated cache memory are contained in a pin-grid array (PGA) package that is installed in a ZIF socket on the system board. The following subsection describes how to install or replace the processor in either the...
Processor Upgrade Installation
Guide - Page 6
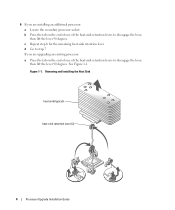
...-sink retention lever. d Go to step 7. If you are upgrading an existing processor: a Press the tab on the end of one of the heat-sink retention levers to disengage the lever, then lift the lever 90 degrees. See Figure 1-1. Figure 1-1. Removing and Installing the Heat Sink
heat sink (typical)
heat-sink retention lever (2)
4
Processor Upgrade Installation Guide
Processor Upgrade Installation
Guide - Page 7
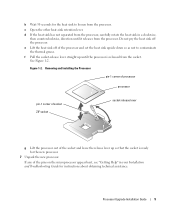
... socket
socket-release lever
g Lift the processor out of the socket and leave the release lever up so that the socket is ready for the new processor.
7 Unpack the new processor.
If any of the pins on the microprocessor appear bent, see "Getting Help" in your Installation and Troubleshooting Guide for instructions about obtaining technical assistance.
Processor Upgrade Installation Guide
5
Processor Upgrade Installation
Guide - Page 8
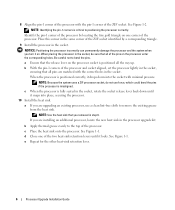
... are installing an additional processor, locate the new heat sink in the processor upgrade kit.
b Apply thermal grease evenly to the top of the processor. c Place the heat sink onto the processor. See Figure 1-1. d Close one of the two heat-sink retention levers until it locks. See Figure 1-1. e Repeat for the other heat-sink retention lever.
6
Processor Upgrade Installation Guide
Processor Upgrade Installation
Guide - Page 9
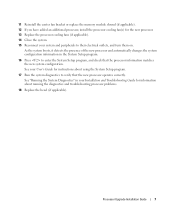
... User's Guide for instructions about using the System Setup program.
17 Run the system diagnostics to verify that the new processor operates correctly. See "Running the System Diagnostics" in your Installation and Troubleshooting Guide for information about running the diagnostics and troubleshooting processor problems.
18 Replace the bezel (if applicable).
Processor Upgrade Installation Guide
7
Processor Upgrade Installation
Guide - Page 10

8
Processor Upgrade Installation Guide
Activating the Integrated RAID
Controller - Page 5
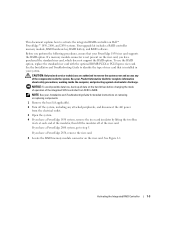
... document explains how to activate the integrated RAID controller on Dell™ PowerEdge™ 1850, 2800, and 2850 systems. Your upgrade kit includes a RAID controller memory module, RAID hardware key, RAID battery, and RAID software.
Before you perform the following procedures, ensure that your PowerEdge 1850 riser card supports the RAID option. If a memory module connector is not present on...
Activating the Integrated RAID
Controller - Page 6
www.dell.com | support.dell.com
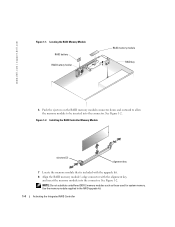
Figure 1-1. Locating the RAID Memory Module RAID battery
RAID battery holder
RAID memory module RAID key
B A
SCSI A SCSI B
6 Push the ejectors on the RAID memory module connector down and outward to allow the memory module to be inserted into the connector. See Figure 1-2.
Figure 1-2. Installing the RAID Controller Memory Module
ejectors (2)
alignment key
7 ...
Activating the Integrated RAID
Controller - Page 8
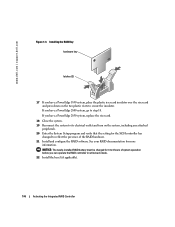
... a PowerEdge 2850 system, replace the riser card.
18 Close the system. 19 Reconnect the system to its electrical outlet and turn on the system, including any attached
peripherals. 20 Enter the System Setup program and verify that the setting for the SCSI controller has
changed to reflect the presence of the RAID hardware. 21 Install and configure the RAID software. See...
Updating Your NIC Teaming
Drivers (.pdf) - Page 3
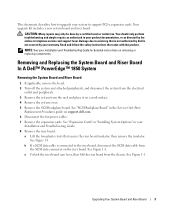
.... 4 Remove the system cover. 5 Remove the SCSI backplane board. See "SCSI Backplane Board" in the Service-Only Parts
Replacement Procedures guide on support.dell.com. 6 Disconnect the fan power cables. 7 Remove the expansion cards. See "Expansion Cards" in "Installing System Options" in your
Installation and Troubleshooting Guide. 8 Remove the riser board:
a Lift the two plastic rivets that secure...
Updating Your NIC Teaming
Drivers (.pdf) - Page 4
www.dell.com | support.dell.com
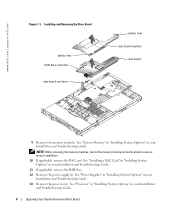
Figure 1-1. Installing and Removing the Riser Board
plastic rivet SCSI data connector riser board cam lever
plastic rivet riser board insulator
riser board
9 Remove the memory modules. See "System Memory" in "Installing System Options" in your Installation and Troubleshooting Guide.
NOTE: While removing the memory modules, record the memory module socket ...
Updating Your NIC Teaming
Drivers (.pdf) - Page 5
...
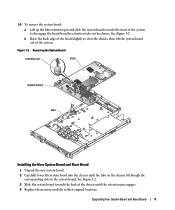
system board tabs
Installing the New System Board and Riser Board
1 Unpack the new system board. 2 Carefully lower the system board into the chassis until the tabs on the chassis fit through the
corresponding slots in the system board. See Figure 1-2. 3 Slide the system board towards the back of the chassis until the retention pin engages. 4 Replace the memory...
Updating Your NIC Teaming
Drivers (.pdf) - Page 6
... the riser board and press down on the two plastic
rivets to secure the insulator. 11 Reconnect the fan power cables. 12 Replace the SCSI backplane board and reinstall the SCSI hard drives. See "SCSI Backplane
Board" in the Service-Only Parts Replacement Procedures guide on support.dell.com. 13 Reinstall the cover. 14 If applicable, reattach the bezel.
6
Upgrading Your System Board and Riser...
Updating Your NIC Teaming
Drivers (.pdf) - Page 7
...RAID key. 14 Remove the power supply(s). See "Power Supplies" in "Installing System Options" in your
Installation and Troubleshooting Guide. 15 Remove the processor(s). See "Processor" in "Installing System Options" in your Installation
and Troubleshooting Guide. 16 Raise the drive-bay retraction bar and swing it toward the front of the chassis to disengage the
SCSI backplane from the system board...