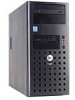
Dell PowerEdge 600SC driver and firmware
Related Dell PowerEdge 600SC Manual Pages
Download the free PDF manual for Dell PowerEdge 600SC and other Dell manuals at ManualOwl.com
Information
Update - Page 3
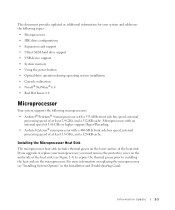
This document provides updated or additional information for your system and addresses the following topics:
• Microprocessor • IDE drive configurations • Expansion card support • Ultra3 SCSI hard drive support • USB device support • System memory • Using the power button • Optical drive operation during operating system installation • Console ...
Information
Update - Page 4
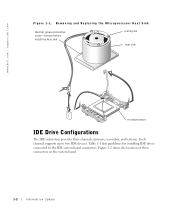
... heat sink
cooling fan heat sink
microprocessor
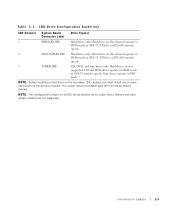
IDE Drive Configurations
The IDE subsystem provides three channels (primary, secondary, and tertiary). Each channel supports up to two IDE devices. Table 1-1 lists guidelines for installing IDE drives connected to the IDE system board connectors. Figure 1-2 shows the location of these connectors on the system board.
1-2
Information Update
Information
Update - Page 5
... speeds. Tape drives operate in PIO
mode 3.
NOTE: Before installing a hard drive on the secondary IDE channel, you must install one or more hard drives on the primary channel. You cannot install a bootable hard drive on the secondary channel.
NOTE: The configuration jumper on all IDE drives must be set to Cable Select. Master and slave jumper settings are not supported.
Information Update
1-3
Information
Update - Page 6

...dell.com | support.dell.com
Figure 1-2. IDE Drive Connectors
THIRD IDE (CD, DVD, and tape drives only) PRIMARY IDE (hard drives only)
SECONDARY IDE (hard drives only)
Expansion Card Support
The system has five PCI expansion slots (see Figure 1-3). Slots 2 through 5 are 64-bit, 33-MHz slots; slot 1 is a 32-bit, 33-MHz slot. Your system supports 3.3-V expansion cards only.
1-4
Information Update
Information
Update - Page 7
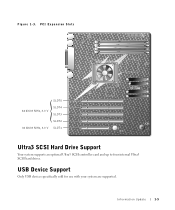
Figure 1-3. PCI Expansion Slots
SLOT5
64 bit/33 MHz, 3.3 V
SLOT4 SLOT3
SLOT2
32 bit/33 MHz, 3.3 V SLOT1
Ultra3 SCSI Hard Drive Support
Your system supports an optional Ultra3 SCSI controller card and up to four internal Ultra3 SCSI hard drives.
USB Device Support
Only USB devices specifically sold for use with your system are supported.
Information Update
1-5
Information
Update - Page 8
... the System Setup program, the power button will still function throughout system POST, but will be deactivated just before the operating system is loaded.
System Lockup While Loading a DOS-Mode CD Drive Device Driver
If your system includes a CD drive and a slave IDE device such as a tape backup unit, your system may lock up while loading a DOS-mode device driver for the...
Information
Update - Page 9
... the interface and power cables to the slave IDE device.
During a Manual Installation, NetWare Is Unable to Mount the CD Drive
Dell strongly recommends that you use the Dell OpenManage Server Assistant CD to install NetWare. If you choose to manually install NetWare from the Novell installation CD, you must download and install a new IDEATA.HAM driver:
1 If a slave IDE device is installed on the...
Information
Update - Page 10
... driver into the system's diskette drive. h Type copy a:\*.* c:\nwupdate.
The files are copied from the diskette.
i Reboot the system. j At the Boot Partition screen, select Continue with existing partition.
7 Follow the instructions on the screen to complete the NetWare installation.
8 If you disconnected a slave IDE device in step 1, shut down the system and reconnect the slave IDE device.
SCSI...
Information
Update - Page 11
... Hat Linux 8.0 errata kernels created after version 2.4.18-19.7.x.
Optional Internal Winmodem
The optional internal Winmodem is not supported by Red Hat Linux 8.0.
Using an IDE Tape Backup Unit With Red Hat Linux 8.0
To use an IDE tape drive on a system running Red Hat Linux 8.0, install the IDE-SCSI driver for the tape backup unit:
1 Using...
Information
Update - Page 12
...-scsi"
d Save the file. e Run lilo to implement the change. f Reboot the system.
Unmounting a Diskette Drive While Using Dell OpenManage™ Server Assistant
If you encounter difficulty unmounting the diskette drive while using Dell OpenManage Server Assistant, use the omawsd stop command to temporarily stop the Server Assistant service, and then unmount the drive. To restart the service...
Information
Update - Page 22
www.dell.com | support.dell.com
d
e
6 a CTRL>
Information
Update - Page 55
IDE Ultra3 SCSI USB DOS CD
Novell® NetWare® 6.0 • Red Hat Linux 8.0
533 MHz 2.4 GHz 512 KB の Intel® Pentium® 4 3.06 GHz
400 MHz 1.8 GHz 128 KB の Intel Celeron
5-1 Installation and Troubleshooting Guide Installing System Options
5-1
Information
Update - Page 60

www.dell.com | support.dell.com
Micron 128 MB
1 Installation and Troubleshooting Guide Installing System Options
4
Disable Power Button POST
DOS CD
CD IDE CD DOS CD www.cdrom-drivers.com CD DOS
POST
5-6
Information
Update - Page 61
Novell NetWare 6.0
Novell NetWare 6.0 IDE IDE IDE Novell NetWare を正し
1
2 Installation and Troubleshooting Guide Removing the Cover
3
4 IDE Installation and Troubleshooting Guide Installing Drives
5
6 Installation and Troubleshooting Guide Installing the Cover
7
8 NetWare
9
10
11 IDE
5-7
Information
Update - Page 63
...partition 7 NetWare 8 手順 1 IDE
IDE
SCSI SCSI TBU Novell X Window NetWare Novell の Web サイト support.novell.com で longscsi.exe 2961305
Red Hat Linux 8.0
IDE IDE IDE Red Hat Linux Red Hat Web サイト www.redhat.com Web サイト support.dell.com から Red HatLinux 8.0 の最...
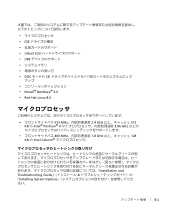
Microprocessor
Upgrade Installation Guide - Page 3

... your system.
NOTICE: Before you upgrade or replace a microprocessor, check the latest system BIOS information on the Dell Support website at support.dell.com, and upgrade the BIOS if necessary.
The microprocessor and its associated cache memory are contained in a pin-grid array (PGA) package that is installed in a ZIF socket on the system board. The following subsection describes how to...
Microprocessor
Upgrade Installation Guide - Page 4
www.dell.com | support.dell.com
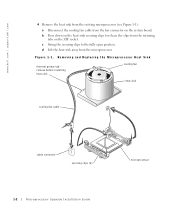
4 Remove the heat sink from the existing microprocessor (see Figure 1-1):
a Disconnect the cooling fan cable from the fan connector on the system board. b Press down on...thermal grease tab - remove before installing heat sink
cooling fan
heat sink
cooling fan cable
cable connector
securing clips (2)
1-2
Microprocessor Upgrade Installation Guide
microprocessor
Microprocessor
Upgrade Installation Guide - Page 5

... the pins on the microprocessor appear bent, see "Getting Help" in your Installation and Troubleshooting Guide for instructions on obtaining technical assistance.
8 Ensure that the microprocessor socket release lever is ...is needed to install the microprocessor in the socket. When the microprocessor is aligned correctly, it should drop into the socket.
Microprocessor Upgrade Installation Guide
1-3
Microprocessor
Upgrade Installation Guide - Page 6
... maintain proper thermal conditions.
14 Connect the fan cable to the fan connector on the system board.
To identify system board connectors, see "Jumpers and Connectors" in your Installation and Troubleshooting Guide.
15 Stand the system upright.
16 Install the cover (see "Installing the Cover" in your Installation and Troubleshooting Guide).
17 Reconnect the system to its electrical outlet...
Microprocessor
Upgrade Installation Guide - Page 7
... the System Setup Program" in your User's Guide).
19 Exit the System Setup program.
20 Run the system diagnostics to verify that the new microprocessor is operating correctly.
See "Running the System Diagnostics" in your Installation and Troubleshooting Guide for information on running the diagnostics and troubleshooting any problems that may occur.
Microprocessor Upgrade Installation Guide
1-5