Dell PowerEdge 6450 driver and firmware


Related Dell PowerEdge 6450 Manual Pages
Download the free PDF manual for Dell PowerEdge 6450 and other Dell manuals at ManualOwl.com
Diagnostics
Failure Message - Page 1
..., which is included on the Dell OpenManage Server Assistant CD and on your system utility partition, cannot test the PowerEdge Expandable RAID Controller 2/Dual Channel (PERC 2/DC) small computer system interface (SCSI) adapter. If your system contains one or more of these adapters with drives attached, you will receive the message Unknown target error when you run the diagnostics. The...
Diagnostics
Failure Message - Page 2
... four diskettes. 6. Click Copy Files at the bottom of the screen and follow the instructions to create
the four diagnostic diskettes. 7. Run the PowerEdge 4400 Diagnostics from the diskettes that were created
above. 8. Choose Select Devices to Test in the main menu of the Dell Diagnostics. 9. Select PERC 2/DC in the Device Groups window. 10. Highlight Run...
Information Update - Page 36
: Installation and Troubleshooting Guide
(S.E.C. Cartridge) 1
: SEC
: SEC
: AC Troubleshooting Guide
1 AC :
2
Inside the Computer 3
Inside the Computer
Installation and Safety First- For You and Your Computer
Installation and Troubleshooting Guide
Installation and Troubleshooting Guide
Checking
Installation and Troubleshooting Guide
Checking
5-2
Information Update - Page 38
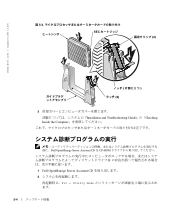
5-2.
SEC (2)
3 Inside the Computer
( (2)
2 )
Installation and Troubleshooting Guide
Checking
: Dell OpenManage Server Assistant CD CD-ROM
B 1 Dell OpenManage Server Assistant CD 2
F10 = Utility Mode
5-4
Rack
Installation Guide - Page 6
...' cables or power cable. Do not modify power cables or plugs. Consult a licensed electrician or your power company for site modifications. Always follow your local/national wiring rules. To help avoid possible damage to the system board, wait 5 seconds after turning off the system before removing a component from the system board or disconnecting a peripheral device from the computer. Handle...
Rack
Installation Guide - Page 7
... Install the power supply before connecting the power cable to the power
supply. - Unplug the power cable before removing the power supply. - If the system has multiple sources of power, disconnect power from the sys-
tem by unplugging all power cables from the power supplies. Move products with care; ensure that all casters and/or stabilizers are firmly connected to the computer or storage system...
Rack
Installation Guide - Page 8
... plug a modem or telephone cable into the network interface controller (NIC) receptacle. Disconnect the modem cable before opening a product enclosure, touching or installing internal components, or touching an uninsulated modem cable or jack. Do not use a telephone line to report a gas leak while you are in the vicinity of the leak.
Observe the following precautions for laser devices: Do not...
Rack
Installation Guide - Page 10
...on the computer chassis. As you continue to work inside the computer, periodically touch... until you are ready to install the component in your computer. Just before unwrapping the antistatic...Dell documentation to remind you of these precautions:
For comfort and efficiency, observe the following ergonomic guidelines when you set up and use your computer...settings, and the lighting around you (such ...
Rack
Installation Guide - Page 13
... Doors From the Rack 1-3 Removing the Doors From the Dell 42-U Rack 1-3 Removing the Doors From the Dell 24-U Rack 1-5
Installing the Slide Assemblies in the Rack 1-7 Installing the System in the Rack 1-11 Installing the Cable Tray 1-12 Installing the Cable-Management Arm 1-13 Reversing the Cable-Management Arm Installation 1-15 Replacing the Rack Doors 1-16
Replacing the Rack...
Rack
Installation Guide - Page 15
This installation guide provides instructions for trained service technicians installing one or more Dell PowerEdge 6x50 computer systems in a Dell rack. One rack kit is required for each PowerEdge system to be installed in the rack.
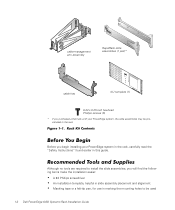
The rack kit includes the following items (see Figure 1-1): One pair of RapidRails™ slide assemblies* One cable-management arm assembly One cable tray One 4-U ...
Rack
Installation Guide - Page 16
...
RapidRails slide assemblies (1 pair)*
cable tray
4-U template (1)
6-32 x 0.25-inch hex-head Phillips screws (5)
* If you purchased a Dell rack with your PowerEdge system, the slide assemblies may be preinstalled in the rack.
Before you begin installing your PowerEdge system in the rack, carefully read the "Safety Instructions" found earlier in this guide.
Although no tools are required...
Rack
Installation Guide - Page 17
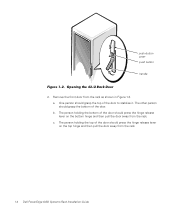
... prevent damage to the doors while installing the computer system.
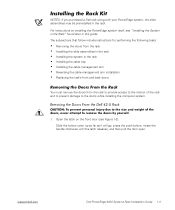
1. Open the latch on the front door (see Figure 1-2). Slide the button cover up as far as it will go, press the push button, rotate the handle clockwise until the latch releases, and then pull the door open.
support.dell.com
Dell PowerEdge 6x50 Systems Rack Installation Guide 1-3
Rack
Installation Guide - Page 18
... holding the top of the door should press the hinge release lever on the top hinge and then pull the door away from the rack.
1-4 Dell PowerEdge 6x50 Systems Rack Installation Guide
Rack
Installation Guide - Page 19
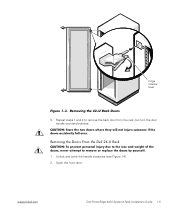
hinge release lever
3. Repeat steps 1 and 2 to remove the back door from the rack, but turn the door handle counter-clockwise.
1. Unlock and twist the handle clockwise (see Figure 1-4). 2. Open the front door.
support.dell.com
Dell PowerEdge 6x50 Systems Rack Installation Guide 1-5
Rack
Installation Guide - Page 20
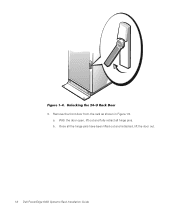
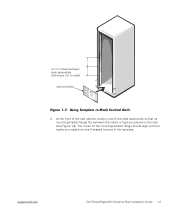
3. Remove the front door from the rack as shown in Figure 1-5. a. With the door open, lift out and fully retract all hinge pins. b. Once all the hinge pins have been lifted out and retracted, lift the door out.
1-6 Dell PowerEdge 6x50 Systems Rack Installation Guide
Rack
Installation Guide - Page 21

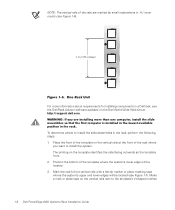
... System in the Rack," found later in this guide.
Use the 4-U rack template to determine where you want to install the slide assemblies. The rack template is the same height as the computer chassis.
You must allow 4 U (7 inches) of vertical space for each PowerEdge 6x50 system you install in the rack.
support.dell.com
Dell PowerEdge 6x50 Systems Rack Installation Guide 1-7
Rack
Installation Guide - Page 22
...(1.75 inches)
For more information about requirements for installing components in a Dell rack, see the Dell Rack Advisor software available on the Dell World Wide Web site at: http://support.dell.com.
To determine where to install the slide assemblies in the rack, perform the ...on the vertical rails next to the template's V-shaped notches.
1-8 Dell PowerEdge 6x50 Systems Rack Installation Guide
Rack
Installation Guide - Page 23
... the rack (see Figure 1-8). The hooks on the mounting-bracket flange should align with the marks you made from the V-shaped notches in the template.
support.dell.com
Dell PowerEdge 6x50 Systems Rack Installation Guide 1-9
Rack
Installation Guide - Page 24
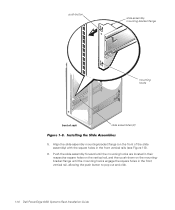
... mountingbracket flange until the mounting hooks engage the square holes in the front vertical rail, allowing the push button to pop out and click.
1-10 Dell PowerEdge 6x50 Systems Rack Installation Guide
Rack
Installation Guide - Page 25
... shoulder screw in the slot near the middle (yellow) latch. Finally, engage the front shoulder screw in the front slot.
5. Push the computer inward on the slide assemblies until the middle (yellow) latch clicks into place, locking the slide to the middle shoulder screw (see Figure 1-9).
support.dell.com
Dell PowerEdge 6x50 Systems Rack Installation Guide 1-11