Dell Precision T1650 driver and firmware
Related Dell Precision T1650 Manual Pages
Download the free PDF manual for Dell Precision T1650 and other Dell manuals at ManualOwl.com
User Manual - Page 6
...™ are trademarks of Advanced Micro Devices, Inc. Microsoft®, Windows®, MS-DOS®, Windows Vista®, the Windows Vista start button, and Office Outlook®...players. The Bluetooth® word mark is a registered trademark and owned by the Bluetooth® SIG, Inc. and any use of such mark by Dell Inc. is under license. Wi-Fi® is a registered trademark of Wireless Ethernet...
Owner's manual - Page 2

... Association (BDA) and licensed for use on discs and players. The Bluetooth® word mark is a registered trademark and owned by the Bluetooth® SIG, Inc. and any use of such mark by Dell Inc. is under license. Wi-Fi® is a registered trademark of Wireless Ethernet Compatibility Alliance, Inc. 2012 - 05 Rev. A00
Owner's manual - Page 3
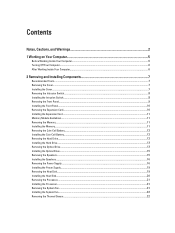
... Card...11 Memory Module Guidelines...11 Removing the Memory...11 Installing the Memory...11 Removing the Coin-Cell Battery...12 Installing the Coin-Cell Battery...12 Removing the Hard Drive...12 Installing the Hard Drive...13 Removing the Optical Drive...13 Installing the Optical Drive...15 Removing the Speakers...15 Installing the Speakers...16 Removing the Power Supply...16 Installing the Power...
Owner's manual - Page 4
... the Power Switch...24 Installing the Power Switch...27 Removing the Input/Output (I/O) Panel...27 Installing the Input/Output (I/O) Panel...29 Removing the System Board...29 Installing the System Board...31 System Board Components...32
3 System Setup...33
Boot Sequence...33 Navigation Keys...33 System Setup Options...34 Updating the BIOS ...40 Jumper Settings...40 System and Setup Password...41...
Owner's manual - Page 5
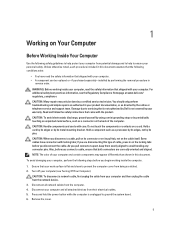
... Off Your Computer).
CAUTION: To disconnect a network cable, first unplug the cable from your computer and then unplug the cable from the network device. 3. Disconnect all network cables from the computer. 4. Disconnect your computer and all attached devices from their electrical outlets. 5. Press and hold the power button while the computer is unplugged to ground the system board. 6. Remove the...
Owner's manual - Page 6
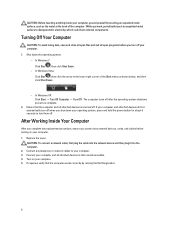
... system, press and hold the power button for about 6 seconds to turn them off.
After Working Inside Your Computer
After you complete any replacement procedure, ensure you connect any external devices, cards, and cables before turning on your computer. 1. Replace the cover.
CAUTION: To connect a network cable, first plug the cable into the network device and then plug it into the...
Owner's manual - Page 7
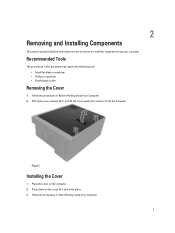
... plastic scribe
Removing the Cover
1. Follow the procedures in Before Working Inside Your Computer. 2. Pull up the cover release latch, and lift the cover upwards to remove it from the computer.
Figure 1.
Installing the Cover
1. Place the cover on the computer. 2. Press down on the cover till it clicks into place. 3. Follow the procedures...
Owner's manual - Page 8
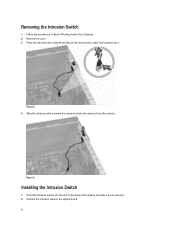
... Intrusion Switch
1. Follow the procedures in Before Working Inside Your Computer. 2. Remove the cover. 3. Press the clip inwards to release and disconnect the intrusion cable from system board.
Figure 2. 4. Slide the intrusion switch toward the chassis bottom and remove it from the chassis.
Figure 3.
Installing the Intrusion Switch
1. Insert the intrusion switch into the...
Owner's manual - Page 9
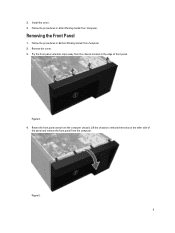
3. Install the cover. 4. Follow the procedures in After Working Inside Your Computer.
Removing the Front Panel
1. Follow the procedures in Before Working Inside Your Computer. 2. Remove the cover. 3. Pry the front panel retention clips away from the chassis located at the edge of front panel.
Figure 4. 4. Rotate the front panel away from the computer chassis...
Owner's manual - Page 10
... to engage the front-panel retention clips, until they click into place. 3. Install the cover. 4. Follow the procedures in After Working Inside Your Computer.
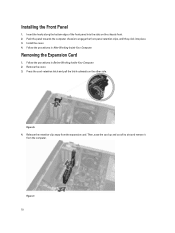
Removing the Expansion Card
1. Follow the procedures in Before Working Inside Your Computer. 2. Remove the cover. 3. Press the card-retention latch and pull the latch outwards on the other side.
Figure...
Owner's manual - Page 11
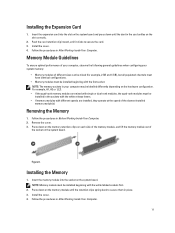
Installing the Expansion Card
1. Insert the expansion card into the slot on the system board and press down until the dent in the card settles on the slot correctly.
2. Push the card retention clip inward, until it clicks to secure the card. 3. Install the cover. 4. Follow the procedures in After Working Inside Your Computer.
Memory Module Guidelines
To ensure optimal performance...
Owner's manual - Page 12
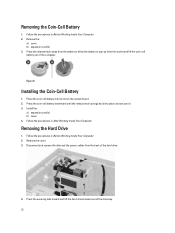
... system board. 2. Press the coin-cell battery downward until the release latch springs back into place and secures it. 3. Install the:
a) expansion card(s) b) cover 4. Follow the procedures in After Working Inside Your Computer.
Removing the Hard Drive
1. Follow the procedures in Before Working Inside Your Computer. 2. Remove the cover. 3. Disconnect and remove the data and the power cables...
Owner's manual - Page 13
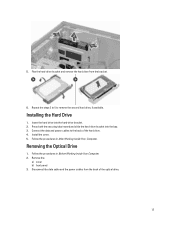
...-drive bracket into the bay. 3. Connect the data and power cables to the back of the hard drive. 4. Install the cover. 5. Follow the procedures in After Working Inside Your Computer.
Removing the Optical Drive
1. Follow the procedures in Before Working Inside Your Computer. 2. Remove the:
a) cover b) front panel 3. Disconnect the data cable and the power cables from the back of the optical drive...
Owner's manual - Page 15
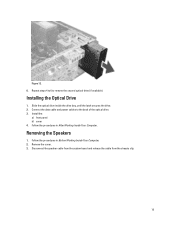
... latch secures the drive. 2. Connect the data cable and power cables to the back of the optical drive. 3. Install the:
a) front panel b) cover 4. Follow the procedures in After Working Inside Your Computer.
Removing the Speakers
1. Follow the procedures in Before Working Inside Your Computer. 2. Remove the cover. 3. Disconnect the speaker cable from the system board and release the cable from the...
Owner's manual - Page 16
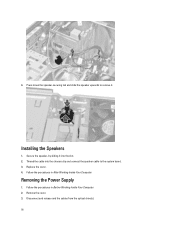
... it into the slot. 2. Thread the cable into the chassis clip and connect the speaker cable to the system board. 3. Replace the cover. 4. Follow the procedures in After Working Inside Your Computer.
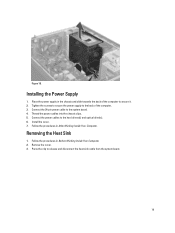
Removing the Power Supply
1. Follow the procedures in Before Working Inside Your Computer. 2. Remove the cover. 3. Disconnect and release and the cables from the optical drive(s). 16
Owner's manual - Page 19
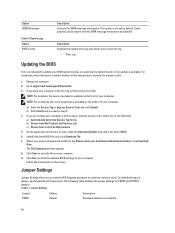
... chassis and slide towards the back of the computer to secure it. 2. Tighten the screws to secure the power supply to the back of the computer. 3. Connect the 24-pin power cable to the system board. 4. Thread the power cables into the chassis clips. 5. Connect the power cables to the hard drives(s) and optical drive(s). 6. Install the cover. 7. Follow the procedures in After Working...
Owner's manual - Page 40
...Updating the BIOS
It is recommended to update your BIOS (system setup), on replacing the system board or if an update is available. For notebooks, ensure that your computer battery is fully charged and connected to a power outlet
1. Restart the computer. 2. Go to support.dell.com/support/downloads. 3. If you have your computer's Service Tag or Express Service Code:
NOTE: For desktops, the service...
Owner's manual - Page 42

... and power-on the computer. 7. Power-off the computer and disconnect the power cable from the electrical outlet. 8. Remove the cover. 9. Replace the PSWD jumper on the system board. 10. Install the cover. 11. Follow the procedures in After Working on Your Computer. 12. Power-on the computer. 13. Go to the system setup, and assign a new system or setup password. See Setting up a System Password...
Owner's manual - Page 46
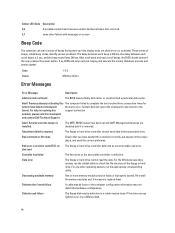
... jump out from looping and execute the normal shutdown process and power system.
Code Cause
1-3-2 Memory failure
Error Messages
Error Message
Description
Address mark not found
The BIOS found a faulty disk sector or could not find a particular disk sector.
Alert! Previous attempts at booting this The computer failed to complete the boot routine three consecutive times for
system have...
Owner's manual - Page 47
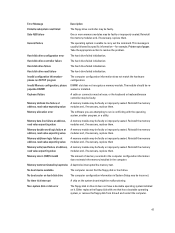
...the memory test.
No boot device available
The computer cannot find the floppy disk or hard drive.
No boot sector on hard-disk drive
The computer configuration information in System Setup may be incorrect.
No timer tick interrupt
A chip on the system board might be malfunctioning.
Non-system disk or disk error
The floppy disk in drive A does not have a bootable operating system installed on...