Foxconn H67A-S driver and firmware
Related Foxconn H67A-S Manual Pages
Download the free PDF manual for Foxconn H67A-S and other Foxconn manuals at ManualOwl.com
User manual - Page 6
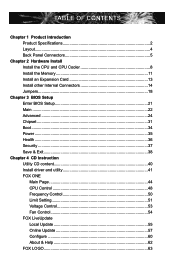
...8 Install the Memory 11 Install an Expansion Card 13 Install other Internal Connectors 14 Jumpers 18
Chapter 3 BIOS Setup Enter BIOS Setup 21 Main ...22 Advanced 24 Chipset...31 Boot...34 Power...35 Health...36 Security 37 Save & Exit 38
Chapter 4 CD Instruction Utility CD content 40 Install driver and utility 41 FOX ONE Main Page 44 CPU Control 48 Frequency Control 50 Limit Setting...
User manual - Page 7
... a RAID Driver Diskette 71 BIOS Configuration 73 Create RAID in BIOS 73 Install a New Windows XP 102
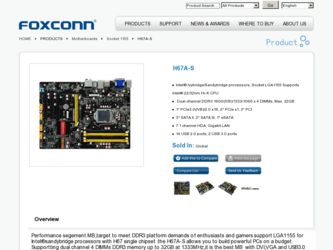
Technical Support :
Website : http://www.foxconnchannel.com
Support
Support Website : http://www.foxconnsupport.com
Worldwide online contact Support : http://www.foxconnsupport.com/inquiry.aspx
CPU Support List : http://www.foxconnsupport.com/cpusupportlist.aspx
Memory, VGA Compatibility...
User manual - Page 10
... Function
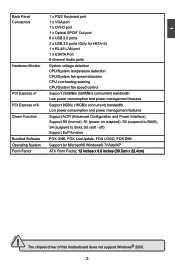
Bundled Software Operating System Form Factor
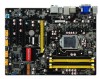
1 x PS/2 Keyboard port 1 x VGA port 1 x DVI-D port 1 x Optical SPDIF Out port 6 x USB 2.0 ports 2 x USB 3.0 ports (Only for H67A-S) 1 x RJ-45 LAN port 1 x ESATA Port 8-channel Audio ports
System voltage detection CPU/System temperature detection CPU/System fan speed detection CPU overheating warning CPU/System fan speed control
Support 250MB...
User manual - Page 46
The utility CD that came with the motherboard contains useful software and several utility drivers that enhance the motherboard features.
This chapter includes the following information: ■ Utility CD content ■ Install driver and utility ■ FOX ONE ■ FOX LiveUpdate ■ FOX LOGO ■ FOX DMI ■ B��r�o�w��s�e�...
User manual - Page 47
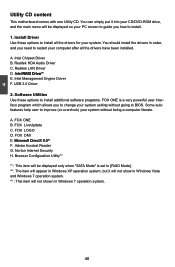
... CD/DVD-ROM drive, and the main menu will be displayed on your PC screen to guide you how to install.
1. Install Driver Use these options to install all the drivers for your system. You should install the drivers in order, and you need to restart your computer after all the drivers have been installed.
A. Intel Chipset Driver B. Realtek HDA Audio Driver C. Realtek LAN Driver D. I�n�...
User manual - Page 62
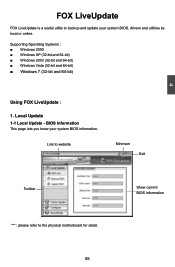
... to backup and update your system BIOS, drivers and utilities by local or online.
Supporting Operating Systems : ■ Windows 2000 ■ Windows XP (32-bit and 64-bit) ■ Windows 2003 (32-bit and 64-bit) ■ Windows Vista (32-bit and 64-bit) ■ Windows 7 (32-bit and 64-bit)
Using FOX LiveUpdate :
1. Local Update 1-1 Local Update - BIOS Information
This page...
User manual - Page 64
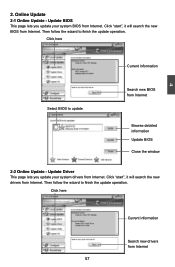
... Update - Update BIOS
This page lets you update your system BIOS from Internet. Click "start", it will search the new BIOS from Internet. Then follow the wizard to finish the update operation.
Click here
4
Current information
Select BIOS to update
Search new BIOS from Internet
Browse detailed information Update BIOS Close the window
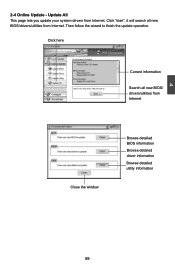
2-2 Online Update - Update Driver This page lets you update...
User manual - Page 65

Select the driver to update
Browse detailed information Install the selected driver
Close the window
2-3 Online Update - Update Utility This page lets you update utilities from Internet. Click "start", it will search the new utilities from Internet. Then follow the wizard to finish the update operation.
Click here
4
Select the utility to update 58 58
Current information
Search new utilities ...
User manual - Page 66
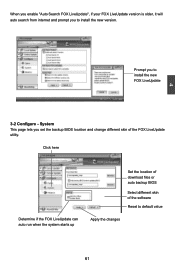
...2-4 Online Update - Update All This page lets you update your system drivers from Internet. Click "start", it will search all new BIOS/drivers/utilities from Internet. Then follow the wizard to finish the update operation.
Click here
Current information
Search all new BIOS/ drivers/utilities from Internet
Close the window
Browse detailed BIOS information
Browse detailed driver information
Browse...
User manual - Page 68
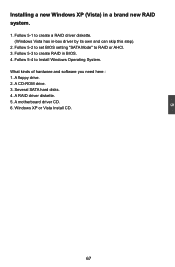
... prompt you to install the new version.
4
Prompt you to install the new FOX LiveUpdate
3-2 Configure - System This page lets you set the backup BIOS location and change different skin of the FOX LiveUpdate utility.
Click here
Determine if the FOX LiveUpdate can auto run when the system starts up
Set the location of download files or...
User manual - Page 73

This chapter will include the following information :
■ RAID Configuration I�n�t�r�o�d�u��c�ti�o�n� ■ Intel® Matrix Storage Manager ■ Create a RAID Driver Diskette ■ BIOS Configuration ■ Create RAID in BIOS ■ Install a New Windows XP
User manual - Page 74
... driver by its own and can skip this step).
2. Follow 5-2 to set BIOS setting "SATA Mode" to RAID or AHCI. 3. Follow 5-3 to create RAID in BIOS. 4. Follow 5-4 to Install Windows Operating System. What kinds of hardware and software you need here : 1. A floppy drive. 2. A CD-ROM drive. 3. Several SATA hard disks. 4. A RAID driver diskette. 5. A motherboard driver CD. 6. Windows XP or Vista Install...
User manual - Page 77

...
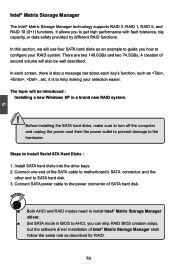
Steps to Install Serial ATA Hard Disks :
1. Install SATA hard disks into the drive bays. 2. Connect one end of the SATA cable to motherboard's SATA connector, and the
other end to SATA hard disk. 3. Connect SATA power cable to the power connector of SATA hard disk.
WARNING!
■ Both AHCI and RAID modes need to install Intel® Matrix Storage Manager driver.
■ Set SATA mode in BIOS to...
User manual - Page 78
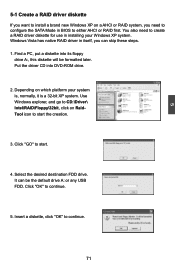
... configure the SATA Mode in BIOS to either AHCI or RAID first. You also need to create a RAID driver diskette for use in installing your Windows XP system. Windows Vista has native RAID driver in itself, you can skip these steps. 1. Find a PC, put a diskette into its floppy
drive A:, this diskette will be formatted later. Put the driver CD into DVD-ROM drive.
2. Depending...
User manual - Page 79
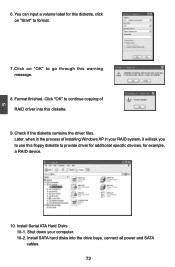
...Check if the diskette contains the driver files. Later, when in the process of installing Windows XP in your RAID system, it will ask you to use this floppy diskette to provide driver for additional specific devices, for example, a RAID device.
10. Install Serial ATA Hard Disks : 10-1. Shut down your computer. 10-2. Install SATA hard disks into the drive bays, connect all power and SATA cables. 72
User manual - Page 109
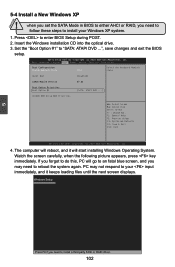
...need to
follow these steps to install your Windows XP system.
1. Press to enter BIOS Setup during POST. 2. Insert the Windows installation CD into the optical drive. 3. Set the "Boot Option #1" to "SATA: ATAPI DVD ...", save changes and exit the BIOS
setup.
Aptio Setup Utility - C opyright (C) 2010 American Megatrends, Inc. Main Advanced Chipset Boot Power Health Security Save & Exit...
User manual - Page 47

... all the drivers have been installed.
A. Intel Chipset Driver B. Realtek HDA Audio Driver C. Realtek LAN Driver D. Intel RAID Driver*1 E. Intel Management Engine Driver F. USB 3.0 Driver
2. Software Utilities Use these options to install additional software programs. FOX ONE is a very powerful user interface program which allows you to change your system setting without going to BIOS. Some auto...
User manual - Page 65

Select the driver to update
Browse detailed information Install the selected driver
Close the window
2-3 Online Update - Update Utility This page lets you update utilities from Internet. Click "start", it will search the new utilities from Internet. Then follow the wizard to finish the update operation.
Click here
4
Select the utility to update 58 58
Current information
Search new utilities ...
User manual - Page 74

... driver by its own and can skip this step).
2. Follow 5-2 to set BIOS setting "SATA Mode" to RAID or AHCI. 3. Follow 5-3 to create RAID in BIOS. 4. Follow 5-4 to Install Windows Operating System. What kinds of hardware and software you need here : 1. A floppy drive. 2. A CD-ROM drive. 3. Several SATA hard disks. 4. A RAID driver diskette. 5. A motherboard driver CD. 6. Windows XP or Vista Install...
User manual - Page 77
...
Steps to Install Serial ATA Hard Disks :
1. Install SATA hard disks into the drive bays. 2. Connect one end of the SATA cable to motherboard's SATA connector, and the
other end to SATA hard disk. 3. Connect SATA power cable to the power connector of SATA hard disk.
WARNING!
■ Both AHCI and RAID modes need to install Intel® Matrix Storage Manager driver.
■ Set SATA mode in BIOS to...