Gigabyte GA-6KIEH-RH driver and firmware
Drivers and firmware downloads for this Gigabyte item

Related Gigabyte GA-6KIEH-RH Manual Pages
Download the free PDF manual for Gigabyte GA-6KIEH-RH and other Gigabyte manuals at ManualOwl.com
Manual - Page 2
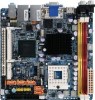
GA-6KIEH-RH/GA-6KIEH2-RH/GA-6KIEL-RH Motherboard Copyright © 2007 GIGA-BYTE TECHNOLOGY CO., LTD. All rights reserved. The trademarks mentioned in the manual are legally registered to their respective companies.
Notice The written content provided with this product is the property of Gigabyte. No part of this manual may be reproduced, copied, translated, or transmitted in any form or...
Manual - Page 3

... Installing Processor Colling Fan 12 2-3: Install Memory Modules 13 2-4: Connect ribbon cables, cabinet wires, and power supply 15
2-4-1 : I/O Back Panel Introduction (GA-6KIEH-RH 15 2-4-2 : I/O Back Panel Introduction (GA-6KIEL-RH 16
2-5: Connectors Introduction & Jumper Setting 20 2-6: Block Diagram 27 Chapter 3 BIOS Setup 28 Main ...30 Advanced 33
System Information ...34 CPU Feature...
Manual - Page 5
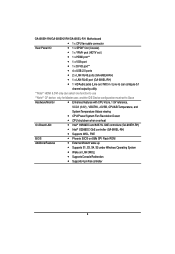
Item Checklist
The GA-6KIEH-RH motherboard The GA-6KIEH2-RH motherboard The GA-6KIEL-RH motherboard Serial ATA cable x 2 I/O Shield Kit IDE (ATA100 ) cable x 1 CD for motherboard driver & utility GA--6KIEH-RH Quick Reference Guide (for GA-6KIEH-RH motherboard) GA-6KIEH2-RH/GA--6KIEL-RL Quick Reference Guide (for GA-6KIEH2-RH/GA-6KIEL-RH motherboard)
Introduction
* The items listed above are for ...
Manual - Page 6
GA-6KIEH-RH/GA-6KIEH2-RH/GA-6KIEL-RH Motherboard
Chapter 1 Introduction
1-1 Considerations Prior to Installation
Preparing Your Computer The motherboard contains numerous delicate electronic circuits and components which can become damaged as a result of electrostatic discharge (ESD). Thus, prior to installation, please follow the instructions below: 1. Please turn off the computer and unplug its ...
Manual - Page 8
...CPU/Power/System Fan Revolution Detect
y CPU shutdown when overheat
On-Board LAN
y Intel® 82566DC and 82573L GbE controllers (GA-6KIEH-RH)
y Intel® 82566DC GbE controller (GA-6KIEL-RH)
y Supports WOL, PXE
BIOS
y Phoenix BIOS on 8Mb SPI Flash ROM
Additional Features
y External Modem wake up
y Supports S1, S3, S4, S5 under Windows Operating System
y Wake on LAN (WOL)
y Supports...
Manual - Page 11
Hardware Installation Process
Chapter 2 Hardware Installation Process
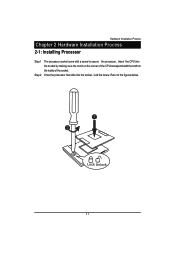
2-1: Installing Processor
Step 1 Step 2
The processor socket come with a screw to secure the processor. Insert the CPU into the socket by making sure the notch on the corner of the CPUcorresponds with the notch on the inside of the socket. Once the processor has slide into the socket, lock the screw. Refer...
Manual - Page 12
GA-6KIEH-RH/GA-6KIEH2-RH/GA-6KIEL-RH Motherboard
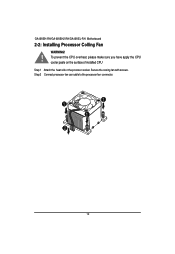
2-2: Installing Processor Colling Fan
WARNING!
! To prevent the CPU overheat, please make sure you have apply the CPU cooler paste on the surface of installed CPU Step 1 Attach the heat sink n the procssor socket. Secure the cooing fan with screws. Step 2 Connect processor fan can cable to the processor fan connector.
1 1
1 2
12
Manual - Page 13
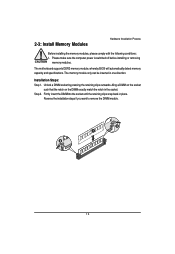
..., please comply with the following conditions: 1. Please make sure the computer power is switched off before installing or removing
memory modules.
The motherboard supports DDR2 memory module, whereby BIOS will automatically detect memory capacity and specifications. The memory module only can be inserted in one direction.
Installation Steps: Step 1. Unlock a DIMM socket by pressing the retaining...
Manual - Page 15
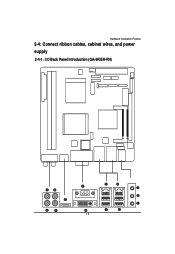
Hardware Installation Process
2-4: Connect ribbon cables, cabinet wires, and power supply
2-4-1 : I/O Back Panel Introduction (GA-6KIEH-RH)
15
Manual - Page 17
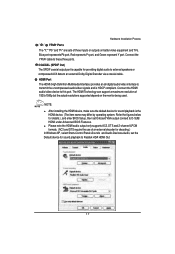
... for details.), and enter BIOS Setup, then set Onboard VGA output connect to D-SUB/ HDMI under Advanced BIOS Features. Please note the HDMI audio output only supports AC3, DTS and 2-channel-LPCM formats. (AC3 and DTS require the use of an external decoder for decoding.)
In Windows XP, select Start>Control Panel>Sounds and Audio Devices>Audio, set the Default device for sound playback to Realtek...
Manual - Page 18
GA-6KIEH-RH/GA-6KIEH2-RH/GA-6KIEL-RH Motherboard In Windows Vista, select Start>Control Panel>Sound, select Realtek HDMI Output and then click Set Default.
VGA Port Connect the monitor cable to this port. DVI-D Port The DVI-D port supports DVI-D specifictation. Connect a monitor that supports DVI-D connection to this port. LAN Port The LAN port provides Internet connection of Gigabit Ethernet with...
Manual - Page 19
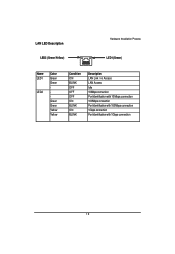
... (Green/Yellow)
Hardware Installation Process LED1 (Green)
Name LED1
LED2
Color Green Green Green Green Yellow Yellow
Condition ON BLINK OFF OFF OFF ON BLINK ON BLINK
Description LAN Link / no Access LAN Access Idle 10Mbps connection Port identification with 10 Mbps connection 100Mbps connection Port identification with 100Mbps connection 1Gbps connection Port identification with 1Gbps...
Manual - Page 22
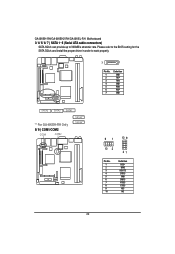
GA-6KIEH-RH/GA-6KIEH2-RH/GA-6KIEL-RH Motherboard 3/ 4/ 5/ 6/ 7 ) SATA 1~5 (Serial ATA cable connectors)
SATA 3Gb/s can provide up to 300MB/s stransfer rate. Please refer to the BIOS setting for the SATA 3Gb/s and install the proper driver in order to work properly.
7
1
Pin No. 1 2 3 4 5 6 7
Definition GND TXP TXN GND RXN RXP GND
SATA5 SATA2 SATA1
** For GA-6KIEH-RH Only
8/ 9 ) COM1/COM2
...
Manual - Page 24
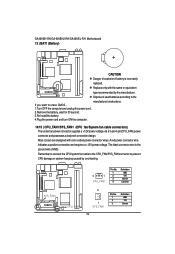
GA-6KIEH-RH/GA-6KIEH2-RH/GA-6KIEL-RH Motherboard 13 ) BAT1 (Battery)
CAUTION Danger of explosion if battery is incorrectly replaced. Replace only with the same or equivalent type recommended by the manufacturer. Dispose of used batteries according to the manufacturer's instructions. If you want to erase CMOS... 1.Turn OFF the computer and unplug the power cord. 2.Remove the battery, wait...
Manual - Page 29
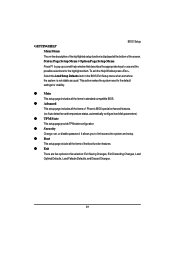
.... To exit the Help Window press .
Select the Load Setup Defaults item in the BIOS Exit Setup menu when somehow the system is not stable as usual. This action makes the system reset to the default settings for stability.
z Main This setup page includes all the items in standard compatible BIOS.
z Advanced This setup page includes all the items...
Manual - Page 31
BIOS Setup
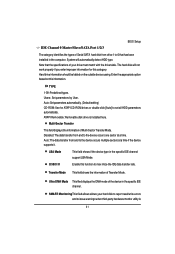
IDE Channel 0 Master/Slave/SATA Port 1/2/3
The category identifies the types of Serial SATA hard disk from drive 1 to 6 that has been installed in the computer. System will automatically detect HDD type. Note that the specifications of your drive must match with the drive table. The hard disk will not work properly if you enter improper information for this category. Hard drive ...
Manual - Page 32
GA-6KIEH-RH/GA-6KIEL-RH Motherboard installed
Halt On
The category determines whether the computer will stop if an error is detected during power up.
No Errors
The system boot will not stop for any error that may be detected and you will be prompted.
All, But Keyboard
The system boot will not stop for a keyboard error; it will stop for all other...
Manual - Page 34
GA-6KIEH-RH/GA-6KIEL-RH Motherboard
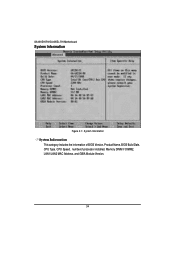
System Information
Figure 2-1: System Information
System Information This category includes the information of BIOS Version, Product Name, BIOS Build Date, CPU Type, CPU Speed, numberof processor installed, Memory DIMM1/ DIMM2, LAN1/LAN2 MAC Address, and GBIA Module Version.
34
Manual - Page 35
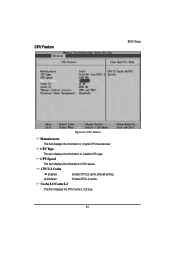
CPU Feature
BIOS Setup
Figure 2-2: CPU Feature
Manufacturer
This item displays the information of original CPU manufacturer.
CPU Type
This item displays the information of installed CPU type.
CPU Speed
This item displays the information of CPU speed.
CPU L2 Cache
Enabled
Enable CPU L2 cache.(Defualt setting)
Disabled
DisableCPU L2 cache.
Cache L1/Cache L2
This item displays the CPU ...
Manual - Page 40
..., when
you install an AGP VGA card and a PCI VGA card on board.
Onboard/AGP Set Init Display First to onbaord AGP Slot. (Default setting)
PCI Slot Set Init Display First to PCI Slot.
Legacy USB Support
This option allows user to function support for legacy USB.
Enabled Enable support for legacy USB. (Default setting)
Disabled Disable support for legacy USB.
LAN1 Controller
Enabled Enable...