Gigabyte GA-8I915P-G driver and firmware
Drivers and firmware downloads for this Gigabyte item
Related Gigabyte GA-8I915P-G Manual Pages
Download the free PDF manual for Gigabyte GA-8I915P-G and other Gigabyte manuals at ManualOwl.com
Manual - Page 2
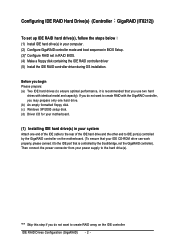
... to create RAID with the GigaRAID controller, you may prepare only one hard drive. (b) An empty formatted floppy disk. (c) Windows XP/2000 setup disk. (d) Driver CD for your motherboard.
(1) Installing IDE hard drive(s) in your system
Attach one end of the IDE cable to the rear of the IDE hard drive and the other end to IDE port(s) controlled by the GigaRAID controller on the motherboard. (To...
Manual - Page 4
... IDE hard drive onto which you want to install
¤¤
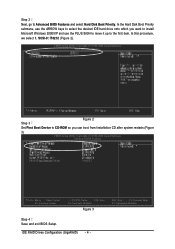
Microsoft Windows 2000/XP and use the PLUS SIGN to move it up to the first item. In this procedure, we select 1. SCSI-0: IT8212 (Figure 2).
¤å
CMOS Setup Utility-Copyright (C) 1984-2004 Award Software
Hard Disk Boot Priority
Step 3
Figure 2
Set First Boot Device to CD-ROM so...
Manual - Page 14
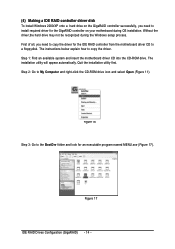
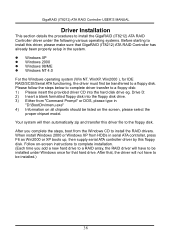
... may not be recognized during the Windows setup process.
¤å
First of all, you need to copy the driver for the IDE RAID controller from the motherboard driver CD to
a floppydisk. The instructions below explain how to copy the driver.
Step 1: Find an available system and insert the motherboard driver CD into the CD-ROM drive. The installation utility will appear automatically. Quit the...
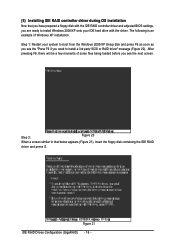
Manual - Page 16
...;
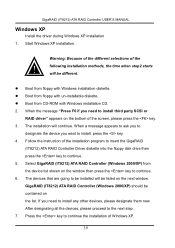
Now that you have prepared a floppy disk with the IDE RAID controller driver and adjusted BIOS settings, you are ready to install Windows 2000/XP onto your IDE hard drive with the driver. The following is an
¤¤
example of Windows XP installation.
¤å
Step 1: Restart your system to boot from the Windows 2000/XP Setup disk and press F6 as soon as...
Manual - Page 17
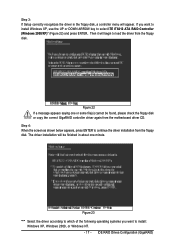
Step 3: If Setup correctly recognizes the driver in the floppy disk, a controller menu will appear. If you want to install Windows XP, use the UP or DOWN ARROW key to select ITE IT8212 ATA RAID Controller (Windows 2000/XP)* (Figure 22) and press ENTER. Then it will begin to load the driver from the floppy disk.
Figure 22 If a message appears saying one or...
Manual - Page 18
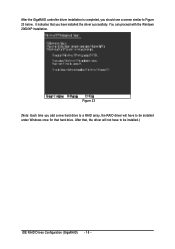
... GigaRAID controller driver installation is completed, you should see a screen similar to Figure
23 below. It indicates that you have installed the driver successfully. You can proceed with the Windows
Åé
2000/XP installation.
¤¤
¤å
Figure 23
(Note: Each time you add a new hard drive to a RAID array, the RAID driver will have to be installed under Windows once...
Manual - Page 3

...) ATA RAID Controller 6 Quick Start ...7 Create Your Disk Array 9 Setup Utility...15 Using the GigaRAID (IT8212) ATA RAID Controller Setup Utility 15 Auto Configuration 17 Define RAID...22 Delete RAID...28 Rebuild RAID 31 RAID Card Configuration 36 Driver Installation ...38 Windows XP 39 Windows 2000 45 Windows SE/ME 53 Windows NT 61 Linux ...69 Install the GigaRAID (IT8212) ATA RAID...
Manual - Page 5
... CPU and firmware on system to handle the RAID function. It can reduce the driver's loading of system CPU and improve the system's ability. Low CPU utilization based on a local processor architecture Compatible with PCI Local bus specification v2.2. Users can easily install our systems to your PCs. Supports PCI power Management v1.0 to reduce power consumption. Supports the drivers for windows...
Manual - Page 6
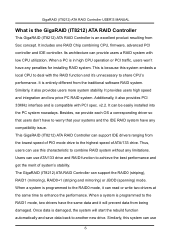
... with PCI spec. v2.2. It can be easily installed into the PC system nowadays. Besides, we provide each OS a corresponding driver so that users don't have to worry that your systems and the IDE RAID system have any compatibility issue. This GigaRAID (IT8212) ATA RAID Controller can support IDE drivers ranging from the lowest speed of PIO mode drive to...
Manual - Page 38
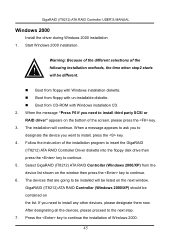
... from the Windows CD to install the RAID drivers. When install Windows 2000 or Windows XP from HDDs in serial ATA controller, press F6 as Win2000 or XP boots up, then supply serial ATA controller driver by this floppy disk. Follow on-screen instructions to complete installation. (Each time you add a new hard drive to a RAID array, the RAID driver will have to be installed under Windows once for...
Manual - Page 39
...appears to ask you to designate the device you want to install, press the key. 4. Follow the instruction of the installation program to insert the GigaRAID (IT8212) ATA RAID Controller Driver diskette into the floppy disk drive then press the key to continue. 5. Select GigaRAID (IT8212) ATA RAID Controller (Windows 2000/XP) from the device list shown on the window then press the key to continue...
Manual - Page 40
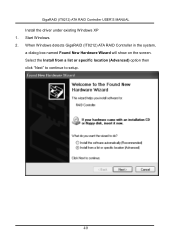
GigaRAID (IT8212) ATA RAID Controller USER'S MANUAL Install the driver under existing Windows XP 1. Start Windows. 2. When Windows detects GigaRAID (IT8212) ATA RAID Controller in the system, a dialog box named Found New Hardware Wizard will show on the screen. Select the Install from a list or specific location (Advanced) option then click "Next" to continue to setup.
40
Manual - Page 43
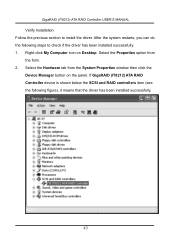
... following steps to check if the driver has been installed successfully. 1. Right-click My Computer icon on Desktop. Select the Properties option from the form. 2. Select the Hardware tab from the System Properties window then click the Device Manager button on the panel. If GigaRAID (IT8212) ATA RAID Controller device is shown below the SCSI and RAID controllers item (see the following figure...
Manual - Page 45
...appears to ask you to designate the device you want to install, press the key. 4. Follow the instruction of the installation program to insert the GigaRAID (IT8212) ATA RAID Controller Driver diskette into the floppy disk drive then press the key to continue. 5. Select GigaRAID (IT8212) ATA RAID Controller (Windows 2000/XP) from the device list shown on the window then press the key to continue...
Manual - Page 53
GigaRAID (IT8212) ATA RAID Controller USER'S MANUAL
Windows SE/ME
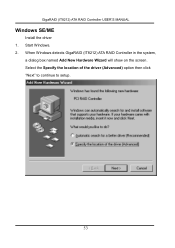
Install the driver 1. Start Windows. 2. When Windows detects GigaRAID (IT8212) ATA RAID Controller in the system,
a dialog box named Add New Hardware Wizard will show on the screen. Select the Specify the location of the driver (Advanced) option then click "Next" to continue to setup.
53
Manual - Page 53
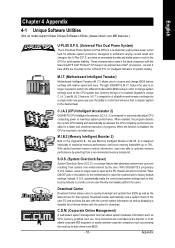
...within BIOS setup in order to change system settings such as the CPU system bus, memory timings or to enabled Gigabyte's unique C.I.A. 2 and M.I.B. 2 features. M.I.T.'s integration of all platform performance settings into a single mode now gives any user the ability to control and enhance their computer system to the desired level.
C.I.A.2 (CPU Intelligent Accelerator 2)
GIGABYTE CPU Intelligent...
Manual - Page 55
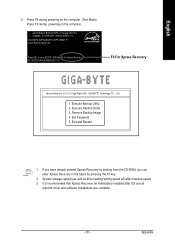
... F9 during powering on the computer .
Award Modular BIOS v6.00PG, An Energy Star Al ly Copyright (C) 1984-2004, Award Software, Inc. Intel 865PE AGPSet BIOS for 8IPE1000MT F1 Check System Health OK . . .
Press DEL to enter SETUP / Q-Flash, F9 For Xpress Recovery 08/16/2002-I845GE-6A69YG01C-00
F9 For Xpress Recovery
Xpress Recovery V1.0 (C) Copy Right 2003. GIGABYTE Technology CO...
Manual - Page 59
... BIOS menu.
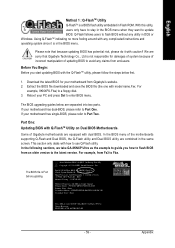
The BIOS upgrading guides below are separated into two parts. If your motherboard has dual-BIOS, please refer to Part One. If your motherboard has single-BIOS, please refer to Part Two.
Part One: Updating BIOS with Q-FlashTM Utility on Dual BIOS Motherboards.
Some of Gigabyte motherboards are equipped with dual BIOS. In the BIOS menu of the motherboards supporting Q-Flash and Dual BIOS...
Manual - Page 66
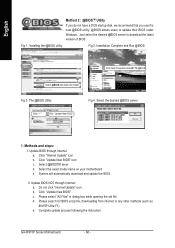
... disk, we recommend that you use the new @BIOS utility. @BIOS allows users to update their BIOS under Windows. Just select the desired @BIOS server to download the latest version of BIOS.
Fig 1. Installing the @BIOS utility
Fig 2. Installation Complete and Run @BIOS
Click Sart/ Programs/ GIGABYTE/@BIOS
Select @BIOS item than click Install
Fig 3. The @BIOS Utility
Click "P"
Click "Update...
Manual - Page 74
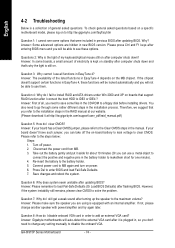
... CD-ROM to a floppy disk before installing drivers. You also need to go through some rather different steps in the installation process. Therefore, we suggest that you refer to the installation steps in the RAID manual at our website. (Please download it at http://tw.giga-byte.com/support/user_pdf/raid_manual.pdf)
Question 5: How do I clear CMOS? Answer: If your board has...