Gigabyte GA-945PL-S3P driver and firmware
Drivers and firmware downloads for this Gigabyte item
Related Gigabyte GA-945PL-S3P Manual Pages
Download the free PDF manual for Gigabyte GA-945PL-S3P and other Gigabyte manuals at ManualOwl.com
Manual - Page 3
...:
„ For quick installation, please refer to the "Hardware Installation Guide" included with the product.
„ For detailed product information and specifications, please carefully read the "Product User Manual".
„ For detailed information related to Gigabyte's unique features, please go to the "Technology Guide" section on Gigabyte's website to read or download the information you need...
Manual - Page 5
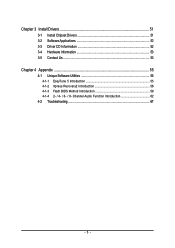
Chapter 3 Install Drivers 51 3-1 Install Chipset Drivers 51 3-2 SoftwareApplications 52 3-3 Driver CD Information 52 3-4 Hardware Information 53 3-5 Contact Us ...53
Chapter 4 Appendix 55 4-1 Unique Software Utilities 55
4-1-1 EasyTune 5 Introduction 55 4-1-2 Xpress Recovery2 Introduction 56 4-1-3 Flash BIOS Method Introduction 58 4-1-4 2- / 4- / 6- / 8- Channel Audio Function ...
Manual - Page 11
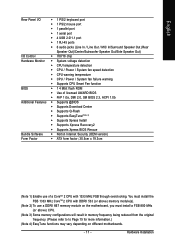
...; Supports Xpress BIOS Rescue
Bundle Software Š Norton Internet Security (OEM version)
Form Factor
Š ATX form factor; 30.5cm x 19.3cm
(Note 1) Enable use of a CoreTM 2 CPU with 1333 MHz FSB through overclocking. You must install the FSB 1333 MHz CoreTM 2 CPU with DDRII 533 (or above) memory module(s).
(Note 2) To use a DDRII 667 memory module on the motherboard, you...
Manual - Page 16
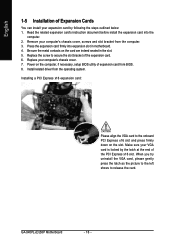
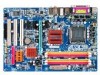
...5. Replace the screw to secure the slot bracket of the expansion card. 6. Replace your computer's chassis cover. 7. Power on the computer, if necessary, setup BIOS utility of expansion card from BIOS. 8. Install related driver from the operating system.
Installing a PCI Express x16 expansion card:
Please align the VGA card to the onboard PCI Express x16 slot and press firmly down on the slot. Make...
Manual - Page 17
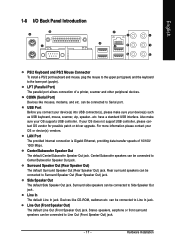
..., mouse, scanner, zip, speaker...etc. have a standard USB interface. Also make sure your OS supports USB controller. If your OS does not support USB controller, please contact OS vendor for possible patch or driver upgrade. For more information please contact your OS or device(s) vendors.
LAN Port The provided Internet connection is Gigabit Ethernet, providing data transfer speeds of 10/100/ 1000...
Manual - Page 22
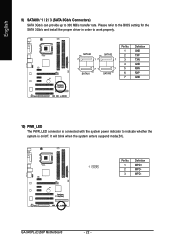
.../s transfer rate. Please refer to the BIOS setting for the SATA 3Gb/s and install the proper driver in order to work properly.
SATAII0
7
17
SATAII2 1
1
71
7
SATAII1
SATAII3
Pin No. 1 2 3 4 5 6 7
Definition GND TXP TXN GND RXN RXP GND
10) PWR_LED The PWR_LED connector is connected with the system power indicator to indicate whether the system is...
Manual - Page 23
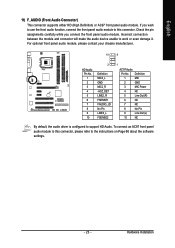
... Pin LINE2_L FSENSE2
1
AC'97 Audio: Pin No. Definition
1
MIC
2
GND
3
MIC Power
4
NC
5
Line Out (R)
6
NC
7
NC
8
No Pin
9
Line Out (L)
10
NC
By default, the audio driver is configured to support HD Audio. To connect an AC97 front panel audio module to this connector, please refer to the instructions on Page 66 about the software settings.
- 23 -
Hardware Installation
Manual - Page 29
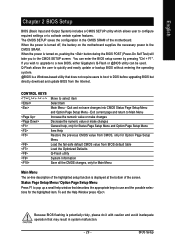
... during the BIOS POST (Power-On Self Test) will take you to the CMOS SETUP screen. You can enter the BIOS setup screen by pressing "Ctrl + F1". If you wish to upgrade to a new BIOS, either Gigabyte's Q-Flash or @BIOS utility can be used. Q-Flash allows the user to quickly and easily update or backup BIOS without entering the operating system. @BIOS is a Windows-based...
Manual - Page 34
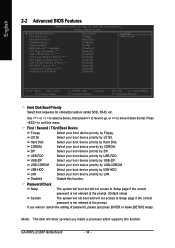
...Disk Boot Priority Select boot sequence for onboard(or add-on cards) SCSI, RAID, etc.
Use < > or < > to select a device,...Setup page if the correct
password is not entered at the prompt.
If you want to cancel the setting of password, please just press ENTER to make [SETUP] empty.
(Note) This item will show up when you install a processor which supports this function.
GA-945PL-(D)S3P Motherboard...
Manual - Page 35

... this function.
Full Screen LOGO Show
Enabled Disabled
Show full screen logo at system startup. (Default value) Disable this function. If you wish to see BIOS POST screen, set this item to "Disabled".
(Note) This item will show up when you install a processor which supports this function.
- 35 -
BIOS Setup
Manual - Page 51
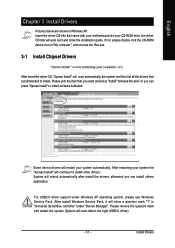
...continue to install other drivers. System will reboot automatically after install the drivers, afterward you can install others application.
For USB2.0 driver support under Windows XP operating system, please use Windows Service Pack. After install Windows Service Pack, it will show a question mark "?" in "Universal Serial Bus controller" under "Device Manager". Please remove the question mark and...
Manual - Page 52
English
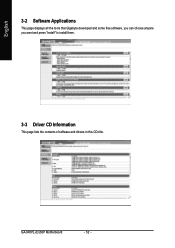
3-2 Software Applications
This page displays all the tools that Gigabyte developed and some free software, you can choose anyone you want and press "install" to install them.
3-3 Driver CD Information
This page lists the contents of software and drivers in this CD-title.
GA-945PL-(D)S3P Motherboard
- 52 -
Manual - Page 56
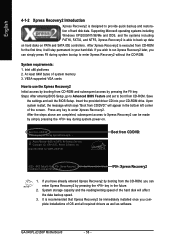
... bytes of system memory 3. VESA-supported VGA cards
How to use the Xpress Recovery2
Initial access by booting from CD-ROM and subsequent access by pressing the F9 key: Steps: After entering BIOS Setup, go to Advanced BIOS Feature and set to boot from CD-ROM. Save
the settings and exit the BIOS Setup. Insert the provided driver CD into your CD-ROM drive. Upon system...
Manual - Page 57
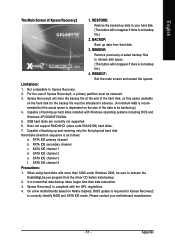
... under Windows 2000, be sure to execute the
EnableBigLba.exe program from the driver CD before data backup.
2. It is normal that data backup takes longer time than data restoration.
3. Xpress Recovery2 is compliant with the GPL regulations.
4. On a few motherboards based on Nvidia chipsets, BIOS update is required for Xpress Recovery2
to correctly identify RAID and SATA...
Manual - Page 58
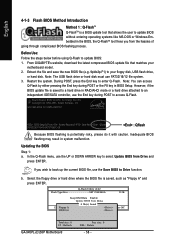
... the Save BIOS to Drive function.
b. Select the floppy drive or hard drive where the BIOS file is saved, such as "Floppy A" and press ENTER.
Q-Flash Utility v2.02 Flash Type/Size SST 25LF040A
512K
Keep DMI Data Enable
Update BIOS from Drive
Sa0vefilBeI(Os)SfotounDdrive
EnteFr l:oRppuyn A
:Move
ESC:Reset :Power Off
HDD 0-0
Total size : 0 F5 : Refresh
GA-945PL-(D)S3P Motherboard
Free...
Manual - Page 60
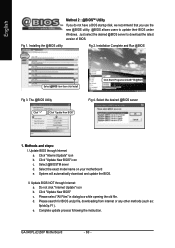
... download and update the BIOS.
II. Update BIOS NOT through Internet: a. Do not click "Internet Update" icon b. Click "Update New BIOS" c. Please select "All Files" in dialog box while opening the old file. d. Please search for BIOS unzip file, downloading from internet or any other methods (such as: 9plds3p.F1). e. Complete update process following the instruction.
GA-945PL-(D)S3P Motherboard...
Manual - Page 62
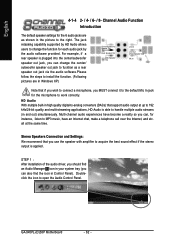
... Settings: We recommend that you use the speaker with amplifier to acquire the best sound effect if the stereo output is applied.
STEP 1 : After installation of the audio driver, you should find an Audio Manager icon in your system tray (you can also find the icon in Control Panel). Doubleclick the icon to open the Audio Control Panel.
GA-945PL-(D)S3P Motherboard...
Manual - Page 63
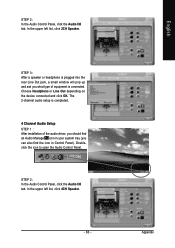
... window will pop up and ask you what type of equipment is connected. Choose Headphone or Line Out depending on the device connected and click OK. The 2-channel audio setup is completed.
4 Channel Audio Setup STEP 1 : After installation of the audio driver, you should find an Audio Manager icon in your system tray (you can also find the icon in Control...
Manual - Page 64
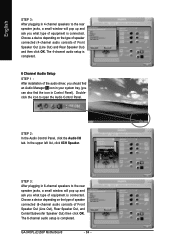
... to the rear speaker jacks, a small window will pop up and ask you what type of equipment is connected. Choose a device depending on the type of speaker connected (6-channel audio consists of Front Speaker Out (Line Out), Rear Speaker Out, and Center/Subwoofer Speaker Out) then click OK. The 6-channel audio setup is completed.
GA-945PL-(D)S3P Motherboard
- 64 -
Manual - Page 65
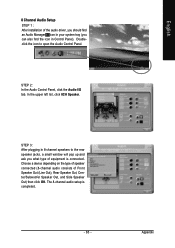
8 Channel Audio Setup STEP 1 : After installation of the audio driver, you should find an Audio Manager icon in your system tray (you can also find the icon in Control Panel). Doubleclick the icon to open the Audio Control Panel.
STEP 2: In the Audio Control Panel, click the Audio I/O tab. In the upper left list, click 8CH Speaker.
STEP 3: After plugging in 8-channel speakers...