Gigabyte GA-970A-DS3 driver and firmware
Drivers and firmware downloads for this Gigabyte item

Related Gigabyte GA-970A-DS3 Manual Pages
Download the free PDF manual for Gigabyte GA-970A-DS3 and other Gigabyte manuals at ManualOwl.com
Manual - Page 3
..., carefully read the User's Manual.
For product-related information, check on our website at: http://www.gigabyte.com
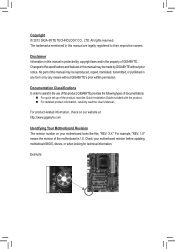
Identifying Your Motherboard Revision The revision number on your motherboard looks like this: "REV: X.X." For example, "REV: 1.0" means the revision of the motherboard is 1.0. Check your motherboard revision before updating motherboard BIOS, drivers, or when looking for technical...
Manual - Page 4
Table of Contents
GA-970A-DS3 Motherboard Layout 5 GA-970A-DS3 Motherboard Block Diagram 6
Chapter 1 Hardware Installation 7 1-1 Installation Precautions 7 1-2 Product Specifications 8 1-3 Installing the CPU 10 1-4 Installing the Memory 11 1-5 Installing an Expansion Card 11 1-6 Back Panel Connectors 12 1-7 Internal Connectors 13
Chapter 2 BIOS Setup 20 2-1 Startup Screen 20 2-2 The ...
Manual - Page 5
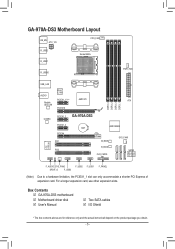
...F_USB2
F_USB1
F_PANEL
(Note) Due to a hardware limitation, the PCIEX1_1 slot can only accommodate a shorter PCI Express x1 expansion card. For a longer expansion card, use other expansion slots.
Box Contents 55 GA-970A-DS3 motherboard 55 Motherboard driver disk 55 User's Manual
55 Two SATA cables 55 I/O Shield
* The box contents above are for reference only and the actual items shall depend...
Manual - Page 7

... a motherboard, CPU or memory. If you do not have an ESD wrist strap, keep your hands dry and first touch a metal object to eliminate static electricity. •• Prior to installing the motherboard, please have it on top of an antistatic pad or within an electrostatic shielding container. •• Before unplugging the power supply cable from...
Manual - Page 8
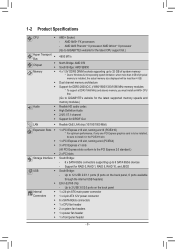
... Phenom™ II processor/ AMD Athlon™ II processor
(Go to GIGABYTE's website for the latest CPU support list.)
Hyper Transport Bus
ŠŠ
4800 MT/s
Chipset
ŠŠ North Bridge: AMD 970 ŠŠ South Bridge: AMD SB950
Memory
ŠŠ 4 x 1.5V DDR3 DIMM sockets supporting up to 32 GB of system memory * Due to Windows 32-bit operating system...
Manual - Page 9
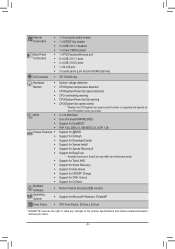
... by motherboard model.
ŠŠ Support for Turbo XHD
ŠŠ Support for Smart Recovery
ŠŠ Support for Auto Green
ŠŠ Support for ON/OFF Charge
ŠŠ Support for 3TB+ Unlock
ŠŠ Support for Q-Share
Bundled Software
ŠŠ Norton Internet Security (OEM version)
Operating System
ŠŠ Support for Microsoft® Windows 7/Vista...
Manual - Page 10
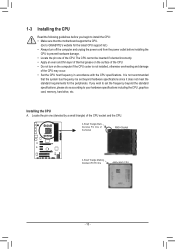
... before you begin to install the CPU: •• Make sure that the motherboard supports the CPU.
(Go to GIGABYTE's website for the latest CPU support list.) •• Always turn off the computer and unplug the power cord from the power outlet before installing the
CPU to prevent hardware damage. •• Locate the pin one of the CPU. The CPU cannot be inserted...
Manual - Page 20
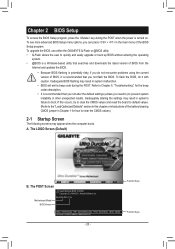
... "Load Optimized Defaults" section in this chapter or introductions of the battery/clearing CMOS jumper in Chapter 1 for how to clear the CMOS values.)
2-1 Startup Screen
The following screens may appear when the computer boots.
A. The LOGO Screen (Default)
B. The POST Screen
Motherboard Model BIOS Version
Award Modular BIOS v6.00PG Copyright (C) 1984-2011, Award Software, Inc.
GA-970A-DS3...
Manual - Page 22
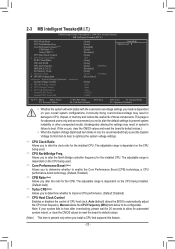
... Tweaker(M.I.T.)
CMOS Setup Utility-Copyright (C) 1984-2011 Award Software MB Intelligent Tweaker(M.I.T.)
CPU Clock Ratio CPU NorthBridge Freq. Core Performance Boost (Note) CPB Ratio (Note) Turbo CPB (Note) CPU Host Clock Control x CPU Frequency(MHz) PCIE Clock(MHz) HT Link Width HT Link Frequency DREAM E.O.C.P Set Memory Clock x Memory Clock } DRAM...
Manual - Page 23

...Auto lets BIOS automatically set the memory clock as required. Manual allows the memory clock control item below to be configurable. (Default: Auto)
&& Memory Clock This option is configurable only when Set Memory Clock is set to Manual. The adjustable range is dependent on the CPU being installed.
&& DRAM Configuration
CMOS Setup Utility-Copyright (C) 1984-2011 Award Software DRAM Configuration...
Manual - Page 27
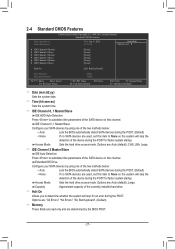
... BIOS automatically detect SATA devices during the POST. (Default) •• None If no SATA devices are used, set this item to None so the system will skip the detection of the device during the POST for faster system startup. Access Mode Sets the hard drive access mode. Options are: Auto (default), Large. Capacity Approximate capacity of the currently installed...
Manual - Page 28
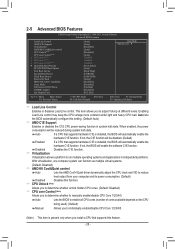
... Option First Boot Device Second Boot Device Third Boot Device Password Check HDD S.M.A.R.T. Capability Away Mode Full Screen LOGO Show IOMMU support Init Display First
[Auto] [Auto] [Disabled] [Auto] [Disabled] [Auto] Enabled Enabled Enabled [Press Enter] [Auto] [Hard Disk] [CDROM] [USB-FDD] [Setup] [Disabled] [Disabled] [Enabled] [Disabled] [PCI Slot]
Item Help...
Manual - Page 29
... lets the BIOS automatically configure this setting depending on the hard drive you install. (Default: Auto)
&& First/Second/Third Boot Device Specifies the boot order from the available devices. Use the up or down arrow key to select a device and press to accept. Options are: LS120, Hard Disk, CDROM, ZIP, USB-FDD, USB-ZIP, USB-CDROM, USB-HDD, Legacy LAN, Disabled.
&& Password Check Specifies...
Manual - Page 30
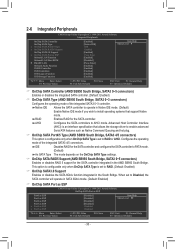
... Setup Utility-Copyright (C) 1984-2011 Award Software Integrated Peripherals
OnChip SATA Controller OnChip SATA Type x OnChip SATA Port4/5 Type x OnChip SATA RAID5 Support OnChip SATA3.0 Support x OnChip SATA Port as ESP Onboard LAN Function Onboard LAN Boot ROM } SMART LAN Onboard Audio Function USB30 Controller USB Controllers USB Legacy Function USB Storage...
Manual - Page 31
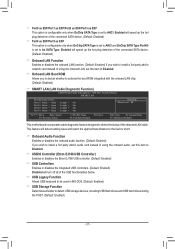
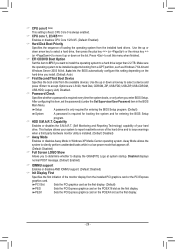
... you wish to install a 3rd party add-in network card instead of using the onboard LAN, set this item to Disabled.
&& Onboard LAN Boot ROM Allows you to decide whether to activate the boot ROM integrated with the onboard LAN chip. (Default: Disabled)
&& SMART LAN (LAN Cable Diagnostic Function)
CMOS Setup Utility-Copyright (C) 1984-2011 Award Software SMART LAN
Start detecting at Port..... Part1...
Manual - Page 32
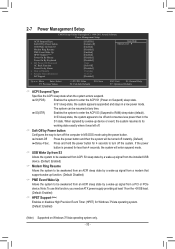
2-7 Power Management Setup
CMOS Setup Utility-Copyright (C) 1984-2011 Award Software Power Management Setup
ACPI Suspend Type Soft-Off by Power button USB Wake Up from S3 Modem Ring Resume PME Event Wake Up HPET Support (Note) Power On By Mouse Power On By Keyboard x KB Power ON Password AC Back Function Power-On by Alarm x Date (of Month) x Resume Time (hh:mm:...
Manual - Page 35
...most stable BIOS settings for the motherboard.
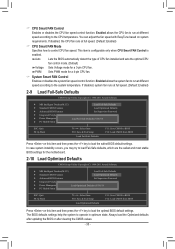
2-10 Load Optimized Defaults
CMOS Setup Utility-Copyright (C) 1984-2011 Award Software
MB Intelligent Tweaker(M.I.T.)
Load Fail-Safe Defaults
Standard CMOS Features
Load Optimized Defaults
Advanced BIOS Features
Set Supervisor Password
Integrated Peripherals
Set User Password
Power Management Setup...
Manual - Page 37
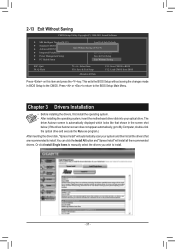
... to the CMOS. Press or to return to the BIOS Setup Main Menu.
Chapter 3 Drivers Installation
•• Before installing the drivers, first install the operating system. •• After installing the operating system, insert the motherboard driver disk into your optical drive. The
driver Autorun screen is automatically displayed which looks like that shown in the screen shot below...
Manual - Page 38
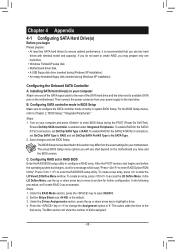
...Controller A. Installing SATA hard drive(s) in your computer
Attach one end of the SATA signal cable to the rear of the SATA hard drive and the other end to available SATA port on the motherboard. Then connect the power connector from your power supply to the hard drive. B. Configuring SATA controller mode in BIOS Setup Make sure to configure the SATA controller mode correctly in system BIOS Setup...
Manual - Page 39
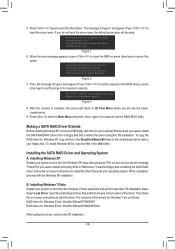
...exit the RAID BIOS utility.
Making a SATA RAID Driver Diskette
Before installing Windows XP, connect a USB floppy disk drive to your computer first because you need to install the SATA RAID/AHCI driver from a floppy disk that contains the driver during the OS installation. To copy the RAID driver for Windows XP, copy all files in the \BootDrv\SBxxx\x86 folder in the motherboard driver disk to your...