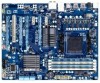
Gigabyte GA-990FXA-D3 driver and firmware
Drivers and firmware downloads for this Gigabyte item
Related Gigabyte GA-990FXA-D3 Manual Pages
Download the free PDF manual for Gigabyte GA-990FXA-D3 and other Gigabyte manuals at ManualOwl.com
Manual - Page 3
..., carefully read the User's Manual.
For product-related information, check on our website at: http://www.gigabyte.com
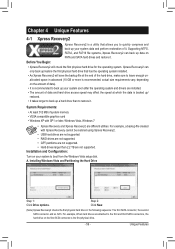
Identifying Your Motherboard Revision The revision number on your motherboard looks like this: "REV: X.X." For example, "REV: 1.0" means the revision of the motherboard is 1.0. Check your motherboard revision before updating motherboard BIOS, drivers, or when looking for technical...
Manual - Page 5
... BIOS with the Q-Flash Utility 62 4-2-2 Updating the BIOS with the @BIOS Utility 65 4-3 EasyTune 6...66 4-4 Easy Energy Saver 67 4-5 Q-Share...69 4-6 SMART Recovery 70 4-7 Auto Green...71 4-8 Cloud OC...72
Chapter 5 Appendix...73 5-1 Configuring SATA Hard Drive(s 73
5-1-1 Configuring SATA Controllers 73 5-1-2 Installing the SATA RAID/AHCI Driver and Operating System 79 5-2 Configuring Audio...
Manual - Page 12
... may differ by motherboard model.
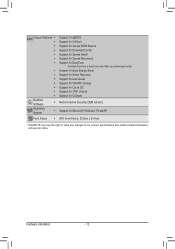
ŠŠ Support for Easy Energy Saver
ŠŠ Support for Smart Recovery
ŠŠ Support for Auto Green
ŠŠ Support for ON/OFF Charge
ŠŠ Support for Cloud OC
ŠŠ Support for 3TB+ Unlock
ŠŠ Support for Q-Share
Bundled Software
ŠŠ Norton Internet Security (OEM version)
Operating System
Š...
Manual - Page 19
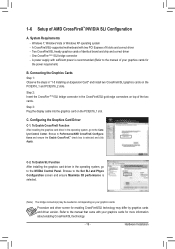
... - Windows 7, Windows Vista or Windows XP operating system - A CrossFireX/SLI-supported motherboard with two PCI Express x16 slots and correct driver - Two CrossFireX/SLI-ready graphics cards of identical brand and chip and correct driver - One CrossFire (Note )/SLI bridge connector - A power supply with sufficient power is recommended (Refer to the manual of your graphics cards for...
Manual - Page 31
... menu of the BIOS Setup program.
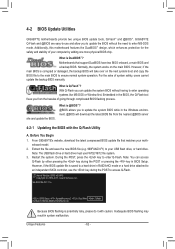
To upgrade the BIOS, use either the GIGABYTE Q-Flash or @BIOS utility. •• Q-Flash allows the user to quickly and easily upgrade or back up BIOS without entering the operating
system. •• @BIOS is a Windows-based utility that searches and downloads the latest version of BIOS from the
Internet and updates the BIOS. For instructions on using the...
Manual - Page 43
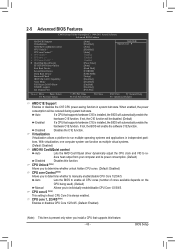
...Boot Option First Boot Device Second Boot Device Third Boot Device Password Check HDD S.M.A.R.T. Capability Away Mode Full Screen LOGO Show IOMMU support Init Display First
[Auto] [Disabled] [Auto] [Disabled] [Auto] Enabled Enabled Enabled [Press Enter] [Auto] [Hard Disk] [CDROM] [USB-FDD] [Setup] [Disabled] [Disabled] [Enabled] [Disabled] [PCI Slot]
Item Help Menu...
Manual - Page 45
...-2011 Award Software Integrated Peripherals
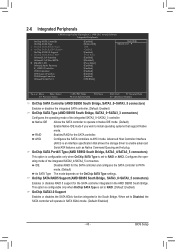
OnChip SATA Controller OnChip SATA Type x OnChip SATA Port4/5 Type x OnChip SATA RAID5 Support OnChip SATA3.0 Support x OnChip SATA Port as ESP Onboard LAN Function Onboard LAN Boot ROM } SMART LAN Onboard Audio Function R_USB30 Controller USB Controllers USB Legacy Function USB Storage Function Onboard Serial Port...
Manual - Page 48
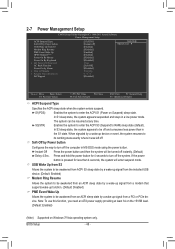
.... (Default: Disabled) PME Event Wake Up
Allows the system to be awakened from an ACPI sleep state by a wake-up signal from a PCI or PCIe device. Note: To use this function, you need an ATX power supply providing at least 1A on the +5VSB lead. (Default: Enabled)
(Note) Supported on Windows 7/Vista operating system only.
BIOS Setup
- 48 -
Manual - Page 55
... want to manually select the utilities to install on the Application Software page later.
•• For USB 2.0 driver support under the Windows XP operating system, please install the Windows XP Service Pack 1 or later. After installing the SP1 (or later), if a question mark still exists in Universal Serial Bus Controller in Device Manager, please remove the question mark (by rightclicking...
Manual - Page 56
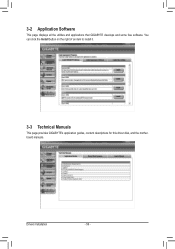
3-2 Application Software
This page displays all the utilities and applications that GIGABYTE develops and some free software. You can click the Install button on the right of an item to install it.
3-3 Technical Manuals
This page provides GIGABYTE's application guides, content descriptions for this driver disk, and the motherboard manuals.
Drivers Installation
- 56 -
Manual - Page 58
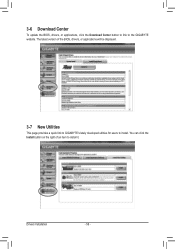
... Download Center
To update the BIOS, drivers, or applications, click the Download Center button to link to the GIGABYTE website. The latest version of the BIOS, drivers, or applications will be displayed.
3-7 New Utilities
This page provides a quick link to GIGABYTE's lately developed utilities for users to install. You can click the Install button on the right of an item to install it.
Drivers...
Manual - Page 59
...•• USB hard drives are not supported. •• RAID drives are not supported. •• GPT partitions are not supported. •• Hard drives larger than 2.2 TB are not supported. Installation and Configuration: Turn on your system to boot from the Windows Vista setup disk. A. Installing Windows Vista and Partitioning the Hard Drive
Step 1: Click Drive options.
Step...
Manual - Page 62
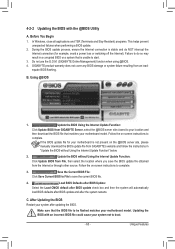
... during the POST or pressing the key in BIOS Setup. However, if the BIOS update file is saved to a hard drive in RAID/AHCI mode or a hard drive attached to an independent SATA controller, use the key during the POST to access Q-Flash.
Award Modular BIOS v6.00PG Copyright (C) 1984-2011, Award Software, Inc.
GA-990FXA-D3 F1a . . . .
: BIOS Setup : XpressRecovery2 : Boot Menu : Qflash 05/06/2011...
Manual - Page 65
... flashing.
B. Using @BIOS
1.
Update the BIOS Using the Internet Update Function:
Click Update BIOS from GIGABYTE Server, select the @BIOS server site closest to your location and
then download the BIOS file that matches your motherboard model. Follow the on-screen instructions to
complete. If the BIOS update file for your motherboard is not present on the @BIOS server site, please
manually...
Manual - Page 66
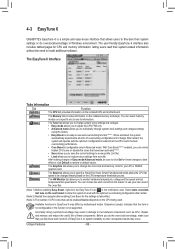
4-3 EasyTune 6
GIGABYTE's EasyTune 6 is a simple and easy-to-use interface that allows users to fine-tune their system settings or do overclock/overvoltage in Windows environment. The user-friendly EasyTune 6 interface also includes tabbed pages for CPU and memory information, letting users read their system-related information without the need to install additional software.
The EasyTune 6 ...
Manual - Page 69
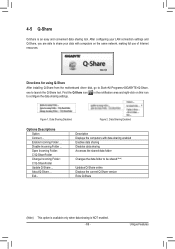
... easy and convenient data sharing tool. After configuring your LAN connection settings and Q-Share, you are able to share your data with computers on the same network, making full use of Internet resources.
Directions for using Q-Share
After installing Q-Share from the motherboard driver disk, go to Start>All Programs>GIGABYTE>Q-Share.
exe to launch the Q-Share tool. Find the...
Manual - Page 73
... one hard drive. •• Windows 7/Vista/XP setup disk. •• Motherboard driver disk. •• A USB floppy disk drive (needed during Windows XP installation) •• An empty formatted floppy disk (needed during Windows XP installation)
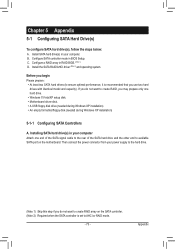
5-1-1 Configuring SATA Controllers
A. Installing SATA hard drive(s) in your computer Attach one end of the SATA signal cable to the...
Manual - Page 79
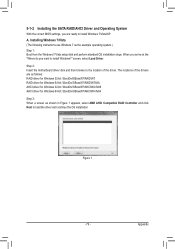
5-1-2 Installing the SATA RAID/AHCI Driver and Operating System
With the correct BIOS settings, you are ready to install Windows 7/Vista/XP. A. Installing Windows 7/Vista (The following instructions use Windows 7 as the example operating system.) Step 1: Boot from the Windows 7/Vista setup disk and perform standard OS installation steps. When you arrive at the "Where do you want to install Windows...
Manual - Page 80
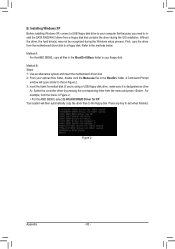
... Installing Windows XP Before installing Windows XP, connect a USB floppy disk drive to your computer first because you need to install the SATA RAID/AHCI driver from a floppy disk that contains the driver during the OS installation. Without the driver, the hard drive(s) may not be recognized during the Windows setup process. First, copy the driver from the motherboard driver disk to a floppy disk...
Manual - Page 89
... Bus Driver for High Definition Audio and select Disable and Uninstall. Step 4: In Device Manager, right-click on the computer name and select Scan for hardware changes. When the Add New Hardware Wizard appears, click Cancel. Then install the onboard HD audio driver from the motherboard driver disk or download the audio driver from GIGABYTE's website to install. For more details, go to the Support...