Gigabyte GA-EG41MFT-US2H driver and firmware
Drivers and firmware downloads for this Gigabyte item

Related Gigabyte GA-EG41MFT-US2H Manual Pages
Download the free PDF manual for Gigabyte GA-EG41MFT-US2H and other Gigabyte manuals at ManualOwl.com
Manual - Page 3
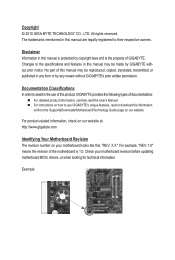
...order to assist in the use of this product, GIGABYTE provides the following types of documentations:
For detailed product information, carefully read the User's Manual. For instructions on how to use GIGABYTE's unique features, read or download the information on/from the Support&Downloads\Motherboard\Technology Guide page on our website.
For product-related information, check...
Manual - Page 5

Chapter 3 Drivers Installation 59 3-1 Installing Chipset Drivers 59 3-2 Application Software 60 3-3 Technical Manuals 60 3-4 Contact...61 3-5 System...61 3-6 Download Center 62 3-7 New Utilities...62
Chapter 4 Unique Features 63 4-1 Xpress Recovery2 63 4-2 BIOS Update Utilities 66
4-2-1 Updating the BIOS with the Q-Flash Utility 66 4-2-2 Updating the BIOS with the @BIOS Utility 69 4-3 ...
Manual - Page 12
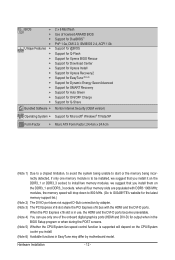
... memory support list.)
(Note 2) The DVI-D port does not support D-Sub connection by adapter. (Note 3) The PCI Express x16 slot share the PCI Express x16 bus with the HDMI and the DVI-D ports.
When the PCI Express x16 slot is in use, the HDMI and the DVI-D ports become unavailable. (Note 4) You can use only one of the onboard digital graphics ports (HDMI and DVI-D) for output when in the
BIOS Setup...
Manual - Page 16
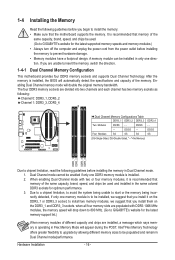
... you begin to install the memory: • Make sure that the motherboard supports the memory. It is recommended that memory of the
same capacity, brand, speed, and chips be used. (Go to GIGABYTE's website for the latest supported memory speeds and memory modules.) • Always turn off the computer and unplug the power cord from the power outlet before installing the memory to prevent hardware...
Manual - Page 18
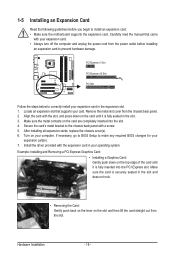
... guidelines before you begin to install an expansion card: • Make sure the motherboard supports the expansion card. Carefully read the manual that came
with your expansion card. • Always turn off the computer and unplug the power cord from the power outlet before installing
an expansion card to prevent hardware damage.
PCI Express x1 Slot
PCI Express x16 Slot
PCI Slot
Follow the steps...
Manual - Page 19
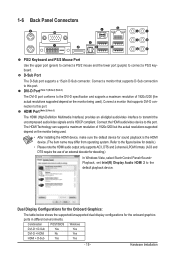
..., select Start>Control Panel>Sound> Playback, set Intel(R) Display Audio HDMI 2 to the default playback device.
Dual Display Configurations for the Onboard Graphics:
The table below shows the supported/unsupported dual display configurations for the onboard graphics ports in different environments.
Combination
POST/BIOS Windows
DVI-D + D-Sub Yes Yes
DVI-D + HDMI No Yes
HDMI + D-Sub...
Manual - Page 31
... of the BIOS Setup program.
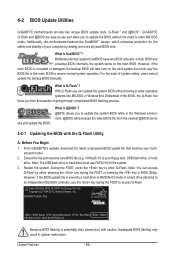
To upgrade the BIOS, use either the GIGABYTE Q-Flash or @BIOS utility. • Q-Flash allows the user to quickly and easily upgrade or back up BIOS without entering the operating
system. • @BIOS is a Windows-based utility that searches and downloads the latest version of BIOS from the
Internet and updates the BIOS. For instructions on using the Q-Flash and @BIOS...
Manual - Page 45
... to HDD
Allows the system to copy the BIOS image file to the hard drive. If the system BIOS is corrupted, it will be recovered from this image file. (Default: Disabled)
(Note) This item is present only if you install a CPU that supports this feature. For more information about Intel CPUs' unique features, please visit Intel's website.
- 45 -
BIOS Setup
Manual - Page 46
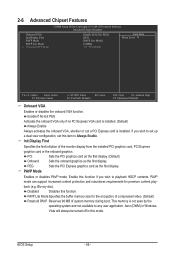
... display. PEG Sets the PCI Express graphics card as the first display. PAVP Mode
Enables or disables PAVP mode. Enable this function if you wish to playback HDCP contents. PAVP mode can support increased content protection and robustness requirements for premium content playback (e.g. Blu-ray disc).
Disabled Disables this function. PAVP Lite Mode Specifies the buffer memory...
Manual - Page 49
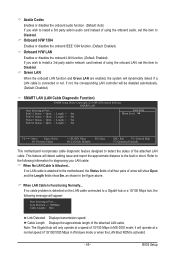
... LAN, set this item to Disabled. Green LAN When the onboard LAN function and Green LAN are enabled, the system will dynamically detect if a LAN cable is connected or not. If not, the corresponding LAN controller will be disabled automatically. (Default: Disabled)
SMART LAN (LAN Cable Diagnostic Function)
CMOS Setup Utility-Copyright (C) 1984-2010 Award Software SMART LAN
Start detecting at Port...
Manual - Page 59
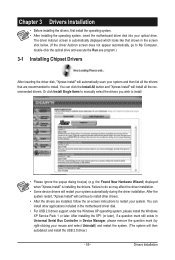
... drivers are installed, follow the on-screen instructions to restart your system. You can install other applications included in the motherboard driver disk.
• For USB 2.0 driver support under the Windows XP operating system, please install the Windows XP Service Pack 1 or later. After installing the SP1 (or later), if a question mark still exists in Universal Serial Bus Controller in Device...
Manual - Page 60
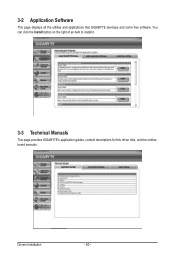
3-2 Application Software
This page displays all the utilities and applications that GIGABYTE develops and some free software. You can click the Install button on the right of an item to install it.
3-3 Technical Manuals
This page provides GIGABYTE's application guides, content descriptions for this driver disk, and the motherboard manuals.
Drivers Installation
- 60 -
Manual - Page 62
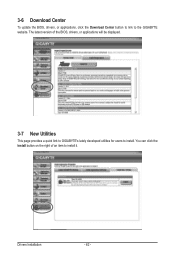
... Download Center
To update the BIOS, drivers, or applications, click the Download Center button to link to the GIGABYTE website. The latest version of the BIOS, drivers, or applications will be displayed.
3-7 New Utilities
This page provides a quick link to GIGABYTE's lately developed utilities for users to install. You can click the Install button on the right of an item to install it.
Drivers...
Manual - Page 63
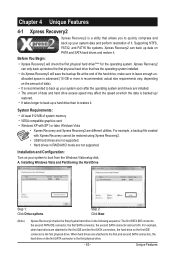
..., a backup file created with Xpress Recovery cannot be restored using Xpress Recovery2.
• USB hard drives are not supported. • Hard drives in RAID/AHCI mode are not supported.
Installation and Configuration: Turn on your system to boot from the Windows Vista setup disk. A. Installing Windows Vista and Partitioning the Hard Drive
Step 1: Click Drive options.
Step 2: Click New.
(Note...
Manual - Page 66
... or pressing the key in BIOS Setup. However, if the BIOS update file is saved to a hard drive in RAID/AHCI mode or a hard drive attached to an independent IDE/SATA controller, use the key during the POST to access Q-Flash.
Award Modular BIOS v6.00PG, An Energy Star Ally Copyright (C) 1984-2010, Award Software, Inc.
EG41MFT-US2H F5a . . . .
: BIOS Setup : XpressRecovery2 : Boot Menu : Qflash 08...
Manual - Page 69
... flashing.
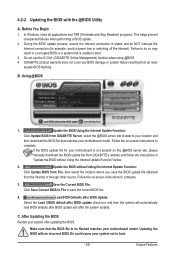
B. Using @BIOS
1.
Update the BIOS Using the Internet Update Function:
Click Update BIOS from GIGABYTE Server, select the @BIOS server site closest to your location and
then download the BIOS file that matches your motherboard model. Follow the on-screen instructions to
complete.
If the BIOS update file for your motherboard is not present on the @BIOS server site, please
manually...
Manual - Page 70

4-3 EasyTune 6
GIGABYTE's EasyTune 6 is a simple and easy-to-use interface that allows users to fine-tune their system settings or do overclock/overvoltage in Windows environment. The user-friendly EasyTune 6 interface also includes tabbed pages for CPU and memory information, letting users read their system-related information without the need to install additional software.
The EasyTune 6 ...
Manual - Page 73
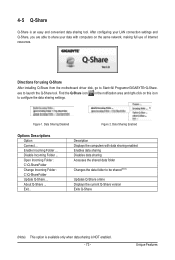
... easy and convenient data sharing tool. After configuring your LAN connection settings and Q-Share, you are able to share your data with computers on the same network, making full use of Internet resources.
Directions for using Q-Share
After installing Q-Share from the motherboard driver disk, go to Start>All Programs>GIGABYTE>Q-Share.
exe to launch the Q-Share tool. Find the...
Manual - Page 77
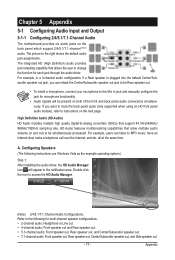
.... For example, users can listen to MP3 music, have an Internet chat, make a telephone call over the Internet, and etc. all at the same time.
A. Configuring Speakers (The following instructions use Windows Vista as the example operating system.)
Step 1: After installing the audio driver, the HD Audio Manager icon will appear in the notification area. Double-click the...
Manual - Page 84
... Bus Driver for High Definition Audio and select Disable and Uninstall. Step 4: In Device Manager, right-click on the computer name and select Scan for hardware changes. When the Add New Hardware Wizard appears, click Cancel. Then install the onboard HD audio driver from the motherboard driver disk or download the audio driver from GIGABYTE's website to install. For more details, go to the Support...