Gigabyte GA-H61M-DS2 driver and firmware
Drivers and firmware downloads for this Gigabyte item
Related Gigabyte GA-H61M-DS2 Manual Pages
Download the free PDF manual for Gigabyte GA-H61M-DS2 and other Gigabyte manuals at ManualOwl.com
Manual - Page 3
..., carefully read the User's Manual. For product-related information, check on our website at: http://www.gigabyte.com
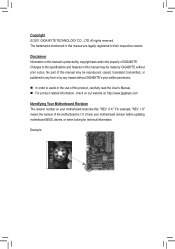
Identifying Your Motherboard Revision The revision number on your motherboard looks like this: "REV: X.X." For example, "REV: 1.0" means the revision of the motherboard is 1.0. Check your motherboard revision before updating motherboard BIOS, drivers, or when looking for...
Manual - Page 4
Table of Contents
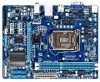
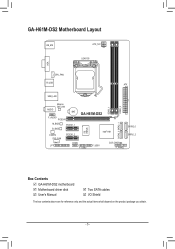
GA-H61M-DS2 Motherboard Layout 5 GA-H61M-DS2 Motherboard Block Diagram 6
Chapter 1 Hardware Installation 7 1-1 Installation Precautions 7 1-2 Product Specifications 8 1-3 Installing the CPU 10 1-4 Installing the Memory 11 1-5 Installing an Expansion Card 11 1-6 Back Panel Connectors 12 1-7 Internal Connectors 13
Chapter 2 BIOS Setup 20 2-1 Startup Screen 20 2-2 The ...
Manual - Page 5
...KB_MS
ATX_12V
LGA1155
VGA
CPU_FAN R_USB
ATX
USB_LAN
DDR3_2
DDR3_1
Atheros GbE LAN
AUDIO
BAT GA-H61M-DS2
F_AUDIO PCIEX16
SATA2_3 SATA2_1
M_BIOS
PCIEX1_1
iTE IT8728
B_BIOS
CODEC SYS_FAN
PCIEX1_2
Intel® H61
COMA
CLR_CMOS
LPT
F_USB1
F_USB2
F_PANEL
SATA2_0 SATA2_2
Box Contents GA-H61M-DS2 motherboard Motherboard driver disk User's Manual
Two SATA cables I/O Shield
The...
Manual - Page 7
... a motherboard, CPU or memory. If you do not have an ESD wrist strap, keep your hands dry and first touch a metal object to eliminate static electricity. •• Prior to installing the motherboard, please have it on top of an antistatic pad or within an electrostatic shielding container. •• Before unplugging the power supply cable from...
Manual - Page 8
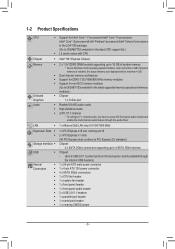
...Express x1 slots (All PCI Express slots conform to PCI Express 2.0 standard.) Chipset: - 4 x SATA 3Gb/s connectors supporting up to 4 SATA 3Gb/s devices Chipset: - Up to 8 USB 2.0/1.1 ports (4 ports on the back panel, 4 ports available through
the internal USB headers) 1 x 24-pin ATX main power connector 1 x 4-pin ATX 12V power connector 4 x SATA 3Gb/s connectors 1 x CPU fan header 1 x system fan...
Manual - Page 9
... BIOS Rescue Support for Download Center Support for Xpress Install Support for Xpress Recovery2 Support for EasyTune
* Available functions in EasyTune may differ by motherboard model. Support for Smart 6™ Support for Auto Green Support for ON/OFF Charge Support for Cloud OC Support for 3TB+ Unlock Support for Q-Share
Norton Internet Security (OEM version)
Support for Microsoft® Windows...
Manual - Page 10
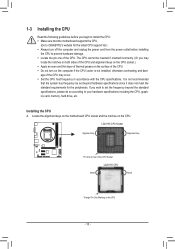
... before you begin to install the CPU: •• Make sure that the motherboard supports the CPU.
(Go to GIGABYTE's website for the latest CPU support list.) •• Always turn off the computer and unplug the power cord from the power outlet before installing
the CPU to prevent hardware damage. •• Locate the pin one of the CPU. The CPU cannot be inserted...
Manual - Page 11
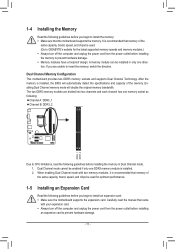
... that memory of the same capacity, brand, speed, and chips be used for optimum performance.
1-5 Installing an Expansion Card
Read the following guidelines before you begin to install an expansion card: •• Make sure the motherboard supports the expansion card. Carefully read the manual that came
with your expansion card. •• Always turn off the computer and unplug the power...
Manual - Page 20
... "Load Optimized Defaults" section in this chapter or introductions of the battery/ clearing CMOS jumper in Chapter 1 for how to clear the CMOS values.)
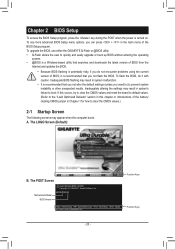
2-1 Startup Screen
The following screens may appear when the computer boots. A. The LOGO Screen (Default):
B. The POST Screen
Motherboard Model BIOS Version
Award Modular BIOS v6.00PG Copyright (C) 1984-2011, Award Software, Inc.
H61M-DS2...
Manual - Page 23
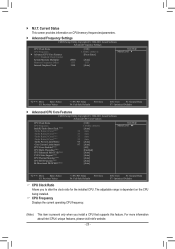
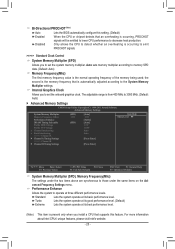
...M.I.T. Current Status This screen provides information on CPU/memory frequencies/parameters.
`` Advanced Frequency Settings
CMOS Setup Utility-Copyright (C) 1984-2011 Award Software Advanced Frequency Settings
CPU Clock Ratio
CPU Frequency
} Advanced CPU Core Features
>>>>> Standard Clock Control
System Memory Multiplier
(SPD)
Memory Frequency (Mhz)
1333
Internal Graphics Clock...
Manual - Page 25
...Note)
Auto Lets the BIOS automatically configure this setting. (Default) Enabled When the CPU or chipset detects that an overheating is occurring, PROCHOT
signals will be emitted to lower CPU performance to decrease heat production. Disabled Only allows the CPU to detect whether an overheating is occurring to emit
PROCHOT signals.
>>>>> Standard Clock Control
System Memory Multiplier (SPD...
Manual - Page 28
.... With virtualization, one computer system can function as multiple virtual systems. (Default: Enabled)
(Note) This item is present only when you install a CPU that supports this feature. For more information about Intel CPUs' unique features, please visit Intel's website.
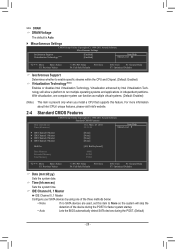
2-4 Standard CMOS Features
CMOS Setup Utility-Copyright (C) 1984-2011 Award Software Standard CMOS Features
Date...
Manual - Page 29
...Second Boot Device Third Boot Device Password Check HDD S.M.A.R.T. Capability Limit CPUID Max. to 3 (Note) No-Execute Memory Protect (Note) Delay For HDD (Secs) Full Screen LOGO Show Init Display First Onboard VGA On-Chip Frame Buffer Size
[Press Enter] [Disabled] [Auto] [Hard Disk] [CDROM] [USB-FDD] [Setup] [Disabled] [Disabled] [Enabled] [0] [Enabled] [PCIE x16...
Manual - Page 30
.... Auto lets the BIOS automatically configure this setting depending on the hard drive you install. (Default: Auto) First/Second/Third Boot Device
Specifies the boot order from the available devices. Use the up or down arrow key to select a device and press to accept. Options are: Hard Disk, CDROM, USB-FDD, USB-ZIP, USB-CDROM, USBHDD, Legacy LAN, Disabled. Password Check
Specifies whether...
Manual - Page 31
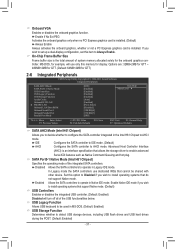
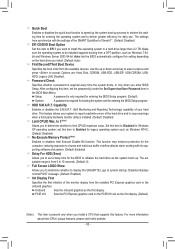
... allows the storage driver to enable advanced
Serial ATA features such as Native Command Queuing and hot plug.
SATA Port0-1 Native Mode (Intel H61 Chipset) Specifies the operating mode of the integrated SATA controllers.
Disabled Allows the SATA controllers to operate in Legacy IDE mode. In Legacy mode the SATA controllers use dedicated IRQs that cannot be shared with
other device. Set this...
Manual - Page 32
... the onboard audio, set this item to Disabled. Onboard H/W LAN Enables or disables the onboard LAN function. (Default: Enabled) If you wish to install a 3rd party add-in network card instead of using the onboard LAN, set this item to Disabled.
SMART LAN (LAN Cable Diagnostic Function)
CMOS Setup Utility-Copyright (C) 1984-2011 Award Software SMART LAN
Start detecting at Port..... Part1-2 Status...
Manual - Page 33

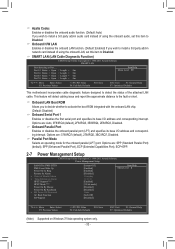
... a wake-up signal from a PCI or PCIe device. Note: To use this function, you need an ATX power supply providing at least 1A on the +5VSB lead. (Default: Enabled) Power On by Ring Allows the system to be awakened from an ACPI sleep state by a wake-up signal from a modem that supports wake-up function. (Default: Enabled...
Manual - Page 35
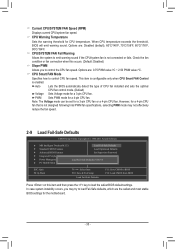
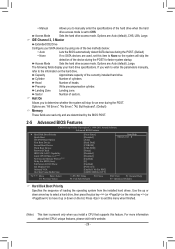
... Fail-Safe Defaults
CMOS Setup Utility-Copyright (C) 1984-2011 Award Software
MB Intelligent Tweaker(M.I.T.)
Load Fail-Safe Defaults
Standard CMOS Features
Load Optimized Defaults
Advanced BIOS Features
Set Supervisor Password
Integrated Peripherals
Set User Password
Power Management Setup PC Health Status
Load Fail-Safe DefaultsS(Yav...
Manual - Page 36

... load the Optimized defaults after updating the BIOS or after clearing the CMOS values.
2-11 Set Supervisor/User Password
CMOS Setup Utility-Copyright (C) 1984-2011 Award Software
MB Intelligent Tweaker(M.I.T.) Standard CMOS Features Advanced BIOS Features Integrated Peripherals Power Management SetupEnter Password: PC Health Status
Load...
Manual - Page 38
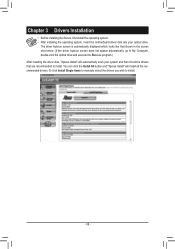
... to My Computer, double-click the optical drive and execute the Run.exe program.) After inserting the driver disk, "Xpress Install" will automatically scan your system and then list all the drivers that are recommended to install. You can click the Install All button and "Xpress Install" will install all the recommended drivers. Or click Install Single Items to manually select the drivers you wish...