Gigabyte GA-H61TN driver and firmware

Related Gigabyte GA-H61TN Manual Pages
Download the free PDF manual for Gigabyte GA-H61TN and other Gigabyte manuals at ManualOwl.com
Manual - Page 6
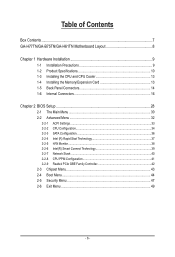
Table of Contents
Box Contents...7 GA-H77TN/GA-B75TN/GA-H61TN Motherboard Layout 8
Chapter 1 Hardware Installation 9 1-1 Installation Precautions 9 1-2 Product Specifications 10 1-3 Installing the CPU and CPU Cooler 13 1-4 Installing the Memory/Expansion Card 13 1-5 Back Panel Connectors 14 1-6 Internal Connectors 16
Chapter 2 BIOS Setup 28 2-1 The Main Menu 30 2-2 Advanced Menu 32
...
Manual - Page 7

Box Contents
;; GA-H77TN or GA-B75TN or GA-H61TN motherboard ;; Motherboard driver disk ;; User's Manual ;; One SATA power cable ;; I/O Shield ;; Screws kit for expansion cards
• The box contents above are for reference only and the actual items shall depend on the product package you obtain.
- 7 -
Manual - Page 9
... a motherboard, CPU or memory. If you do not have an ESD wrist strap, keep your hands dry and first touch a metal object to eliminate static electricity. •• Prior to installing the motherboard, please have it on top of an antistatic pad or within an electrostatic shielding container. •• Before unplugging the power supply cable from...
Manual - Page 10
...the audio driver.
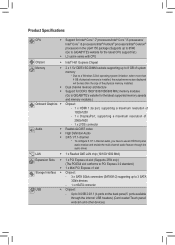
LAN
ŠŠ 1 x Realtek® GbE LAN chip (10/100/1000 Mbit)
Expansion Slots Storage Interface
ŠŠ 1 x PCI Express x4 slot (Supports 25W only) (The PCIEX4 slot conforms to PCI Express 3.0 standard.)
ŠŠ 1 x Mini PCI Express x1 slot
ŠŠ Chipset: GA-H77TN: - 2 x SATA 6Gb/s connectors (SATA0/1) supporting up to 2 SATA 6Gb/s devices - 2 x SATA 3Gb...
Manual - Page 12
... the CPU fan speed control function is supported will depend on the CPU
cooler you install.
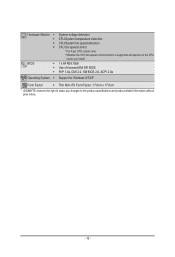
ŠŠ 1 x 64 Mbit flash ŠŠ Use of licensed AMI EFI BIOS ŠŠ PnP 1.0a, DMI 2.0, SM BIOS 2.6, ACPI 2.0a
Operating System ŠŠ Support for Windows 8/7/XP
Form Factor
ŠŠ Thin Mini-ITX Form Factor; 17.0cm x 17.0cm
* GIGABYTE reserves...
Manual - Page 13
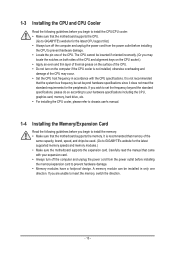
... be used. (Go to GIGABYTE's website for the latest supported memory speeds and memory modules.) •• Make sure the motherboard supports the expansion card. Carefully read the manual that came with your expansion card. •• Always turn off the computer and unplug the power cord from the power outlet before installing the memory/expansion card to prevent hardware damage. •...
Manual - Page 14
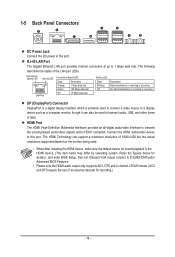
... this port. The HDMI Technology can support a maximum resolution of 1920x1200 but the actual resolutions supported depend on the monitor being used.
• When After installing the HDMI device, make sure the default device for sound playback is the HDMI device. (The item name may differ by operating system. Refer the figures below for details.), and enter BIOS Setup, then set Onboard VGA output...
Manual - Page 16
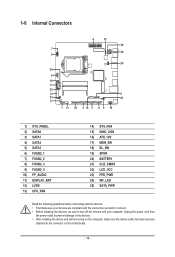
... with the connectors you wish to connect. • Before installing the devices, be sure to turn off the devices and your computer. Unplug the power cord from
the power outlet to prevent damage to the devices. • After installing the device and before turning on the computer, make sure the device cable has been securely
attached to the connector on the motherboard.
- 16 -
Manual - Page 22
..., it is recommended that a system fan be installed inside the chassis.
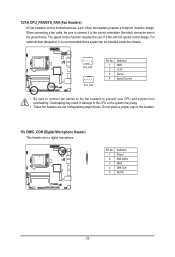
1 CPU_FAN
SYS_FAN
Pin No. 1 2 3 4
Definition GND +12V Sense Speed Control
• Be sure to connect fan cables to the fan headers to prevent your CPU and system from overheating. Overheating may result in damage to the CPU or the system may hang.
• These...
Manual - Page 27
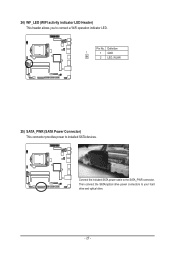
...WF_LED (WIFI activity indicator LED Header) This header allows you to connect a WiFi operation indicator LED.
Pin No. Definition
1
1 GND
2 LED_WLAN
25) SATA_PWR (SATA Power Connector) This connector provides power to installed SATA devices.
Connect the included SATA power cable to the SATA_PWR connector. Then connect the SATA/optical drive power connectors to your hard drive and optical drive...
Manual - Page 31
...
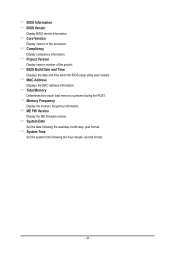
Display version number of the project. && BIOS Build Date and Time
Displays the date and time when the BIOS setup utility was created. && MAC Address
Displays the MAC address information. && Total Memory
Determines how much total memory is present during the POST. && Memory Frequency
Display the memory frequency information. && ME FW Version
Display the ME firmware version. && System Date
Set...
Manual - Page 34
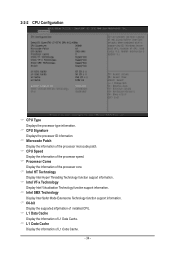
...the processor core.
&& Intel HT Technology Display Intel Hyper Threading Technology function support information.
&& Intel VT-x Technology Display Intel Virtualization Technology function support information.
&& Intel SMX Technology Display Intel Safer Mode Extensions Technology function support information.
&& 64-bit Display the supported infprmation of installed CPU.
&& L1 Data Cache Display the...
Manual - Page 35
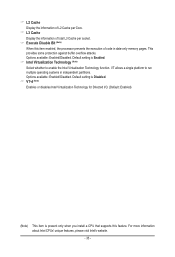
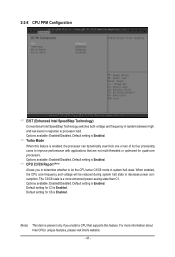
... platform to run multiple operating systems in independent partitions. Options available: Enabled/Disabled. Default setting is Disabled.
&& VT-d (Note) Enables or disables Intel Virtualization Technology for Directed I/O. (Default: Enabled)
(Note) This item is present only when you install a CPU that supports this feature. For more information about Intel CPUs' unique features, please visit Intel...
Manual - Page 36
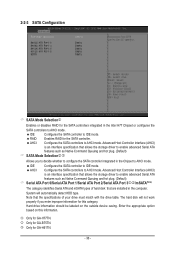
.... Advanced Host Controller Interface (AHCI)
is an interface specification that allows the storage driver to enable advanced Serial ATA
features such as Native Command Queuing and hot plug. (Default)
&& Serial ATA Port 0/Serial ATA Port 1/Serial ATA Port 2/Serial ATA Port 3jk/mSATA(Note)
The category identifies Serial ATA and mSATA types of hard disk that are installed in the computer.
System...
Manual - Page 38
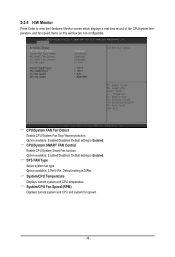
... to view the Hardware Monitor screen which displays a real-time record of the CPU/system temperature, and fan speed, Items on this window are non-configurable.
&& CPU/System FAN Fail Detect Enable CPU/System Fan Stop Warning function. Option available: Enabled/Disabled. Default setting is Enabled.
&& CPU/System SMART FAN Control Enable CPU/System Smart Fan function. Option available: Enabled...
Manual - Page 40
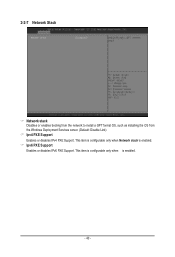
... Disables or enables booting from the network to install a GPT format OS, such as installing the OS from the Windows Deployment Services server. (Default: Disable Link)
&& Ipv4 PXE Support Enables or disables IPv4 PXE Support. This item is configurable only when Network stack is enabled.
&& Ipv6 PXE Support Enables or disables IPv6 PXE Support. This item is configurable only when...
Manual - Page 41
... during system halt state to decrease power consumption. The C3/C6 state is a more enhanced power-saving state than C1. Options available: Enabled/Disabled. Default setting is Enabled. Default setting for C3 is Enabled. Default setting for C6 is Enabled.
(Note) This item is present only if you install a CPU that supports this feature. For more information about...
Manual - Page 4
...audio driver.
LAN
ŠŠ 1 x Realtek GbE LAN chip (10/100/1000 Mbit)
Expansion Slots ŠŠ 1 x PCI Express x4 slot (Supports 25W only)
(The PCIEX4 slot conforms to PCI Express 3.0 standard.)
ŠŠ 1 x Mini PCI Express x1 slot
Storage Interface ŠŠ Chipset:
- 3 x SATA 3Gb/s connectors (SATA0/1/2) supporting up to 3 SATA
3Gb/s devices
- 1 x mSATA connector
USB...
Manual - Page 5
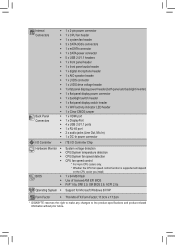
... panel display switch header ŠŠ 1 x WIFI activity indicator LED header ŠŠ 1 x Clear CMOS jumper ŠŠ 1 x HDMI port ŠŠ 1 x DisplayPort ŠŠ 4 x USB 2.0/1.1 ports ŠŠ 1 x RJ-45 port ŠŠ 2 x audio jacks (Line Out, Mic In) ŠŠ 1 x DC-In power connector
I/O Controller
ŠŠ iTE I/O Controller Chip
Hardware Monitor BIOS...
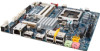
Manual - Page 6
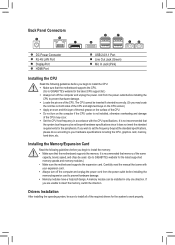
... RJ-45 LAN Port DisplayPort HDMI Port
USB 2.0/1.1 Port Line Out Jack (Green) Mic In Jack (Pink)
Installing the CPU
Read the following guidelines before you begin to install the CPU: •• Make sure that the motherboard supports the CPU.
(Go to GIGABYTE's website for the latest CPU support list.) •• Always turn off the computer and unplug the power cord from the power outlet...