Gigabyte GA-MA78GM-DS2HP driver and firmware
Drivers and firmware downloads for this Gigabyte item
Related Gigabyte GA-MA78GM-DS2HP Manual Pages
Download the free PDF manual for Gigabyte GA-MA78GM-DS2HP and other Gigabyte manuals at ManualOwl.com
Manual - Page 4
... types of documentations:
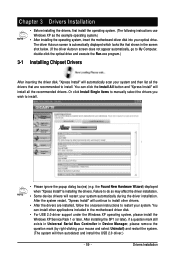
For quick set-up of the product, read the Quick Installation Guide included with the product. For detailed product information, carefully read the User's Manual. For instructions on how to use GIGABYTE's unique features, read or download the
information on/from the Support\Motherboard\Technology Guide page on our website.
For product-related...
Manual - Page 6
...(s 73
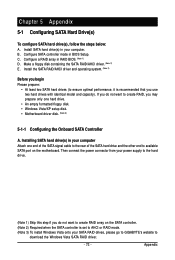
5-1-1 Configuring the Onboard SATA Controller 73 5-1-2 Making a SATA RAID/AHCI Driver Diskette for Windows XP 79 5-1-3 Installing the SATA RAID/AHCI Driver and Operating System 80 5-2 ConfiguringAudio Input and Output 85 5-2-1 Configuring 2/4/5.1/7.1-Channel Audio 85 5-2-2 Installing the S/PDIF In and Out Cable (Optional 87 5-2-3 Enabling the DTS (Digital Theater Systems) Function 89...
Manual - Page 14

... MHz memory speed is supported depends on the CPU being used. (Note 3) For Windows Vista/XP 32-bit operating system only. (Note 4) The DVI-D port does not support D-Sub connection by adapter. (Note 5) Whether the CPU/system fan speed control function is supported will depend on the CPU/
system cooler you install. (Note 6) Available functions in EasyTune may differ by motherboard model.
GA-MA78GM...
Manual - Page 21
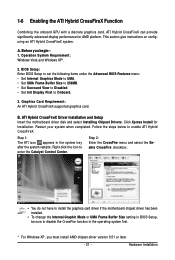
... BIOS Features menu: • Set Internal Graphics Mode to UMA. • Set UMA Frame Buffer Size to 256MB. • Set Surround View to Disabled. • Set Init Display First to Onboard.
3. Graphics Card Requirement: An ATI Hybrid CrossFireX-supported graphics card.
B. ATI Hybrid CrossFireX Driver Installation and Setup Insert the motherboard driver disk and select Installing Chipset Drivers...
Manual - Page 37
... of the BIOS Setup program.
To upgrade the BIOS, use either the GIGABYTE Q-Flash or @BIOS utility. • Q-Flash allows the user to quickly and easily upgrade or back up BIOS without entering the
operating system. • @BIOS is a Windows-based utility that searches and downloads the latest version of BIOS from the
Internet and updates the BIOS. For instructions on using the Q-Flash and @BIOS...
Manual - Page 47
...: Enabled)
AMD K8 Cool&Quiet control
Auto
Lets the AMD Cool'n'Quiet driver dynamically adjust the CPU clock and VIA to
Disabled
reduce heat output from your computer and its power consumption. (Default) Disable this function.
Hard Disk Boot Priority
Specifies the sequence of loading the operating system from the installed hard drives. Use the up
or down arrow...
Manual - Page 48
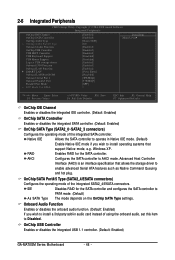
...CMOS Setup Utility-Copyright (C) 1984-2008 Award Software Integrated Peripherals
OnChip IDE Channel OnChip SATA Controller OnChip SATA Type x OnChip SATA Port4/5 Type Onboard Audio Function OnChip USB Controller USB EHCI Controller USB Keyboard Support USB Mouse Support Legacy USB storage detect Onboard 1394 Function Onboard LAN Function SMART LAN Onboard LAN Boot ROM Onboard Serial Port...
Manual - Page 51

... system to be awakened from ACPI S3 sleep state by a wake-up signal from the
installed USB device. (Default: Enabled)
Modem Ring Resume
Allows the system to be awakened from an ACPI sleep state by a wake-up signal from a modem
that supports wake-up function. (Default: Disabled)
(Note) Supported on Windows® Vista® operating system only. - 51 -
BIOS Setup
Manual - Page 59
... drivers are installed, follow the onscreen instructions to restart your system. You
can install other applications included in the motherboard driver disk. • For USB 2.0 driver support under the Windows XP operating system, please install the
Windows XP Service Pack 1 or later. After installing the SP1 (or later), if a question mark still exists in Universal Serial Bus Controller in Device...
Manual - Page 60
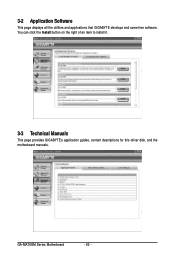
3-2 Application Software
This page displays all the utilities and applications that GIGABYTE develops and some free software. You can click the Install button on the right of an item to install it.
3-3 Technical Manuals
This page provides GIGABYTE's application guides, content descriptions for this driver disk, and the motherboard manuals.
GA-MA78GM Series Motherboard
- 60 -
Manual - Page 62
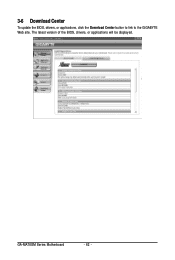
3-6 Download Center
To update the BIOS, drivers, or applications, click the Download Center button to link to the GIGABYTE Web site. The latest version of the BIOS, drivers, or applications will be displayed.
GA-MA78GM Series Motherboard
- 62 -
Manual - Page 63
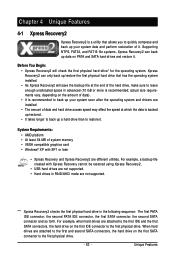
... MB of system memory • VESA compatible graphics card • Windows® XP with SP1 or later
• Xpress Recovery and Xpress Recovery2 are different utilities. For example, a backup file created with Xpress Recovery cannot be restored using Xpress Recovery2.
• USB hard drives are not supported. • Hard drives in RAID/AHCI mode are not supported.
"*" Xpress Recovery2 checks...
Manual - Page 66
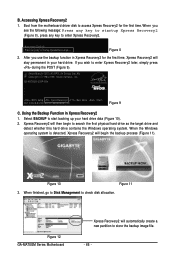
B. Accessing Xpress Recovery2 1. Boot from the motherboard driver disk to access Xpress Recovery2 for the first time. When you... in your hard drive. If you wish to enter Xpress Recovery2 later, simply press during the POST (Figure 9).
Award Modular BIOS v6.00PG, An Energy Star Ally Copyright (C) 1984-2008, Award Software, Inc.
GA-MA78GM-S2HP FAe . . . .
: BIOS Setup : XpressRecovery2 : Boot...
Manual - Page 68
... or pressing the key in BIOS Setup. However, if the BIOS update file is saved to a hard drive in RAID/AHCI mode or a hard drive attached to an independent IDE/SATA controller, use the key during the POST to access Q-Flash.
Award Modular BIOS v6.00PG, An Energy Star Ally Copyright (C) 1984-2008, Award Software, Inc.
GA-MA78GM-S2HP FAe . . . .
: BIOS Setup : XpressRecovery2 : Boot Menu : Qflash...
Manual - Page 71
... flashing.
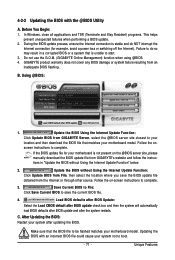
B. Using @BIOS:
1.
Update the BIOS Using the Internet Update Function:
Click Update BIOS from GIGABYTE Server, select the @BIOS server site closest to your
location and then download the BIOS file that matches your motherboard model. Follow the onscreen instructions to complete.
If the BIOS update file for your motherboard is not present on the @BIOS server site, please manually...
Manual - Page 72
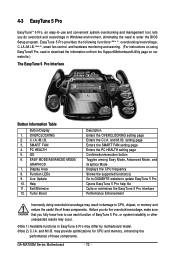
... setting page Confirmation/execution button Toggles among Easy Mode, Advanced Mode, and Graphics Mode Displays the CPU frequency Shows the supported function(s) Go to GIGABYTE website to update EasyTune 5 Pro Opens EasyTune 5 Pro help file Quits or minimizes the EasyTune 5 Pro interface Performance Enhancement
Incorrectly doing overclock/overvoltage may result in damage to CPU, chipset, or memory...
Manual - Page 73
... empty formatted floppy disk. • Windows Vista/XP setup disk. • Motherboard driver disk. (Note 3)
5-1-1 Configuring the Onboard SATA Controller
A. Installing SATA hard drive(s) in your computer Attach one end of the SATA signal cable to the rear of the SATA hard drive and the other end to available SATA port on the motherboard. Then connect the power connector from your power supply to...
Manual - Page 79
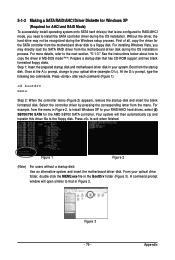
... during the Windows setup process. First of all, copy the driver for the SATA controller from the motherboard driver disk to a floppy disk. For installing Windows Vista, you may directly load the SATA RAID driver from the motherboard driver disk during the OS installation process. For more details, refer to the next section, "5-1-3." See the instructions below about how to copy the driver in MS...
Manual - Page 85

... 1: After installing the audio driver, the Audio Manager icon will appear in your system tray. Doubleclick the icon to access the Audio Control Panel.
Before installing the audio driver, make sure the "Microsoft UAA Bus driver for High Definition Audio" has been installed from the motherboard driver disk and your operating system has been updated with the latest Service Pack for Windows.
(Note...
Manual - Page 90
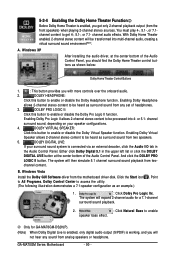
... upper left list or click the DOLBY
DIGITAL LIVE button at the center bottom of the Audio Control Panel. And click the DOLBY PRO
LOGIC II button. The system will then simulate 5.1 channel surround sound playback from two-
channel content.
B. Windows Vista
Install the Dolby GUI Software driver from the motherboard driver disk. Click the Start icon to All Programs...