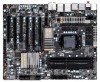
Gigabyte GA-P67A-UD7-B3 driver and firmware
Drivers and firmware downloads for this Gigabyte item
Related Gigabyte GA-P67A-UD7-B3 Manual Pages
Download the free PDF manual for Gigabyte GA-P67A-UD7-B3 and other Gigabyte manuals at ManualOwl.com
Manual - Page 3
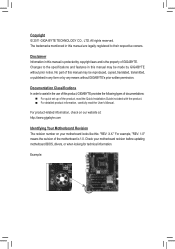
..., carefully read the User's Manual.
For product-related information, check on our website at: http://www.gigabyte.com
Identifying Your Motherboard Revision The revision number on your motherboard looks like this: "REV: X.X." For example, "REV: 1.0" means the revision of the motherboard is 1.0. Check your motherboard revision before updating motherboard BIOS, drivers, or when looking for technical...
Manual - Page 5
Chapter 3 Drivers Installation 63 3-1 Installing Chipset Drivers 63 3-2 Application Software 64 3-3 Technical Manuals 64 3-4 Contact...65 3-5 System...65 3-6 Download Center 66 3-7 New Utilities...66
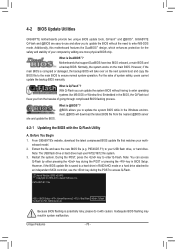
Chapter 4 Unique Features 67 4-1 Xpress Recovery2 67 4-2 BIOS Update Utilities 70
4-2-1 Updating the BIOS with the Q-Flash Utility 70 4-2-2 Updating the BIOS with the @BIOS Utility 73 4-3 ...
Manual - Page 12
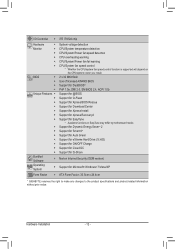
.../System temperature detection
ŠŠ CPU/System/Power fan speed detection
ŠŠ CPU overheating warning
ŠŠ CPU/System/Power fan fail warning
ŠŠ CPU/System fan speed control
* Whether the CPU/system fan speed control function is supported will depend on
the CPU/system cooler you install.
BIOS
ŠŠ 2 x 32 Mbit flash
ŠŠ Use of licensed...
Manual - Page 19
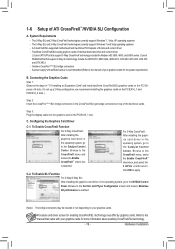
... the PCI Express x16 slots. (To set up a 2-Way configuration, we recommend installing the graphics cards on the PCIEX16_1 and PCIEX16_2 slots. )
Step 2: Insert the CrossFire (Note )/SLI bridge connectors in the CrossFireX/SLI gold edge connectors on top of the two/three cards.
Step 3: Plug the display cable into the graphics card on the PCIEX16_1 slot.
C. Configuring the Graphics Card Driver...
Manual - Page 35
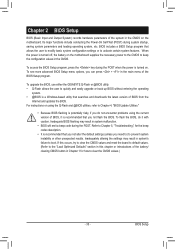
... of the BIOS Setup program.
To upgrade the BIOS, use either the GIGABYTE Q-Flash or @BIOS utility. • Q-Flash allows the user to quickly and easily upgrade or back up BIOS without entering the operating
system. • @BIOS is a Windows-based utility that searches and downloads the latest version of BIOS from the
Internet and updates the BIOS. For instructions on using the Q-Flash and @BIOS...
Manual - Page 50
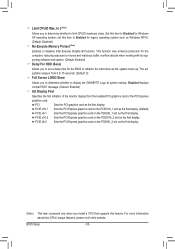
... slot as the first display.
PCIE x16-2 Sets the PCI Express graphics card on the PCIEX16_2 slot as the first display.
PCIE x8-2 Sets the PCI Express graphics card on the PCIEX8_2 slot as the first display.
(Note) This item is present only when you install a CPU that supports this feature. For more information about Intel CPUs' unique features, please visit Intel's website.
BIOS Setup
- 50 -
Manual - Page 52
... in MS-DOS. (Default: Enabled) USB Storage Function
Determines whether to detect USB storage devices, including USB flash drives and USB hard drives during the POST. (Default: Enabled)
Azalia Codec
Enables or disables the onboard audio function. (Default: Auto) If you wish to install a 3rd party add-in audio card instead of using the onboard audio, set this item to Disabled. Onboard H/W 1394...
Manual - Page 53
... SATA controller integrated in the Marvell 88SE9128 chip
to AHCI mode.
IDE
Configures the SATA controller to IDE mode. (Default)
AHCI
Configures the SATA controller to AHCI mode. Advanced Host Controller Interface
(AHCI) is an interface specification that allows the storage driver to enable advanced
Serial ATA features such as Native Command Queuing and hot plug.
- 53 -
BIOS Setup
Manual - Page 54
... BIOS Setup first
for the settings to take effect.
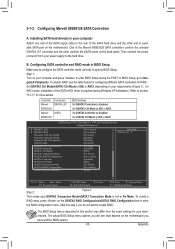
eSATA3 RAID Configuration (Marvell 88SE9128 Chip, eSATA Connectors on the Back
Panel)
Allows you to configure RAID for the Marvell 88SE9128 SATA controller. Refer to Chapter 5, "Configuring SATA Hard Drive(s)," for instructions on configuring a RAID array.
SATA3 Firmware Selection
Determines whether to automatically update the firmware...
Manual - Page 63
... if you want to manually select the utilities to install on the Application Software page later.
• For USB 2.0 driver support under the Windows XP operating system, please install the Windows XP Service Pack 1 or later. After installing the SP1 (or later), if a question mark still exists in Universal Serial Bus Controller in Device Manager, please remove the question mark (by right-clicking...
Manual - Page 64

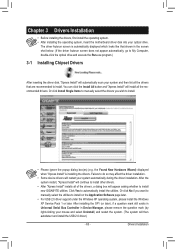
3-2 Application Software
This page displays all the utilities and applications that GIGABYTE develops and some free software. You can click the Install button on the right of an item to install it.
3-3 Technical Manuals
This page provides GIGABYTE's application guides, content descriptions for this driver disk, and the motherboard manuals.
Drivers Installation
- 64 -
Manual - Page 66

... Download Center
To update the BIOS, drivers, or applications, click the Download Center button to link to the GIGABYTE website. The latest version of the BIOS, drivers, or applications will be displayed.
3-7 New Utilities
This page provides a quick link to GIGABYTE's lately developed utilities for users to install. You can click the Install button on the right of an item to install it.
Drivers...
Manual - Page 67

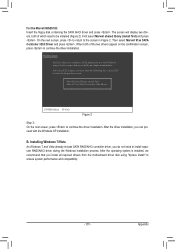
...USB hard drives are not supported. • Hard drives in RAID/AHCI mode are not supported.
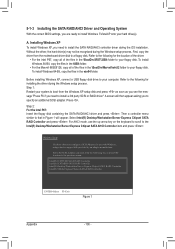
Installation and Configuration: Turn on your system to boot from the Windows Vista setup disk. A. Installing Windows Vista and Partitioning the Hard Drive
Step 1: Click Drive options.
Step 2: Click New.
(Note) Xpress Recovery2 checks the first physical hard drive in the following sequence: The first SATA...
Manual - Page 70
... during the POST or pressing the key in BIOS Setup. However, if the BIOS update file is saved to a hard drive in RAID/AHCI mode or a hard drive attached to an independent SATA controller, use the key during the POST to access Q-Flash.
Award Modular BIOS v6.00PG Copyright (C) 1984-2010, Award Software, Inc.
P67A-UD7-B3 F3a . . . .
: BIOS Setup : XpressRecovery2 : Boot Menu : Qflash 10/28/2010...
Manual - Page 83
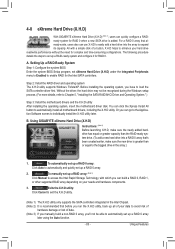
...Enter the system BIOS Setup program, set eXtreme Hard Drive (X.H.D) under the Integrated Peripherals menu to Enabled to enable RAID for the Intel SATA controllers.
Step 2: Install the RAID driver and operating system The X.H.D utility supports Windows 7/Vista/XP. Before installing the operating system, you have to load the SATA controller driver first. Without the driver, the hard drive may not be...
Manual - Page 95
... SATA signal cable to the rear of the SATA hard drive and the other end to available SATA port on the motherboard. One of the Marvell 88SE9128 SATA controllers controls the onboard GSATA3_6/7 connector and the other controls the eSATA ports on the back panel. Then connect the power connector from your power supply to the hard drive.
B. Configuring SATA controller and RAID mode in BIOS Setup
Make...
Manual - Page 99

... WDC WD800JD-22L PD 0: WDC WD800JD-22L Free Physical Disks Delete Virtual Disk
Information
Vendor ID : Device ID : Revision ID : BIOS Version : Firmware Version : PCIe Speed rate : Configure SATA as :
Do you want to delete this virtual disk?
Yes
No
1B4B 91A3 B1 0.0.0.0000 2.1.0.1512 5.0Gbps IDE Mode
Help Marvell RAID on chip controller. ENTER: Operation F10: Exit/Save ESC: Return...
Manual - Page 100
... .
Windows Setup
You have chosen to configure a SCSI Adapter for use with Windows, using a device support disk provided by an adapter manufacturer.
Select the SCSI Adapter you want from the following list, or press ESC to return to the previous screen.
Intel(R) ICH7R/DH SATA RAID Controller Intel(R) ICH7MDH SATA RAID Controller Intel(R) Desktop/Workstation/Server Express Chipset SATA RAID...
Manual - Page 101
... in Figure 2. Then select Marvell 91xx SATA Controller 32bit Driver and press . When both of the two drivers appear on the confirmation screen, press to continue the driver installation.
Windows Setup
You have chosen to configure a SCSI Adapter for use with Windows, using a device support disk provided by an adapter manufacturer.
Select the SCSI Adapter you want from the following list, or...
Manual - Page 114
... Bus Driver for High Definition Audio and select Disable and Uninstall. Step 4: In Device Manager, right-click on the computer name and select Scan for hardware changes. When the Add New Hardware Wizard appears, click Cancel. Then install the onboard HD audio driver from the motherboard driver disk or download the audio driver from GIGABYTE's website to install. For more details, go to the Support...