Gigabyte GA-VM900M driver and firmware
Related Gigabyte GA-VM900M Manual Pages
Download the free PDF manual for Gigabyte GA-VM900M and other Gigabyte manuals at ManualOwl.com
Manual - Page 5
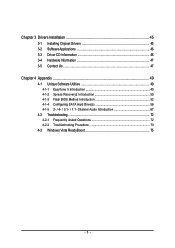
... 3-1 Installing Chipset Drivers 45 3-2 SoftwareApplications 46 3-3 Driver CD Information 46 3-4 Hardware Information 47 3-5 Contact Us ...47
Chapter 4 Appendix ...49 4-1 Unique Software Utilities 49
4-1-1 EasyTune 5 Introduction 49 4-1-2 Xpress Recovery2 Introduction 50 4-1-3 Flash BIOS Method Introduction 52 4-1-4 Configuring SATA Hard Drive(s 56 4-1-5 2- / 4- / 5.1- / 7.1- Channel Audio...
Manual - Page 6
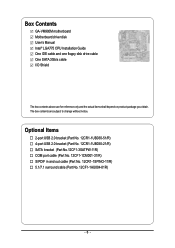
Box Contents
GA-VM900M motherboard Motherboard driver disk User's Manual Intel® LGA775 CPU Installation Guide One IDE cable and one floppy disk drive cable One SATA 3Gb/s cable I/O Shield
The box contents above are for reference only and the actual items shall depend on product package you obtain. The box contents are subject to change without notice.
Optional Items
2-port USB 2.0 bracket (...
Manual - Page 11
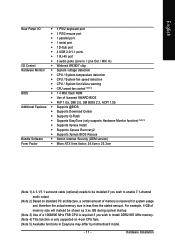
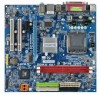
... D-Sub port
Š 4 USB 2.0/1.1 ports
Š 1 RJ-45 port
Š 3 audio jacks (Line In / Line Out / MIC In)
I/O Control
Š Winbond W83627 chip
Hardware Monitor Š System voltage detection
Š CPU / System temperature detection
Š CPU / System fan speed detection
Š CPU / System fan failure warning
Š CPU smart fan control (Note 4)
BIOS
Š 1 4 Mbit flash ROM...
Manual - Page 15
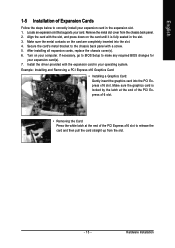
...the chassis cover(s). 6. Turn on your computer. If necessary, go to BIOS Setup to make any required BIOS changes for
your expansion card(s). 7. Install the driver provided with the expansion card in your operating system. Example: Installing and Removing a PCI Express x16 Graphics Card:
• Installing a Graphics Card: Gently insert the graphics card into the PCI Express x16 slot. Make sure the...
Manual - Page 16
... or other peripherals.
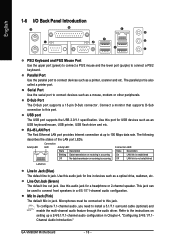
D-Sub Port
The D-Sub port supports a 15-pin D-Sub connector. Connect a monitor that supports D-Sub
connection to this port.
USB port
The USB port supports the USB 2.0/1.1 specification. Use this port for USB devices such as an
USB keyboard/mouse, USB printer, USB flash drive and etc.
RJ-45 LAN Port
The Fast Ethernet LAN port provides Internet connection at up to 100...
Manual - Page 22
... Pin LINE2_L FSENSE2
1
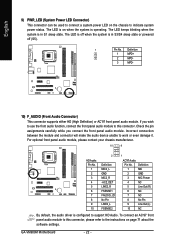
AC'97 Audio:
Pin No. Definition
1
MIC
2
GND
3
MIC Power
4
NC
5
Line Out (R)
6
NC
7
NC
8
No Pin
9
Line Out (L)
10
NC
By default, the audio driver is configured to support HD Audio. To connect an AC'97 front panel audio module to this connector, please refer to the instructions on page 71 about the software settings.
GA-VM900M Motherboard
- 22 -
Manual - Page 27
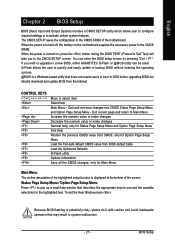
...". If you wish to upgrade to a new BIOS, either GIGABYTE's Q-Flash or @BIOS utility can be used. Q-Flash allows the user to quickly and easily update or backup BIOS without entering the operating system. @BIOS is a Windows-based utility that does not require users to boot to DOS before upgrading BIOS but directly download and update BIOS from the Internet.
CONTROL KEYS Enter>
Move to...
Manual - Page 45
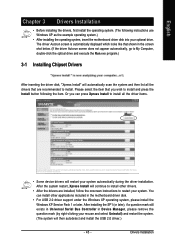
... drivers are installed, follow the onscreen instructions to restart your system. You can install other applications included in the motherboard driver disk.
• For USB 2.0 driver support under the Windows XP operating system, please install the Windows XP Service Pack 1 or later. After installing the SP1 (or later), if a question mark still exists in Universal Serial Bus Controller in Device...
Manual - Page 46
English
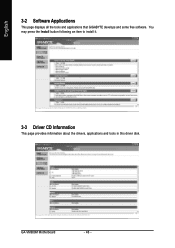
3-2 Software Applications
This page displays all the tools and applications that GIGABYTE develops and some free software. You may press the Install button following an item to install it.
3-3 Driver CD Information
This page provides information about the drivers, applications and tools in this driver disk.
GA-VM900M Motherboard
- 46 -
Manual - Page 50
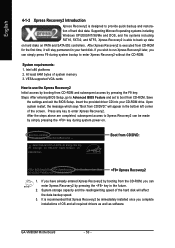
... bytes of system memory 3. VESA-supported VGA cards
How to use the Xpress Recovery2 Initial access by booting from CD-ROM and subsequent access by pressing the F9 key: Steps: After entering BIOS Setup, go to Advanced BIOS Feature and set to boot from CD-ROM. Save
the settings and exit the BIOS Setup. Insert the provided driver CD into your CD-ROM drive. Upon system...
Manual - Page 51
... hard disks installed with Windows operating systems including DOS and Windows XP/2000/NT/9x/Me. 5. USB hard disks are currently not supported. 6. Does not support RAID/AHCI (class code 0104/0106) hard disks. 7. Capable of backing up and restoring only the first physical hard disk. Hard disks detection sequence is as follows: a. PATA IDE primary channel b. PATA IDE secondary channel c . SATA IDE...
Manual - Page 52
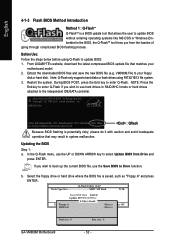
... if you wish to use hard drives in RAID/AHCI mode or hard drives attached to the independent IDE/SATA controller.
Award Modular BIOS v6.00PG, An Energy Star Ally Copyright (C) 1984-2007, Award Software, Inc.
VM900M FAm . . . .
: BIOS Setup/Q-Flash : XpressRecovery2 : Boot Menu : Qflash 05/10/2007-P4M900-8237S-6A7L8G10C-00
: Qflash
Because BIOS flashing is potentially risky, please do it with...
Manual - Page 54

...not have a DOS startup disk, we recommend that you use the new @BIOS utility. @BIOS allows users to update their BIOS under Windows. Just select the desired @BIOS server to download the latest version of BIOS.
Fig 1. Installing the @BIOS utility
Fig 2. Installation Complete and Run @BIOS
Click Start/ Programs/ Gigabyte/ BIOS/ @BIOS
Select @BIOS item
Fig 3. The @BIOS Utility
Fig 4. Select the...
Manual - Page 56
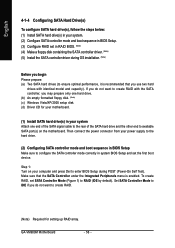
... create RAID with the SATA controller, you may prepare only one hard drive. (b) An empty formatted floppy disk. (Note) (c) Windows Vista/XP/2000 setup disk. (d) Driver CD for your motherboard.
(1) Install SATA hard drive(s) in your system Attach one end of the SATA signal cable to the rear of the SATA hard drive and the other end to available SATA port(s) on the motherboard. Then connect the power...
Manual - Page 57
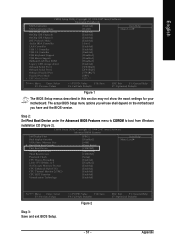
... the BIOS version.
Step 2:
Set First Boot Device under the Advanced BIOS Features menu to CDROM to boot from Windows
installation CD (Figure 2).
CMOS Setup Utility-Copyright (C) 1984-2007 Award Software Advanced BIOS Features
Init Display First Dual display function
VGA Share Memory Size ` Hard Disk Boot Priority
First Boot Device
Second Boot Device Third Boot Device Password Check
CPU Hyper...
Manual - Page 63
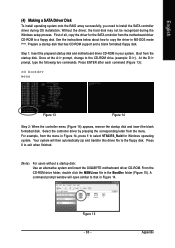
... to install the SATA controller driver during OS installation. Without the driver, the hard disk may not be recognized during the Windows setup process. First of all, copy the driver for the SATA controller from the motherboard driver CD-ROM to a floppy disk. See the instructions below about how to copy the driver in MS-DOS mode . (Note) Prepare a startup disk that has CD-ROM support and a blank...
Manual - Page 64
... the floppy disk containing the SATA driver and press S (Figure 17).
Windows Setup
Setup could not determine the type of one or more mass storage devices installed in your system, or you have chosen to manually specify an adapter. Currently, Setup will load support for the following mass storage devices(s)
* To specify additional SCSI adapters, CD-ROM drives, or special disk controllers for use...
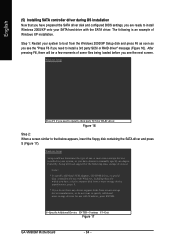
Manual - Page 65

... SATA driver installation from the floppy disk. The driver installation will be finished in about one minute.
Windows Setup
Setup will load support for the following mass storage device(s):
VIA V-RAID Controller Series (Windows XP/SRV2003)
* To specify additional SCSI adapters, CD-ROM drives, or special disk controllers for use with Windows, including those for which you have a device support disk...
Manual - Page 66
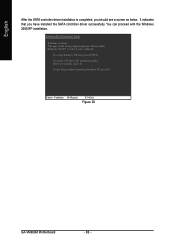
... have installed the SATA controller driver successfully. You can proceed with the Windows 2000/XP installation.
WindowsXP Professional Setup
Welcome to Setup. This port of the Setup program prepares Microsoft(R) Windows (R) XP to run on your computer.
To set up Windows XP now, press ENTER.
To repair a Windows XP installation using Recovery Console, press R.
To quit Setup without installing Windows...
Manual - Page 68
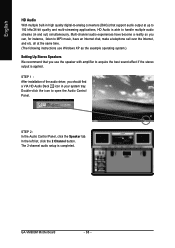
... if the stereo output is applied.
STEP 1 : After installation of the audio driver, you should find a VIA HD Audio Deck icon in your system tray. Double-click the icon to open the Audio Control Panel.
STEP 2: In the Audio Control Panel, click the Speaker tab. In the left list, click the 2 Channel button. The 2-channel audio setup is completed.
GA-VM900M Motherboard
- 68 -