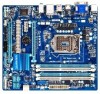
Gigabyte GA-Z77M-D3H driver and firmware
Drivers and firmware downloads for this Gigabyte item

Related Gigabyte GA-Z77M-D3H Manual Pages
Download the free PDF manual for Gigabyte GA-Z77M-D3H and other Gigabyte manuals at ManualOwl.com
User Guide - Page 1
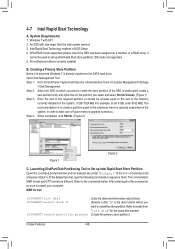
... memory 3. Intel Rapid Start Technology enabled in BIOS Setup 4. AHCI/RAID mode supported (please note if the SSD has been assigned as a member of a RAID array, it
cannot be used to set up Intel Rapid Start store partition); IDE mode not supported 5. All motherboard drivers correctly installed
B. Creating a Primary Store Partition Below it is assumed Windows 7 is already installed on the SATA...
User Guide - Page 2
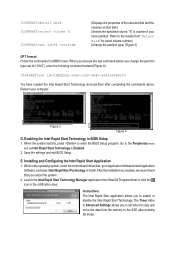
... restarts, press to enter the BIOS Setup program. Go to the Peripherals menu
and set Intel Rapid Start Technology to Enabled. 2. Save the settings and exit BIOS Setup.
E. Installing and Configuring the Intel Rapid Start Application 1. While in the operating system, insert the motherboard driver disk, go to Application Software\Install Application
Software, and select Intel Rapid Start Technology...
User Guide - Page 3
... is waked up.
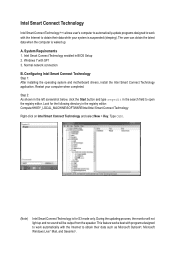
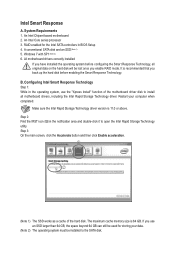
A. System Requirements 1. Intel Smart Connect Technology enabled in BIOS Setup 2. Windows 7 with SP1 3. Normal network connection
B. Configuring Intel Smart Connect Technology Step 1: After installing the operating system and motherboard drivers, install the Intel Smart Connect Technology application. Restart your computer when completed.
Step 2: As shown in the left screenshot below...
User Guide - Page 5
Intel Smart Response
A. System Requirements 1. An Intel Chipset-based motherboard 2. An Intel Core series processor 3. RAID enabled for the Intel SATA controllers in BIOS Setup 4. A conventional SATA disk and an SSD (Note 1) 5. Windows 7 with SP1 (Note 2) 6. All motherboard drivers correctly installed
If you have installed the operating system before configuring the Smart Response Technology, all ...
User Manual - Page 3
..., carefully read the User's Manual.
For product-related information, check on our website at: http://www.gigabyte.com
Identifying Your Motherboard Revision The revision number on your motherboard looks like this: "REV: X.X." For example, "REV: 1.0" means the revision of the motherboard is 1.0. Check your motherboard revision before updating motherboard BIOS, drivers, or when looking for technical...
User Manual - Page 5
Chapter 3 Drivers Installation 53 3-1 Installing Chipset Drivers 53 3-2 Application Software 54 3-3 Technical Manuals 54 3-4 Contact...55 3-5 System...55 3-6 Download Center 56 3-7 New Program 56
Chapter 4 Unique Features 57 4-1 Xpress Recovery2 57 4-2 BIOS Update Utilities 60
4-2-1 Updating the BIOS with the Q-Flash Utility 60 4-2-2 Updating the BIOS with the @BIOS Utility 63 4-3 ...
User Manual - Page 10
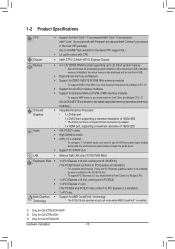
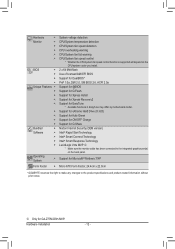
... To support XMP memory, you must install an Intel 22nm (Ivy Bridge) CPU. l (Go to GIGABYTE's website for the latest supported memory speeds and memory modules.) ŠŠ Integrated Graphics Processor: - 1 x D-Sub port - 1 x DVI-D port, supporting a maximum resolution of 1920x1200
* The DVI-D port does not support D-Sub connection by adapter. - 1 x HDMI port, supporting a maximum resolution of...
User Manual - Page 12
... connected to the integrated graphics port(s) on the back panel.
Support for Microsoft® Windows 7/XP
Form Factor ŠŠ Micro ATX Form Factor; 24.4cm x 22.0cm
* G IGABYTE reserves the right to make any changes to the product specifications and product-related information without prior notice.
MM Only for GA-Z77M-D3H-MVP.
Hardware Installation
- 12 -
User Manual - Page 31
... POST when the power is turned on.
To upgrade the BIOS, use either the GIGABYTE Q-Flash or @BIOS utility. •• Q-Flash allows the user to quickly and easily upgrade or back up BIOS without entering the operating
system. •• @BIOS is a Windows-based utility that searches and downloads the latest version of BIOS from the Internet
and updates the BIOS. For instructions on using...
User Manual - Page 45
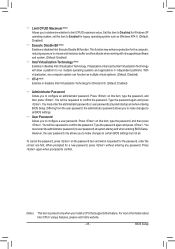
... make changes to certain BIOS settings but not all.
To cancel the password, press on the password item and when requested for the password, enter the correct one first. When prompted for a new password, press without entering any password. Press again when prompted to confirm.
(Note) This item is present only when you install a CPU that supports this feature. For...
User Manual - Page 47
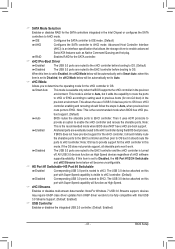
... allows the storage driver to enable advanced Serial ATA features such as Native Command Queuing and hot plug. RAID Enables RAID for the SATA controller.
&& xHCI Pre-Boot Driver Enabled The USB 3.0 ports are routed to the xHCI controller before booting to OS. (Default) Disabled The USB 3.0 ports are routed to the EHCI controller before booting to OS. When this item is set to Enabled...
User Manual - Page 53
... No if you want to manually select the utilities to install on the Application Software page later.
•• For USB 2.0 driver support under the Windows XP operating system, please install the Windows XP Service Pack 1 or later. After installing the SP1 (or later), if a question mark still exists in Universal Serial Bus Controller in Device Manager, please remove the question mark (by right...
User Manual - Page 54
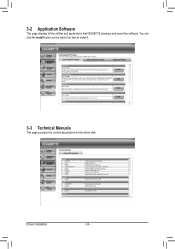
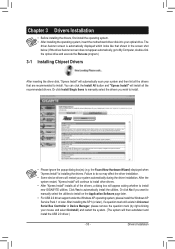
3-2 Application Software
This page displays all the utilities and applications that GIGABYTE develops and some free software. You can click the Install button on the right of an item to install it.
3-3 Technical Manuals
This page provides the content descriptions for this driver disk.
Drivers Installation
- 54 -
User Manual - Page 56
...
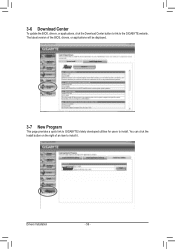
To update the BIOS, drivers, or applications, click the Download Center button to link to the GIGABYTE website.
The latest version of the BIOS, drivers, or applications will be displayed.
3-7 New Program
This page provides a quick link to GIGABYTE's lately developed utilities for users to install. You can click the
Install button on the right of an item to install it.
Drivers Installation
- 56...
User Manual - Page 60
... the latest BIOS file from the nearest @BIOS server site
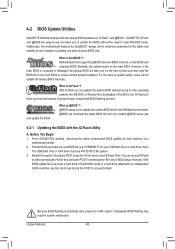
4-2-1 Updating the BIOS with the Q-Flash Utility
A. Before You Begin 1. From GIGABYTE's website, download the latest compressed BIOS update file that matches your
motherboard model. 2. Extract the file and save the new BIOS file (e.g. H77MD3H.F1) to your USB flash drive or hard drive. Note:
The USB flash drive or hard drive must use FAT32...
User Manual - Page 66
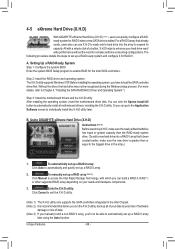
... it for RAID 0.
A. Setting Up a RAID-Ready System Step 1: Configure the system BIOS Enter the system BIOS Setup program to enable RAID for the Intel SATA controllers.
Step 2: Install the RAID driver and operating system The X.H.D utility supports Windows 7/XP. Before installing the operating system, you have to load the SATA controller driver first. Without the driver, the hard drive may not...
User Manual - Page 68
... memory 3. Intel Rapid Start Technology enabled in BIOS Setup 4. AHCI/RAID mode supported (please note if the SSD has been assigned as a member of a RAID array, it
cannot be used to set up Intel Rapid Start store partition); IDE mode not supported 5. All motherboard drivers correctly installed
B. Creating a Primary Store Partition Below it is assumed Windows 7 is already installed on the SATA...
User Manual - Page 70

... is waked up.
A. System Requirements 1. Intel Smart Connect Technology enabled in BIOS Setup 2. Windows 7 with SP1 3. Normal network connection
B. Configuring Intel Smart Connect Technology Step 1: After installing the operating system and motherboard drivers, install the Intel Smart Connect Technology application. Restart your computer when completed.
Step 2: As shown in the left screenshot below...
User Manual - Page 83
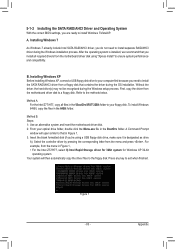
... Installing Windows XP Before installing Windows XP, connect a USB floppy disk drive to your computer first because you need to install the SATA RAID/AHCI driver from a floppy disk that contains the driver during the OS installation. Without the driver, the hard drive(s) may not be recognized during the Windows setup process. First, copy the driver from the motherboard driver disk to a floppy disk...
User Manual - Page 94
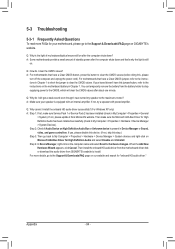
... Bus Driver for High Definition Audio and select Disable and Uninstall. Step 4: In Device Manager, right-click on the computer name and select Scan for hardware changes. When the Add New Hardware Wizard appears, click Cancel. Then install the onboard HD audio driver from the motherboard driver disk or download the audio driver from GIGABYTE's website to install. For more details, go to the Support...