Gigabyte GA-Z77MX-D3H TH driver and firmware
Drivers and firmware downloads for this Gigabyte item

Related Gigabyte GA-Z77MX-D3H TH Manual Pages
Download the free PDF manual for Gigabyte GA-Z77MX-D3H TH and other Gigabyte manuals at ManualOwl.com
User Guide - Page 1
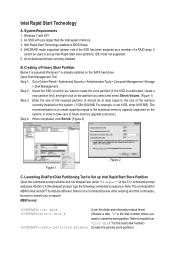
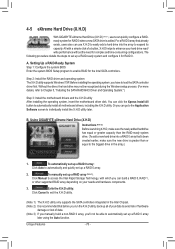
... Rapid Start store partition); IDE mode not supported 5. All motherboard drivers correctly installed
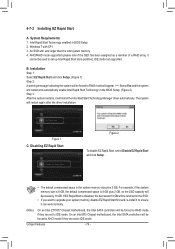
B. Creating a Primary Store Partition Below it is assumed Windows 7 is already installed on the SATA hard drive. Open Disk Management Tool Step 1: Go to Control Panel > System and Security > Administrative Tools > Computer Management >Storage
> Disk Management. Step 2: Select the SSD on which...
User Guide - Page 2
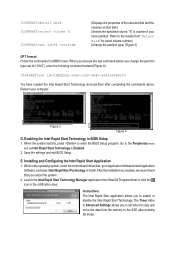
... restarts, press to enter the BIOS Setup program. Go to the Peripherals menu
and set Intel Rapid Start Technology to Enabled. 2. Save the settings and exit BIOS Setup.
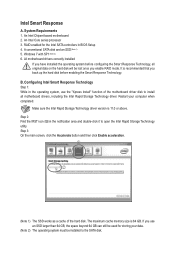
E. Installing and Configuring the Intel Rapid Start Application 1. While in the operating system, insert the motherboard driver disk, go to Application Software\Install Application
Software, and select Intel Rapid Start Technology...
User Guide - Page 3
... is waked up.
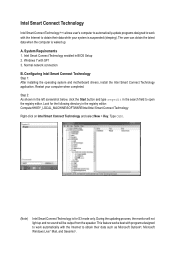
A. System Requirements 1. Intel Smart Connect Technology enabled in BIOS Setup 2. Windows 7 with SP1 3. Normal network connection
B. Configuring Intel Smart Connect Technology Step 1: After installing the operating system and motherboard drivers, install the Intel Smart Connect Technology application. Restart your computer when completed.
Step 2: As shown in the left screenshot below...
User Guide - Page 5
Intel Smart Response
A. System Requirements 1. An Intel Chipset-based motherboard 2. An Intel Core series processor 3. RAID enabled for the Intel SATA controllers in BIOS Setup 4. A conventional SATA disk and an SSD (Note 1) 5. Windows 7 with SP1 (Note 2) 6. All motherboard drivers correctly installed
If you have installed the operating system before configuring the Smart Response Technology, all ...
Manual - Page 3
..., carefully read the User's Manual.
For product-related information, check on our website at: http://www.gigabyte.com
Identifying Your Motherboard Revision The revision number on your motherboard looks like this: "REV: X.X." For example, "REV: 1.0" means the revision of the motherboard is 1.0. Check your motherboard revision before updating motherboard BIOS, drivers, or when looking for technical...
Manual - Page 5
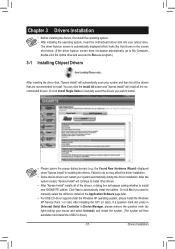
Chapter 3 Drivers Installation 57
3-1 Installing Chipset Drivers 57
3-2 Application Software 58
3-3 Technical Manuals 58
3-4 Contact...59
3-5 System...59
3-6 Download Center 60
3-7 New Program 60
Chapter 4 Unique Features 61
4-1 Xpress Recovery2 61
4-2 BIOS Update Utilities 64
4-2-1 Updating the BIOS with the Q-Flash Utility 64
4-2-2 Updating the BIOS with the @BIOS Utility ...
Manual - Page 12
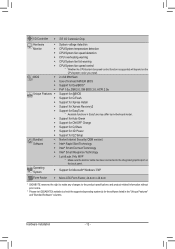
... differ by motherboard model. Support for Auto Green Support for ON/OFF Charge Support for Q-Share Support for 3D Power Support for EZ Setup Norton Internet Security (OEM version) Intel® Rapid Start Technology Intel® Smart Connect Technology Intel® Smart Response Technology LucidLogix Virtu MVP
* Make sure the monitor cable has been connected to the integrated graphics port on the...
Manual - Page 19

... -- Windows 7 or Windows XP operating system -- A CrossFireX/SLI-supported motherboard with two PCI Express x16 slots and correct driver -- Two CrossFireX/SLI-ready graphics cards of identical brand and chip and correct driver -- CrossFireX (Note)/SLI bridge connector -- A power supply with sufficient power is recommended (Refer to the manual of your graphics cards for the power requirement...
Manual - Page 21
... Windows 7.)
In Windows 7, select Start>Control Panel>Hardware and
Sound>Sound>Playback, set Intel(R) Display Audio to the
default playback device.
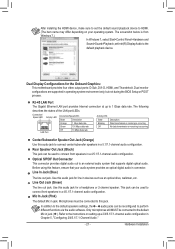
Dual Display Configurations for the Onboard Graphics: This motherboard provides four video output ports: D-Sub, DVI-D, HDMI, and Thunderbolt. Dual monitor confgurations are supported in operating system environment only, but not during the BIOS Setup...
Manual - Page 31
... POST when the power is turned on.
To upgrade the BIOS, use either the GIGABYTE Q-Flash or @BIOS utility. •• Q-Flash allows the user to quickly and easily upgrade or back up BIOS without entering the operating system. •• @BIOS is a Windows-based utility that searches and downloads the latest version of BIOS from the Internet
and updates the BIOS. For instructions on using...
Manual - Page 48
... make changes to certain BIOS settings but not all.
To cancel the password, press on the password item and when requested for the password, enter the correct one first. When prompted for a new password, press without entering any password. Press again when prompted to confirm.
(Note) This item is present only when you install a CPU that supports this feature. For...
Manual - Page 50
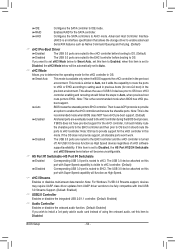
... be fully compatible with Intel USB 3.0 Streams Support. (Default: Enabled)
&& USB2.0 Controller Enables or disables the integrated USB 2.0/1.1 controller. (Default: Enabled)
&& Audio Controller Enables or disables the onboard audio function. (Default: Enabled) If you wish to install a 3rd party add-in audio card instead of using the onboard audio, set this item to Disabled.
BIOS Setup
- 50 -
Manual - Page 57
... No if you want to manually select the utilities to install on the Application Software page later.
•• For USB 2.0 driver support under the Windows XP operating system, please install the Windows XP Service Pack 1 or later. After installing the SP1 (or later), if a question mark still exists in Universal Serial Bus Controller in Device Manager, please remove the question mark (by right...
Manual - Page 58
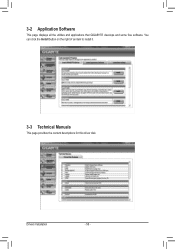
3-2 Application Software
This page displays all the utilities and applications that GIGABYTE develops and some free software. You can click the Install button on the right of an item to install it.
3-3 Technical Manuals
This page provides the content descriptions for this driver disk.
Drivers Installation
- 58 -
Manual - Page 60
...
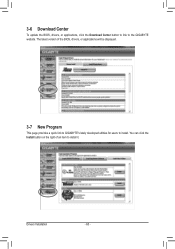
To update the BIOS, drivers, or applications, click the Download Center button to link to the GIGABYTE website. The latest version of the BIOS, drivers, or applications will be displayed.
3-7 New Program
This page provides a quick link to GIGABYTE's lately developed utilities for users to install. You can click the Install button on the right of an item to install it.
Drivers Installation
- 60...
Manual - Page 64
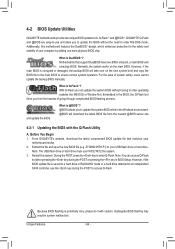
...Windows environment. @BIOS will download the latest BIOS file from the nearest @BIOS server site
4-2-1 Updating the BIOS with the Q-Flash Utility
A. Before You Begin 1. From GIGABYTE's website, download the latest compressed BIOS update file that matches your
motherboard model. 2. Extract the file and save the new BIOS file (e.g. Z77MXD3HTH.F1) to your USB flash drive or hard drive.
Note: The USB...
Manual - Page 70
... it for RAID 0.
A. Setting Up a RAID-Ready System Step 1: Configure the system BIOS Enter the system BIOS Setup program to enable RAID for the Intel SATA controllers.
Step 2: Install the RAID driver and operating system The X.H.D utility supports Windows 7/XP. Before installing the operating system, you have to load the SATA controller driver first. Without the driver, the hard drive may not...
Manual - Page 74
...; If you want to upgrade your system memory, disable EZ Rapid Start first and re-install it to ensure it can work normally.
(Note)
On an Intel Z77/H77 Chipset motherboard, the Intel SATA controllers will be forced to RAID mode if they are set to IDE mode. On an Intel B75 Chipset motherboard, the Intel SATA controllers will be forced to AHCI...
Manual - Page 85

... Installing Windows XP Before installing Windows XP, connect a USB floppy disk drive to your computer first because you need to install the SATA RAID/AHCI driver from a floppy disk that contains the driver during the OS installation. Without the driver, the hard drive(s) may not be recognized during the Windows setup process. First, copy the driver from the motherboard driver disk to a floppy disk...
Manual - Page 97
... Bus Driver for High Definition Audio and select Disable and Uninstall. Step 4: In Device Manager, right-click on the computer name and select Scan for hardware changes. When the Add New Hardware Wizard appears, click Cancel. Then install the onboard HD audio driver from the motherboard driver disk or download the audio driver from GIGABYTE's website to install. For more details, go to the Support...