Gigabyte GV-NX72G512P1 driver and firmware
Drivers and firmware downloads for this Gigabyte item

Related Gigabyte GV-NX72G512P1 Manual Pages
Download the free PDF manual for Gigabyte GV-NX72G512P1 and other Gigabyte manuals at ManualOwl.com
Manual - Page 6
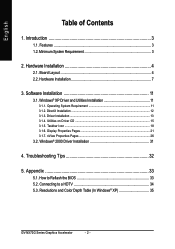
...Minimum System Requirement 3
2. Hardware Installation 4
2.1. Board Layout 4 2.2. Hardware Installation 7
3. Software Installation 11
3.1. Windows® XP Driver and Utilities Installation 11
3.1.1. Operating System Requirement 11 3.1.2. DirectX Installation ...12 3.1.3. Driver Installation ...13 3.1.4. Utilities on Driver CD 15 3.1.5. Taskbar Icon ...18 3.1.6. Display Properties Pages 21...
Manual - Page 7
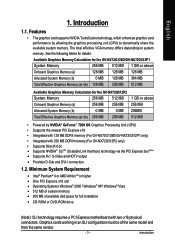
...higher • One PCI Express x16 slot • Operating Systems Windows® 2000 / Windows® XP/ Windows® Vista • 512 MB of system memory • 200 MB of available disk space for full installation
• CD-ROM or DVD-ROM drive
(Note): SLI technology requires a PCI Express motherboard with two x16 physical connectors. Graphics cards working in an SLI configuration must be of...
Manual - Page 12

... screw to fasten the card in place, and replace the computer cover.
3. Plug the display cable into your card; then turn on the computer and monitor. If your graphics card came with a DVI-I connector, you can connect a flat panel display to the appropriate connector, as shown below...
To D-Sub Monitor To TV / VCR
To Flat Panel Display
To avoid system instability...
Manual - Page 13

...; SLITM (Scalable Link Interface) technology: After installing two SLI-ready graphics cards of the same model on an SLI motherboard (example: GV-NX72G128D)(Figure 1), users can enable SLI mode simply through the graphics card driver(Note).
Figure 1
Step 1: After installing the graphics card driver, right-click on Desktop and select Properties. When Display Properties dialog box appears, select the...
Manual - Page 15
English
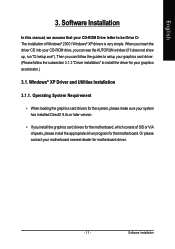
3. Software Installation
In this manual, we assume that your CD-ROM Drive letter to be Drive D: The installation of Windows® 2000 / Windows® XP drivers is very simple. When you insert the driver CD into your CD-ROM drive, you can see the AUTORUN window (if it does not show up, run "D:\setup.exe"). Then you can follow the guides to setup your graphics card driver. (Please follow...
Manual - Page 16
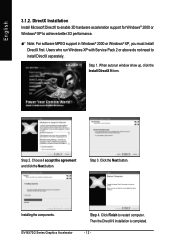
... 3D hardware acceleration support for Windows® 2000 or Windows® XP to achieve better 3D performance.
0 Note: For software MPEG support in Windows® 2000 or Windows® XP, you must install DirectX first. Users who run Windows XP with Service Pack 2 or above do not need to install DirectX separately.
Step 1. When autorun window show up, click the Install DirectX 9 item...
Manual - Page 17
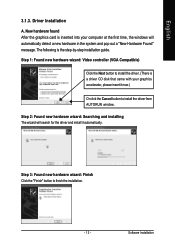
... inserted into your computer at the first time, the windows will automatically detect a new hardware in the system and pop out a "New Hardware Found" message. The following is the step-by-step installation guide.
Step 1: Found new hardware wizard: Video controller (VGA Compatible)
Click the Next button to install the driver. (There is a driver CD disk that came with your...
Manual - Page 18
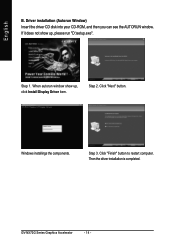
... (Autorun Window) Insert the driver CD disk into your CD-ROM, and then you can see the AUTORUN window. If it does not show up, please run "D:\setup.exe".
Step 1. When autorun window show up, click Install Display Driver item.
Step 2. Click "Next" button.
Windows installings the components.
Step 3. Click "Finish" button to restart computer. Then the driver installation is completed.
GV-NX72G...
Manual - Page 19
English
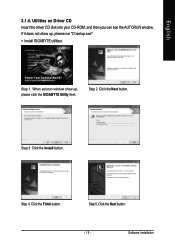
3.1.4. Utilities on Driver CD Insert the driver CD disk into your CD-ROM, and then you can see the AUTORUN window. If it does not show up, please run "D:\setup.exe".
• Install GIGABYTE utilities:
Step 1. When autorun window show up, please click the GIGABYTE Utility item.
Step 2. Click the Next button.
Step 3. Click the Install button.
Step 4. Click the Finish...
Manual - Page 21
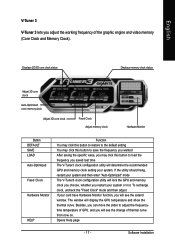
... If your card have Hardware Monitor function, you will see the extend window. The window will display the GPU temperature and show the thermal curve. Besides, you can move the slider to adjust the frequencytime temperature of GPU, and you will see the change of thermal curve from now on. Opens Help page
- 17 -
Software Installation
Manual - Page 22
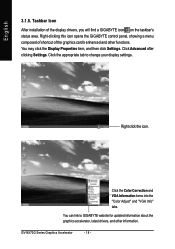
...3.1.5. Taskbar Icon
After installation of the display drivers, you will find a GIGABYTE icon on the taskbar's status area. Right-clicking this icon opens the GIGABYTE control panel, showing a menu composed of shortcut of the graphics card's enhanced and other functions. You may click the Display Properties item, and then click Settings. Click Advanced after clicking Settings. Click the appropriate...
Manual - Page 23
English
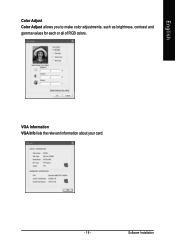
Color Adjust Color Adjust allows you to make color adjustments, such as brightness, contrast and gamma values for each or all of RGB colors.
VGA Information VGA Info lists the relevant information about your card.
- 19 -
Software Installation
Manual - Page 24

English
After installation of the display drivers, you will find a NVIDIA icon on the taskbar's status area. Click this icon to open the control panel.
Right click the icon.
You can adjust the properties of the graphics accelerator from here.
GV-NX72G Series Graphics Accelerator
- 20 -
Manual - Page 25
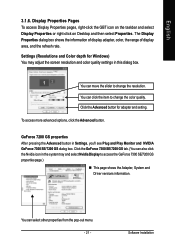
... icon on the taskbar and select Display Properties or right-click on Desktop and then select Properties. The Display Properties dialog box shows the information of display adapter, color, the range of display area, and the refresh rate. Settings (Resolutions and Color depth for Windows) You may adjust the screen resolution and color quality settings in this dialog box.
You can...
Manual - Page 27
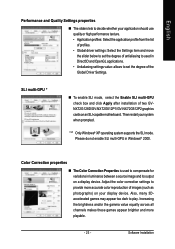
...the degree of the Global Driver Settings.
SLI multi-GPU *
„ To enable SLI mode, select the Enable SLI multi-GPU check box and click Apply after installation of two GVNX72G128D/GV-NX72G512P1/GV-NX72G512P2 graphics cards on an SLI-capable motherboard. Then restart your system when prompted.
"*" Only Windows® XP operating system supports the SLI mode. Please do not enable SLI multi-GPU in...
Manual - Page 29
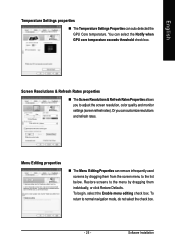
... exceeds threshold check box.
Screen Resolutions & Refresh Rates properties
„ The Screen Resolutions & Refresh Rates Properties allows you to adjust the screen resolution, color quality and monitor settings (screen refresh rates). Or you can customize resolutions and refresh rates.
Menu Editing ... return to normal navigation mode, do not select the check box.
- 25 -
Software Installation
Manual - Page 31
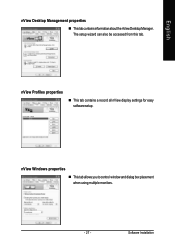
... properties
„ ThistabcontainsinformationaboutthenViewDesktopManager. The setup wizard can also be accessed from this tab.
nView Profiles properties
„ This tab contains a record all nView display settings for easy software setup.
nView Windows properties
„ This tab allows you to control window and dialog box placement when using multiple monitors.
- 27 -
Software Installation
Manual - Page 33
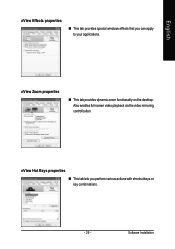
... windows effects that you can apply to your applications.
nView Zoom properties
„ This tab provides dynamic zoom functionality on the desktop. Also enables full screen video playback via the video mirroring control button.
nView Hot Keys properties
„ This tab lets you perform various actions with shortcut keys or key combinations.
- 29 -
Software Installation
Manual - Page 35
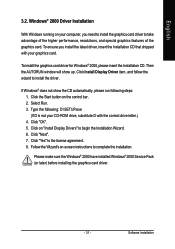
...up. Click Install Display Driver item, and follow the wizard to install the driver.
If Windows® does not show the CD automatically, please run following steps: 1. Click the Start button on the control bar. 2. Select Run. 3. Type the following: D:\SETUP.exe (If D is not your CD-ROM drive, substitute D with the correct drive letter.) 4. Click "OK". 5. Click on "Install Display Drivers" to begin...
Manual - Page 36
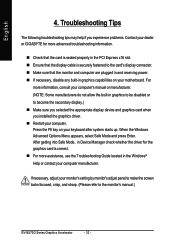
... power. „ If necessary, disable any built-in graphics capabilities on your motherboard. For
more information, consult your computer's manual or manufacturer. (NOTE: Some manufacturers do not allow the built-in graphics to be disabled or to become the secondary display.) „ Make sure you selected the appropriate display device and graphics card when you installed the graphics driver...