Gigabyte GV-RX165T256D-RH driver and firmware
Drivers and firmware downloads for this Gigabyte item


Related Gigabyte GV-RX165T256D-RH Manual Pages
Download the free PDF manual for Gigabyte GV-RX165T256D-RH and other Gigabyte manuals at ManualOwl.com
Manual - Page 4
... Installation 13 3.1.4. Utilities on Driver CD 15 3.1.5. Taskbar Icon 18 3.1.6. Display Properties pages 21
3.2. Windows® 2000 Driver Installation 38
4. Troubleshooting Tips 39
5. Appendix 40
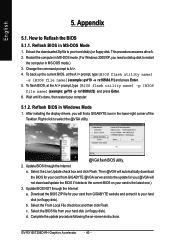
5.1. How to Reflash the BIOS 40 5.1.1. Reflash BIOS in MS-DOS Mode 40 5.1.2. Reflash BIOS in Windows Mode 40
5.2. Resolutions and Color Depth Table (In Windows® XP 41
GV-RX165T256D-RH...
Manual - Page 5
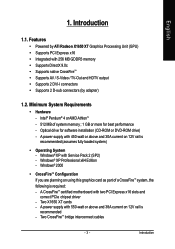
... CrossFireTM • Supports AV / S-Video / TV-Out and HDTV output • Supports 2 DVI-I connectors • Supports 2 D-sub connectors (by adapter)
1.2. Minimum System Requirements
• Hardware - Intel® Pentium® 4 or AMD AthlonTM - 512 MB of system memory ; 1 GB or more for best performance - Optical drive for software installation (CD-ROM or DVD-ROM drive) - A power supply with...
Manual - Page 9
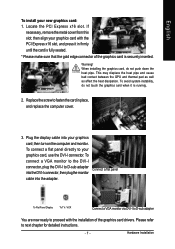
...your graphics card, use the DVI-I connector. To connect a VGA monitor to the DVI-I connector, plug the DVI-I to D-sub adapter into the DVI-I connector, then plug the monitor cable into the adapter.
Connect a flat panel
To Flat Panel Display
To TV / VCR
Connect a VGA monitor via DVI-I to D-sub adapter
You are now ready to proceed with the installation of the graphics card drivers. Please refer...
Manual - Page 12
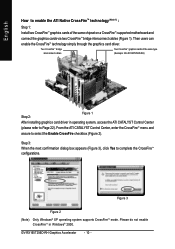
... a CrossFireTM-supported motherboard and connect the graphics cards via two CrossFireTM bridge interconnect cables (Figure 1). Then users can enable the CrossFireTM technology simply through the graphics card driver.
Two CrossFireTM bridge interconnect cables.
Two CrossFireTM graphics cards of the same type. (Example: GV-RX165T256D-RH)
Step 2:
Figure 1
After installing graphics card driver in...
Manual - Page 13

English
3. Software Installation
In this manual, we assume that your CD-ROM Drive letter to be Drive D:
The installation of Windows® 2000 / Windows® XP drivers is very simple. When you insert the driver CD into your CD-ROM drive, you can see the AUTORUN window (if it does not show up, run "D:\setup.exe"). Then you can follow the guides to setup your graphics card driver. (Please follow...
Manual - Page 14
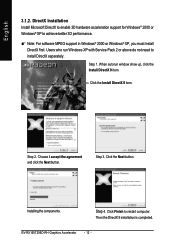
... not need to install DirectX separately. Step 1. When autorun window show up, click the Install DirectX 9 item.
Click the Install DirectX 9 item.
Step 2. Choose I accept the agreement and click the Next button.
Step 3. Click the Next button.
Installing the components.
Step 4. Click Finish to restart computer. Then the DirectX 9 installation is completed.
GV-RX165T256D-RH Graphics Accelerator...
Manual - Page 15
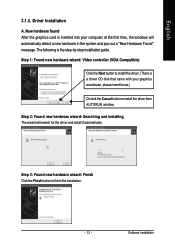
... inserted into your computer at the first time, the windows will automatically detect a new hardware in the system and pop out a "New Hardware Found" message. The following is the step-by-step installation guide.
Step 1: Found new hardware wizard: Video controller (VGA Compatible)
Click the Next button to install the driver. (There is a driver CD disk that came with your...
Manual - Page 16
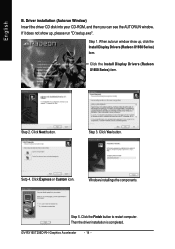
... up, click the Install Display Drivers (Radeon X1650 Series) item.
Click the Install Display Drivers (Radeon X1650 Series) item.
Step 2. Click Next button.
Step 3. Click Yes button.
Setp 4. Click Express or Custom icon.
Windows installings the components.
Step 5. Click the Finish button to restart computer. Then the driver installation is completed.
GV-RX165T256D-RH Graphics Accelerator - 14...
Manual - Page 17
English
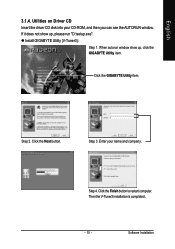
3.1.4. Utilities on Driver CD Insert the driver CD disk into your CD-ROM, and then you can see the AUTORUN window. If it does not show up, please run "D:\setup.exe". z Install GIGABYTE Utility (V-Tuner3):
Step 1. When autorun window show up, click the GIGABYTE Utility item.
Click the GIGABYTE Utility item.
Step 2. Click the Next button.
Step 3. Enter your name and...
Manual - Page 18

English
z Install Hydravision :
Click the Hydravision Install item.
Step 2. Click the Next button.
Step 3. Click the Yes button.
Step 4. Click the Next button.
Windows installings the components.
Step 5. Click the Next button.
Step 6. Click the Finish button to restart computer. Then the Hydravision Install is completed.
GV-RX165T256D-RH Graphics Accelerator - 16 -
Manual - Page 19
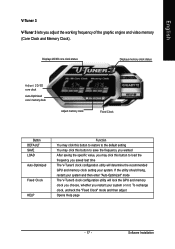
... graphic engine and video memory (Core Clock and Memory Clock).
Displays 2D/3D core clock status
Displays memory clock status
Adjust 2D/3D core clock
Auto-Optimized core / memory clock
Adjust memory clock
Fixed Clock
Button DEFAULT SAVE LOAD Auto-Optimized
Fixed Clock
HELP
Function You may click this button to restore to the default setting You may click...
Manual - Page 20

..." item, and then click Settings. Click "Advanced" after clicking Settings. Click the appropriate tab to change your display settings.
Right click the icon.
Click "VGA Information" item into the "VGA Info" and "Color Adjust" tabs. You can link to GIGABYTE website for updated information about the graphics accelerator, latest drivers, and other information.
GV-RX165T256D-RH Graphics Accelerator - 18...
Manual - Page 22
...
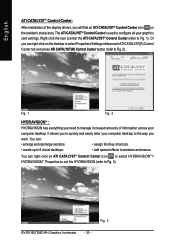
work. You can:
• arrange and rearrange monitors.
• assign Hot Key shortcuts.
• create up to 9 virtual desktops.
• add special effects to windows and menus.
You can right-click on ATI CATALYST® Control Center icon to select HYDRAVISIONTM> HYDRAVISIONTM Properties to set the HYDRAVISION (refer to Fig. 3).
Fig. 3 GV-RX165T256D-RH Graphics Accelerator - 20 -
Manual - Page 23
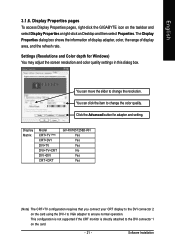
...) CRT+DVI DVI+TV DVI+TV+CRT DVI +DVI CRT+CRT
GV-RX165T256D-RH Yes Yes Yes No Yes Yes
(Note) The CRT+TV configuration requires that you connect your CRT display to the DVI connector 2 on the card using the DVI-I to VGA adapter to ensure normal operation. This configuration is not supported if the CRT monitor is directly attached to the DVI connector 1 on the card.
- 21 -
Software Installation
Manual - Page 26
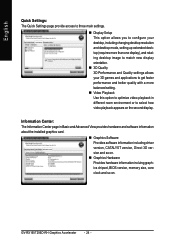
... and Advanced View provides hardware and software information about the installed graphics card.
„ Graphics Software Provides software information including driver version, CATALYST version, Direct 3D version and so on.
„ Graphics Hardware Provides hardware information incluing graphics chipset, BIOS version, memory size, core clock and so on.
GV-RX165T256D-RH Graphics Accelerator - 24 -
Manual - Page 35
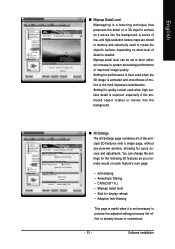
...resolution texture maps are stored in memory and selectively used to create the object's surface, depending on what level of detail is needed. Mipmap detail level can be set... • Wait for display refresh • Adaptive Anti-Aliasing
This page is useful when it is not necessary to preview the adjusted settings because the effect is already known or understood.
- 33 -
Software Installation
Manual - Page 39
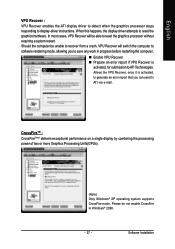
... activated, to generate an error report that you can send to ATI via e-mail.
CrossFireTM : CrossFire(Note) delivers exceptional performance on a single display by combining the processing power of two or more Graphics Processing Units(GPUs).
(Note) Only Windows® XP operating system supports CrossFire mode. Please do not enable CrossFire in Windows® 2000.
- 37 -
Software Installation
Manual - Page 40
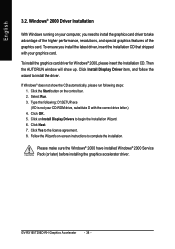
... OK. 5. Click on Install Display Drivers to begin the Installation Wizard. 6. Click Next. 7. Click Yes to the license agreement. 8. Follow the Wizard's on-screen instructions to complete the installation.
Please make sure the Windows® 2000 have installed Windows® 2000 Service Pack (or later) before installing the graphics accelerator driver.
GV-RX165T256D-RH Graphics Accelerator - 38 -
Manual - Page 41
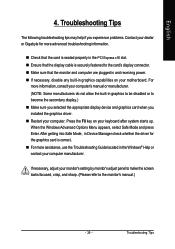
... power. „ If necessary, disable any built-in graphics capabilities on your motherboard. For
more information, consult your computer's manual or manufacturer. (NOTE: Some manufacturers do not allow the built-in graphics to be disabled or to become the secondary display.) „ Make sure you selected the appropriate display device and graphics card when you installed the graphics driver...
Manual - Page 42
... your computer.
5.1.2. Reflash BIOS in Windows Mode
1. After installing the display drivers, you will find a GIGABYTE icon in the lower-right corner of the Taskbar. Right-click to select the @VGA utility.
@VGA flash BIOS utility. 2. Update BIOS through the Internet
a. Select the Live Update check box and click Flash. Then @VGA will automatically download the BIOS for your card from GIGABYTE @VGA...