Gigabyte GV-RX80T256V driver and firmware
Drivers and firmware downloads for this Gigabyte item

Related Gigabyte GV-RX80T256V Manual Pages
Download the free PDF manual for Gigabyte GV-RX80T256V and other Gigabyte manuals at ManualOwl.com
Manual - Page 2
... DirectX Installation 9 3.1.3. Driver Installation 10 3.1.4. Utilities on Driver CD 12 3.1.5. Taskbar Icon ...14 3.1.6. Display Properties Pages 18
3.2. Win® 2000 Driver Installation 28 3.3. BIOS Flaseh Utility 28
4. Troubleshooting Tips 29
5. Appendix 30
5.1. How to Reflash the BIOS 30 5.2. Resolutions and Color Depth Table (In Windows® XP 30
GV-RX80T256V Graphics Accelerator...
Manual - Page 7
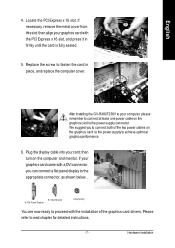
... place, and replace the computer cover.
After installing the GV-RX80T256V to your computer, please remember to connect at lease one power cable on the graphics card to the power supply connector. We suggest you to connect both of the two power cables on the graphics card to the power supply to achieve optimcal graphics performance.
6. Plug the display cable into your card; then turn on...
Manual - Page 8
...
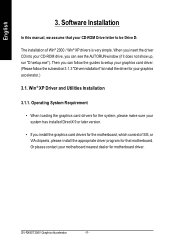
3. Software Installation
In this manual, we assume that your CD-ROM Drive letter to be Drive D:
The installation of Win® 2000 / Win® XP drivers is very simple. When you insert the driver CD into your CD-ROM drive, you can see the AUTORUN window (if it does not show up, run "D:\setup.exe"). Then you can follow the guides to setup your graphics card driver...
Manual - Page 9
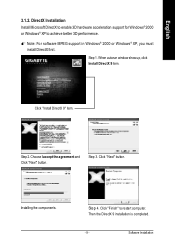
... For software MPEG support in Windows® 2000 or Windows® XP, you must
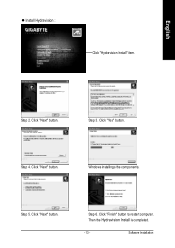
install DirectX first. Step 1. When autorun window show up, click Install DirectX 9 item.
Click "Install DirectX 9" item.
Step 2. Choose Iacceptthe agreement and Click "Next" button.
Step 3. Click "Next" button.
Installing the components.
Step 4. Click "Finish" to restart computer. Then the DirectX 9 installation is...
Manual - Page 10
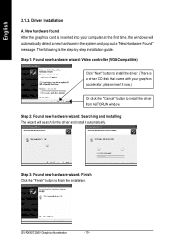
... the graphics card is inserted into your computer at the first time, the windows will automatically detect a new hardware in the system and pop out a "New Hardware Found" message. The following is the step-by-step installation guide.
Step 1: Found new hardware wizard: Video controller (VGACompatible)
Click "Next" button to install the driver. (There is a driver CD disk that came...
Manual - Page 11
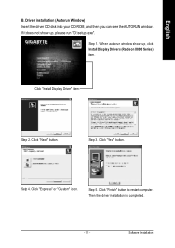
... disk into your CD-ROM, and then you can see theAUTORUN window. If it does not show up, please run "D:\setup.exe".
Step 1. When autorun window show up, click Install Display Drivers (Radeon X800 Series) item.
Click "Install Display Driver" item.
Step 2. Click "Next" button.
Step 3. Click "Yes" button.
Setp 4 . Click "Express" or "Custom" icon.
Step 5. Click "Finish" button to restart computer...
Manual - Page 12
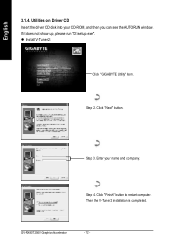
... on Driver CD Insert the driver CD disk into your CD-ROM, and then you can see theAUTORUN window. If it does not show up, please run "D:\setup.exe". l Install V-Tuner2:
Click "GIGABYTE Utility" item.
Step 2. Click "Next" button.
Step 3 . Enter your name and co mpany.
Step 4. Click "Finish" button to restart computer. Then the V-Tuner2 installation is completed.
GV-RX80T256V Graphics...
Manual - Page 13
English
l Install Hydravision :
Click "Hydravision Install" item.
Step 2. Click "Next" button.
Step 3. Click "Yes" button.
Step 4. Click "Next" button.
Windows installings the components.
Step 5. Click "Next" button.
Step 6. Click "Finish" button to restart computer. Then the Hydravision Install is completed.
- 13 -
Software Installation
Manual - Page 14
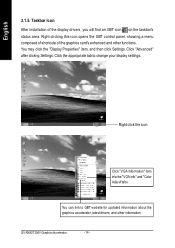
..." item, and then click Settings. Click "Advanced" after clickng Settings. Click the appropriate tab to change your display settings.
Right click the icon.
Click "VGA Information" item into the "VGA Info" and "Color Adjust"ta bs.
You can link to GBT website for updated information about the graphics accelerator, latestdrivers, and other information.
GV-RX80T256V Graphics Accelerator
- 14 -
Manual - Page 15

... Utility)
V-Tuner 2 lets you adjust the working frequency of the graphic engine and video memory (Core Clock and Memory Clock).
Displays core clock status
Displays memoryclock status
Core speed adjustment
Enables auto adjustm ent of core/
memory cloc k settings set by user when running 3D applications.
OpensHelp page
Core speed adjust
Select choice of skin
- 15 -
Software Installation
Manual - Page 17
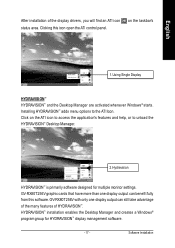
... settings. GV-RX80T256V graphic cards that have more than one display output can benefit fully from this software. GV-RX80T256V with only one display output can still take advantage of the many features of HYDRAVISION™ . HYDRAVISION™ installation enables the Desktop Manager and creates a Windows® program group for HYDRAVISION™ display management software.
- 17 -
Software...
Manual - Page 19
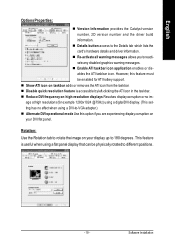
... ATI icon in the taskbar. n Reduce DVI frequency on high-resolution displays Resolves display corruption orno im-
age at high resolutions (for example 1280x1024 @75Hz) using a digitalDVI display. (This setting has no effectwhen using a DVI-to-VGA adapter.) n Alternate DVI operational mode Use this option ifyou are experiencing display corruption on your DVI flat p anel.
Rotation:
Use the Rotation...
Manual - Page 21
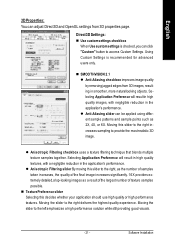
... Properties: You can adjust Direct3D and OpenGL settings from 3D properties page.
Direct3D Settings: n Use custom settings checkbox
When Use sustom settings is checked,you can click "Custom" button to access Custom Settings. Using Custom Settings is recommended for advanced users only.
n ... leftemphasizes a high performance solution while still providing good visuals.
- 21 -
Software Installation
Manual - Page 23
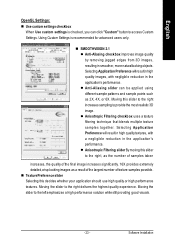
... checked, you can click "Custom" button to access Custom Settings. Using Custom Settings is recommended for advanced users only.
n SMOOTHVISION 2.1 l Anti-Aliasing checkbox improves image quality by removing jagged edges from 3D ...the highest quality experience. Moving the slider to the leftemphasizes a high performance solution while still providing good visuals.
- 23 -
Software Installation
Manual - Page 25
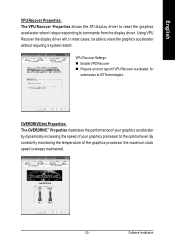
... to reset the graphics accelerator when it stops responding to commands from the display driver. Using VPU Recover the display driver will, in most cases, be able to reset the graphics accelerator without requiring a system restart.
VPU Recover Settings: n Enable VPU Recover n Prepare an error report ifVPU Recover is activated, for
submission to ATI Technologies.
OVERDRIVE(tm) Properties: The...
Manual - Page 26
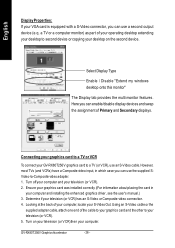
... second device or copying your desktop on the second device.
Select Display Type Enable / Disable "Extend my windows desktop onto this monitor" The Display tab provides the multi monitor features. Here you can enable/disable display devices and swap the assignment of Primary and Secondary displays.
Connecting your graphics card to a TV or VCR
To connect your GV-RX80T256V graphics card to a TV (or...
Manual - Page 27
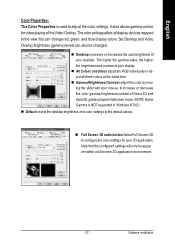
... mode. (NOTE: Game Gamma is NOT supported in Windows NT4.0)
n Default resets the desktop brightness and color settings to the default values.
n Full Screen 3D radio button SelectFull Screen 3D to configure the color settings for your 3D application. Note that the configured settings will only be appar ent within a full screen 3D application environment.
- 27 -
Software Installation
Manual - Page 28

... Windows®2000 Service Pack (or later) before installing the graphics accelerator driver.
3.3. BIOS Flash Utility
BIOS update procedure: MNote: Please download the newest BIOS from our website (www.gigabyte.com.tw) or contact your local dealer for the file. MIf you want to realize the BIOS flash information, please refer to detail on subsection 5.1. "How to reflash the BIOS".
GV-RX80T256V...
Manual - Page 29
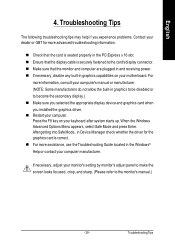
... power. n If necessary, disable any built-in graphics capabilities on your motherboard. For
more information, consult your computer's manual or manufacturer. (NOTE: Some manufacturers do not allow the built-in graphics to be disabled or to become the secondary display.) n Make sure you selected the appropriate display device and graphics card when you installed the graphics driver. n Restart...
Manual - Page 30
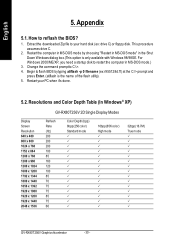
... rtup disk to restart th e computer in MS-DOS mo de.)
3. Change the command promptto C:\>. 4. Begin to flash BIOS by typing atiflash -p 0 filename (ex:r955128d.f1) at the C:\> prompt and
press Enter. (atiflash is the name of the flash utility). 5. Restart your PC when it's done.
5.2. Resolutions and Color Depth Table (In Windows® XP)
Display Screen Resolution 640...