Intel SE7320VP2 driver and firmware

Related Intel SE7320VP2 Manual Pages
Download the free PDF manual for Intel SE7320VP2 and other Intel manuals at ManualOwl.com
User Guide - Page 3
...memory DIMMs, hard drive, floppy drive, CD-ROM or DVD-ROM drive, RAID controller, operating system.
For information about which accessories, memory, processors, and third-party hardware have been tested and can be used with your board, and for ordering information for Intel products, see http://support.intel.com/support/motherboards/server/SE7320VP2/.
Intel® Server Board SE7320VP2 User Guide...
User Guide - Page 4
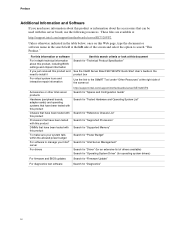
... falls within the allowed power budget For software to manage your Intel® server
For drivers
http://support.intel.com/support/motherboards/server/SE7320VP2 Search for "Spares and Configuration Guide" Search for "Tested Hardware and Operating System List"
Search for "Reference Chassis List" Search for "Supported Processors" Search for "Supported Memory" Search for "Power Budget" Search for...
User Guide - Page 11
... Supplies Needed 25 Installing and Removing Memory 25
Installing DIMMs...25 Removing DIMMs...27 Installing or Replacing the Processor 28 Installing the Processor 28 Removing a Processor 30 RJ45 Serial Port Configuration 31 Installing a PCI, PCI-X, or PCI-Express* Add-in Card 32 Replacing the Backup Battery 32
3 Server Utilities 34
Using the BIOS Setup Utility 34 Starting Setup ...34 If...
User Guide - Page 12
...Figures
Figure 1. Intel® Server Board SE7320VP2 15 Figure 2. Server Board Connector and Header Locations 17 Figure 3. Recovery Jumper Location 18 Figure 4. Serial Port Configuration Jumper Location 19 Figure 5. BIOS Select Jumper Location 20 Figure 6. Back Panel Connectors 21 Figure 7. Installing Memory...26 Figure 8. Opening Socket Lever 28 Figure 9. Inserting Processor...29 Figure 10...
User Guide - Page 22
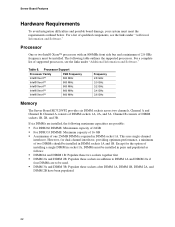
... board damage, your system must meet the requirements outlined below. For a list of qualified components, see the links under "Additional Information and Software."
Processor
One or two Intel® Xeon™ processors with an 800MHz front side bus and a minimum of 2.8 GHz frequency must be installed. The following table outlines the supported processors. For a complete list of supported...
User Guide - Page 23
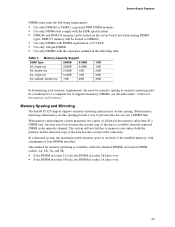
.... For a complete list of supported memory DIMMs, see the links under "Additional Information and Software."
Memory Sparing and Mirroring
The Intel® E7320 chipset supports memory mirroring and memory on-line sparing. Both memory mirroring and memory on-line sparing provide a way to prevent data loss in case a DIMM fails.
With memory mirroring the system maintains two copies of all data in the...
User Guide - Page 24
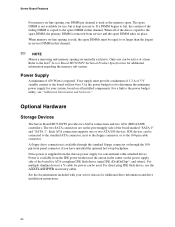
...all installed components. For a link to the power budget utility, see "Additional Information and Software."
Optional Hardware
Storage Devices
The Server Board SE7320VP2 provides two SATA connections and two ATA (IDE/ATAPI) controllers. The two SATA connectors are on the powersupply side of the board marked "SATA 0" and "SATA 1". Each ATA connection supports one or two ATA/100 devices. IDE devices...
User Guide - Page 25
... and Software" for a link to the list of tested DIMMs.
Installing DIMMs
To install DIMMs, follow these steps: 1. Observe the safety and ESD precautions at the beginning of this book. 2. Turn off all peripheral devices connected to the server. Turn off the server. 3. Disconnect the AC power cord from the server.
Intel® Server Board SE7320VP2 User Guide
25
User Guide - Page 26
Hardware Installations and Upgrades
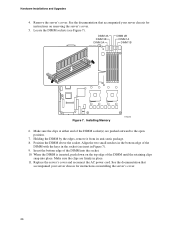
4. Remove the server's cover. See the documentation that accompanied your server chassis for instructions on removing the server's cover.
5. Locate the DIMM sockets (see Figure 7).
DIMM 2A DIMM 3B DIMM 3A
DIMM 2B DIMM 1A DIMM 1B
Figure 7. Installing Memory
TP00761
6. Make sure the clips at either end of the DIMM socket...
User Guide - Page 27
Hardware Installations and Upgrades
Removing DIMMs
To remove a DIMM, follow these steps: 1. Observe the safety and ESD precautions at the beginning of this book. 2. Turn off all peripheral devices connected to the server. Turn off the server. 3. Remove the AC power cord from the server. 4. Remove the server's cover. See the documentation that accompanied your...
User Guide - Page 28
... Installations and Upgrades
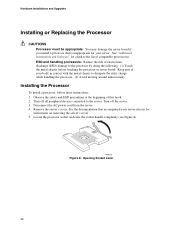
Installing or Replacing the Processor
CAUTIONS
Processor must be appropriate: You may damage the server board if you install a processor that is inappropriate for your server. See "Additional Information and Software" for a link to the list of compatible processor(s). ESD and handling processors: Reduce the risk of electrostatic discharge (ESD) damage to the processor...
User Guide - Page 29
Hardware Installations and Upgrades
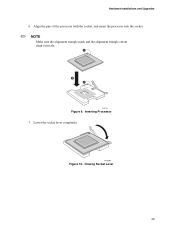
6. Align the pins of the processor with the socket, and insert the processor into the socket.
✏ NOTE
Make sure the alignment triangle mark and the alignment triangle cutout align correctly.
A
B A
TP00764
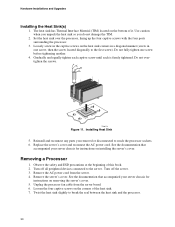
Figure 9. Inserting Processor 7. Lower the socket lever completely.
TP00765
Figure 10. Closing Socket Lever
29
User Guide - Page 30
.... See the documentation that
accompanied your server chassis for instructions on installing the server's cover.
Removing a Processor
1. Observe the safety and ESD precautions at the beginning of this book. 2. Turn off all peripheral devices connected to the server. Turn off the server. 3. Remove the AC power cord from the server. 4. Remove the server's cover. See...
User Guide - Page 36
...; On-board system BIOS, including the recovery code, BIOS Setup Utility, and strings. ƒ On-board video BIOS and other option ROMs for devices embedded on the server board. ƒ OEM binary area ƒ Microcode ƒ A means to change the BIOS Language
Preparing for the Upgrade
The steps below explain how to prepare to upgrade the BIOS, including how to record the current BIOS settings and...
User Guide - Page 39
.... Firmware upgrades include updates for BIOS, the baseboard management controller (BMC), and the hot-swap controller (HSC). See "Additional Information and Software" for a link to the software updates. In addition to the server firmware and files, also update any drivers used for components you have installed in your system, such as video drivers, network drivers, and SCSI drivers.
Intel provides...
User Guide - Page 40
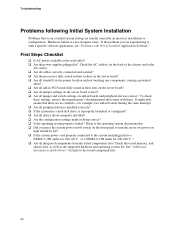
...for example, two add-in boards sharing the same interrupt. ‰ Are all peripheral devices installed correctly? ‰ If the system has a hard disk drive, is it properly formatted or configured? ‰ Are all device drivers properly installed? ‰ Are the configuration settings made in Setup correct? ‰ Is the operating system properly loaded? Refer to the operating system documentation...
User Guide - Page 45
... in your NET.CFG file. The controller stopped working when an add-in adapter was installed. ‰ Make sure the cable is connected to the port from the onboard network controller. ‰ Make sure your BIOS is current. See "Additional Information and Software" for a link to the current version. ‰ Make sure the other adapter supports shared interrupts. Make sure your operating...
User Guide - Page 46

... without apparent cause. ‰ Try reseating the adapter first; then try a different slot if necessary. ‰ The network driver files may be corrupt or deleted. Delete and then reinstall the drivers. ‰ Run the diagnostics.
System Boots when Installing PCI Card
System Server Management features require full-time "standby" power. This means some parts of the system have...
User Guide - Page 47
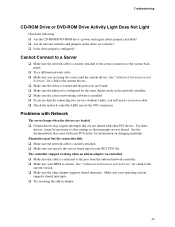
... on the SCSI bus. See your
drive documentation for details on setting the SCSI ID for your drives. ‰ If using ATA drives, verify that the master/slave settings are set correctly. See your drive
documentation for details on setting the master/slave settings. ‰ If using a RAID configuration with SCSI or SATA drives, make sure the RAID card is installed
correctly.
Bootable CD-ROM Is Not...
User Guide - Page 56

... ˆ On-Board NIC1 (10/100/1000 Mb) ˆ On-Board NIC2 (10/100/1000 Mb)
Driver Revision
IRQ #
I/O Base Address
FW Rev#
Hard Drive Information:
ˆ ATA # of drives installed: Make/Model/Firmware Revision
ˆ SATA # of drives installed:
Make/Model/Firmware Revision
Hot-swap:
Fixed:
Management Information:
ˆ Essentials Server Management (on-board)
Control Panel Information...