JVC GZ-E10 driver and firmware

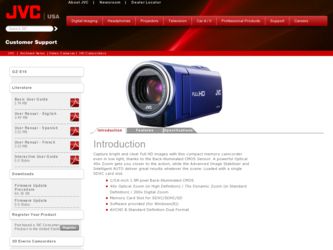
Related JVC GZ-E10 Manual Pages
Download the free PDF manual for JVC GZ-E10 and other JVC manuals at ManualOwl.com
Basic User Guide - Page 2
... of the TV is not recommended, as tripping on the cables will cause this unit to fall, resulting in damage.
CAUTION: The mains plug shall remain readily operable.
• Remove the mains plug immediately if the
camcorder functions abnormally.
WARNING: The battery pack, the camcorder with battery installed, and the remote control with battery installed should...
Basic User Guide - Page 3
...
JVC dealer.
Plug Adapter
• Remove the AC adapter from the AC wall outlet
when not in use.
• Do not leave dust or metal objects adhered to
the AC wall outlet or AC adapter (power/DC plug).
• Be sure to use the supplied AC adapter. • Do not use the supplied AC adapter with other
devices...
Basic User Guide - Page 4
... For the Camera . . 4
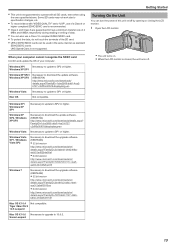
Getting Started
Charging the Battery Pack 5 Inserting an SD Card 6 Changing Menu Settings 7 Clock Setting 7
Recording
Video Recording 8
Playback
Playing Back/Deleting Files on this Unit .... 9 Playing Back on TV 10
Copying
Keep It High Definition (Windows) ....... 11 Install Everio MediaBrowser (Windows) ..... 12 USB Menu Operations 13 File Backup (Windows 14 View...
Basic User Guide - Page 11
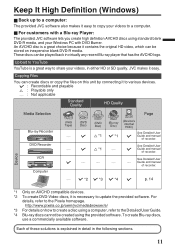
...
-
I Guide and manual
of recorder.
See Detailed User
-
- Guide and manual
of recorder.
- I *2 I *3 I *4 I
p. 14
Device
. .. .
*1 Only on AVCHD compatible devices. *2 To create DVD-Video discs, it is necessary to update the provided software. For
details, refer to the Pixela homepage. http://www.pixela.co.jp/oem/jvc/mediabrowser/e/
*3 For details on how to create a disc using a computer...
Basic User Guide - Page 12
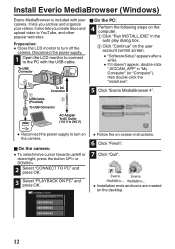
... the user account control screen.
0 "Software Setup" appears after a
while.
0 If it doesn't appear, double-click
"JVCCAM_APP" in "My Computer" (or "Computer"), then double-click the "install.exe".
5 Click "Everio MediaBrowser 4".
USB Cable (Provided)
To USB Connector
AC Adapter
To AC Outlet (110 V to 240 V)
.
0 Reconnect the power supply to turn on
the camera.
o On the camera: 0 To select/move...
Basic User Guide - Page 13
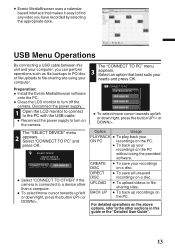
... to file-sharing site using your computer.
Preparation:
0 Install the Everio MediaBrowser software
onto the PC.
0 Close the LCD monitor to turn off the
camera. Disconnect the power supply.
1 Open the LCD monitor to connect to the PC with the USB cable. 0 Reconnect the power supply to turn on the camera.
The "SELECT DEVICE" menu
2 appears. Select "CONNECT TO PC...
Basic User Guide - Page 14
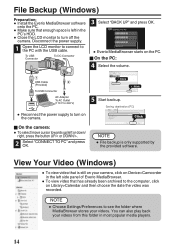
... only supported by
the provided software.
View Your Video (Windows)
0 To view video that is still on your camera, click on Device>Camcorder
in the left side panel of Everio MediaBrowser.
0 To view video that has already been archived to the computer, click
on Library>Calendar and then choose the date the video was recorded.
NOTE 0 Choose Settings...
Basic User Guide - Page 15
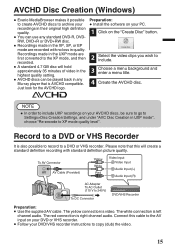
... converted to the XP mode, and then recorded.
0 A standard 4.7 GB disc will hold
approximately 35 minutes of video in the highest quality setting.
0 AVCHD discs can be played back in any
Blu-ray player that is AVCHD compatible. Just look for the AVCHD logo.
Preparation:
0 Install the software on your PC.
1 Click on the "Create...
Basic User Guide - Page 16
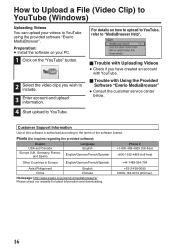
... Videos 0 Check if you have created an account
with YouTube.
o Trouble with Using the Provided Software "Everio MediaBrowser"
0 Consult the customer service center
below.
Customer Support Information
Use of this software is authorized according to the terms of the software license.
Pixela (for inquires regarding the provided software)
Region USA and Canada Europe (UK, Germany, France,
and...
Basic User Guide - Page 17
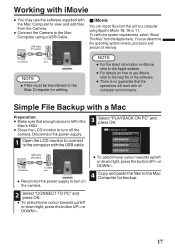
... from the Camera.
0 Connect the Camera to the Mac
Computer using a USB Cable.
USB cable (Provided)
o iMovie
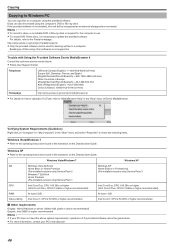
You can import files from this unit to a computer using Apple's iMovie '08, '09 or '11. To verify the system requirements, select "About This Mac" from the Apple menu. You can determine the operating system version, processor and amount of memory.
.
To USB Connector
To USB port
NOTE...
User Manual - English - Page 2
...-SCREEN DISPLAY 63 Display Settings Menu 64 LANGUAGE 64 DATE DISPLAY STYLE 64 MONITOR BRIGHTNESS 65 Basic Settings Menu 66 DEMO MODE 66 OPERATION SOUND 67 AUTO POWER OFF 67 QUICK RESTART 68 UPDATE 68 PC SOFTWARE UPDATE 68 FACTORY PRESET 68 Connection Settings Menu 69 DISPLAY ON TV 69 VIDEO OUTPUT 69 HDMI OUTPUT 70 HDMI CONTROL 70 Media Settings Menu 71 FORMAT SD CARD 71 MOBILE...
User Manual - English - Page 15
... same manner as standard
SDHC/SDXC cards. UHS Speed Class is not supported.
When your computer cannot recognize the SDXC card Confirm and update the OS of your computer.
Windows XP /
Necessary to update to SP2 or higher.
Windows XP SP1
Windows XP SP2 / Windows XP SP3
Necessary to download the update software. (KB955704) http://www.microsoft.com/downloads/ details.aspx?FamilyID=1cbe3906-ddd1...
User Manual - English - Page 46
Copying
Copying to Windows PC
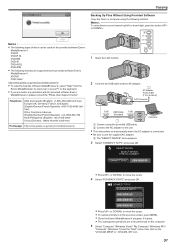
You can copy files to a computer using the provided software. Discs can also be created using the computer's DVD or Blu-ray drive. If the provided software is not installed, this unit will be recognized as an external storage when connected. Memo :
0 To record to discs, a recordable DVD or Blu-ray drive is required for the computer in use. 0 To create...
User Manual - English - Page 47
Copying
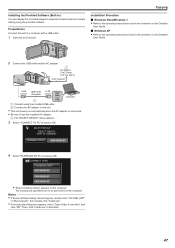
Installing the Provided Software (Built-in) You can display the recorded images in calendar format and perform simple editing using the provided software.
Preparations Connect this unit to a computer with a USB cable. 1 Open the LCD monitor.
Installation Procedure
o Windows Vista/Windows 7 0 Refer to the operating instructions found in the animation on the Detailed
User Guide.
o Windows ...
User Manual - English - Page 49
... the USB cable and close the LCD monitor.
Copying
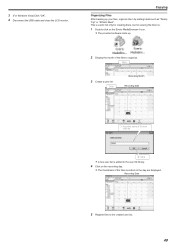
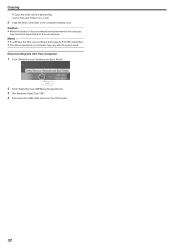
Organizing Files After backing up your files, organize them by adding labels such as "Family Trip" or "Athletic Meet". This is useful not only for creating discs, but for viewing the files too. 1 Double-click on the Everio MediaBrowser 4 icon.
0 The provided software starts up.
.
2 Display...
User Manual - English - Page 51
....
2 Connect the USB cable and the AC adapter.
AC Adapter To AC Outlet (110 V to 240 V) To DC Connector
To USB Connector
USB Cable (Provided)
To USB Connector
Computer
.
A Connect using the provided USB cable. B Connect the AC adapter to this unit.
0 This unit powers on automatically when the AC adapter is connected. 0 Be sure to use the supplied AC adapter.
C The "SELECT DEVICE" menu appears...
User Manual - English - Page 52
... anymore. Memo :
0 To edit/view the files, use a software that supports AVCHD (video) files. 0 The above operations on computer may vary with the system used. Disconnecting this Unit from Computer 1 Click "Safely Remove Hardware and Eject Media".
Click
.
2 Click "Safely Remove USB Mass Storage Device". 3 (For Windows Vista) Click "OK". 4 Disconnect the USB cable and close the LCD monitor.
52
User Manual - English - Page 66
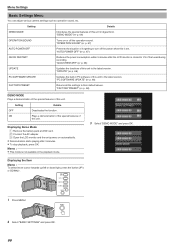
... is set. "AUTO POWER OFF" (A p. 67)
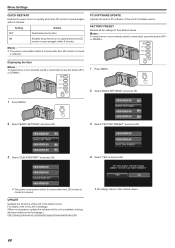
QUICK RESTART
Reduces the power consumption within 5 minutes after the LCD monitor is closed to 1/3 of that used during recording. "QUICK RESTART" (A p. 68)
UPDATE
Updates the functions of this unit to the latest version. "UPDATE" (A p. 68)
PC SOFTWARE UPDATE
Updates the built-in PC software of this unit to the latest version. "PC SOFTWARE UPDATE" (A p. 68...
User Manual - English - Page 68
... power consumption within 5 minutes after the LCD monitor is
closed is reduced.
UPDATE Updates the functions of this unit to the latest version. For details, refer to the JVC homepage. (When no program to update the software of this unit is available, nothing will be provided on the homepage.) http://www3.jvckenwood.com/dvmain/support/download/index.html
.
0 All settings...
User Manual - English - Page 79
... UP" menu is displayed. "Backing Up All Files" (A p. 48)
Unable to turn off the BACK-UP menu. Turn off the power of this unit or remove the AC adapter.
Unable to copy files to the computer's HDD. Connect the USB cable correctly. "Backing Up All Files" (A p. 48) If the provided software Everio MediaBrowser 4 is not installed, some functions may...