Lexmark 3200 - MFP - Option driver and firmware
Drivers and firmware downloads for this Lexmark item
Related Lexmark 3200 Manual Pages
Download the free PDF manual for Lexmark 3200 and other Lexmark manuals at ManualOwl.com
Setup Guide - Page 2
... server containing the fax modem port, follow all safety precautions of any equipment into which the card is being installed.
• Never install or use this equipment in wet locations.
• Before attempting to access the printer compartment where the option card is installed, you must remove the fax phone line cable first from the wall outlet, and then from the fax modem port of the...
Setup Guide - Page 3
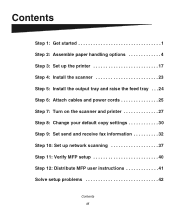
... handling options 4 Step 3: Set up the printer 17 Step 4: Install the scanner 23 Step 5: Install the output tray and raise the feed tray . . . 24 Step 6: Attach cables and power cords 25 Step 7: Turn on the scanner and printer 27 Step 8: Change your default copy settings 30 Step 9: Set send and receive fax information 32 Step 10: Set up network scanning 37 Step 11: Verify MFP setup 40...
Setup Guide - Page 5

... with the option or your printer and then return to this guide and continue setup.
If you encounter a problem while setting up the printer, see the "Solve setup problems" on page 42 or visit our Web site at www.lexmark.com.
Turning off the printer
If you are installing a scanner after initial printer setup, turn the printer off and unplug the power cord from...
Setup Guide - Page 6
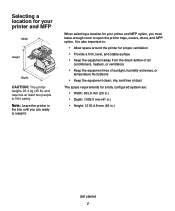
...) and requires at least two people to lift it safely. Note: Leave the printer in the box until you are ready to install it.
When selecting a location for your printer and MFP option, you must leave enough room to open the printer trays, covers, doors, and MFP option. It is also important to:
• Allow space around the...
Setup Guide - Page 7
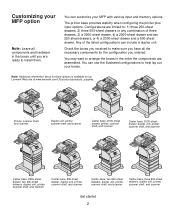
Customizing your MFP option
Note: Leave all components and hardware in the boxes until you are ready to install them.
You can customize your MFP with various input and memory options.
The printer base provides stability when configuring the printer plus input options. Configurations are limited to: 1) three 250-sheet drawers, 2) three 500-sheet drawers or any combination of three...
Setup Guide - Page 8
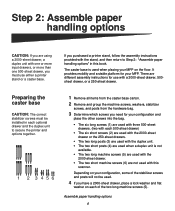
... your MFP on the floor. It provides mobility and a stable platform for your MFP. There are different assembly instructions for use with a 2000-sheet drawer, 500sheet drawer, or a 250-sheet drawer.
Preparing the caster base
CAUTION: The correct stabilizer screws must be installed in each optional drawer and the duplex unit to secure the printer and options together...
Setup Guide - Page 9
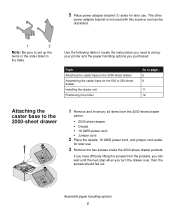
5 Place power adapter bracket (1) aside for later use. The other
power adapter bracket is not used with this scanner and can be discarded.
Note: Be sure to set up the items in the order listed in the table.
Use the following table to locate the instructions you need to set up your printer and the paper handling options you purchased...
Setup Guide - Page 10
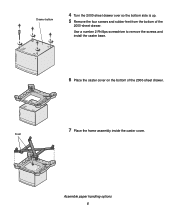
... up. 5 Remove the four screws and rubber feet from the bottom of the
2000-sheet drawer.
Use a number 2 Phillips screwdriver to remove the screws and install the caster base.
6 Place the caster cover on the bottom of the 2000-sheet drawer.
7 Place the frame assembly inside the caster cover.
Front
Assemble...
Setup Guide - Page 12
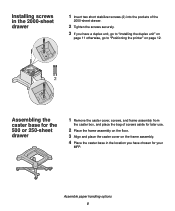
...the
2000-sheet drawer.
2 Tighten the screws securely.
3 If you have a duplex unit, go to "Installing the duplex unit" on
page 11 otherwise, go to "Positioning the printer" on page 12.
Assembling the caster base for the 500 or 250-sheet drawer
1 Remove the caster ... cover on the frame assembly.
4 Place the caster base in the location you have chosen for your
MFP.
Assemble paper handling options 8
Setup Guide - Page 13
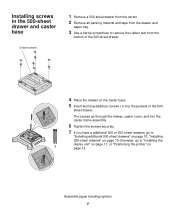
Installing screws in the 500-sheet drawer and caster base
Drawer bottom
1 Remove a 500-sheet drawer from the .... 7 If you have a additional 500 or 250-sheet drawers, go to
"Installing additional 500-sheet drawers" on page 10, "Installing 250-sheet drawers" on page 10 otherwise, go to "Installing the duplex unit" on page 11, or "Positioning the printer" on page 12.
Assemble paper handling options 9
Setup Guide - Page 14

...drawer on top of the previously installed drawer.
Make sure they lock together...install another 500-sheet drawer.
Installing 250sheet drawers
Drawer bottom
1 Remove a 250-sheet drawer from the carton.
2 Remove all packing material and tape from the drawer and
paper tray.
3 Use a flat tip screwdriver to remove the rubber feet from the
bottom of the 250-sheet drawer.
Assemble paper handling options...
Setup Guide - Page 16
... of the screws of the previously installed drawer.
7 Tighten the posts securely.
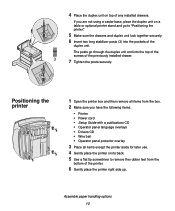
Positioning the printer
1 Open the printer box and then remove all items from the box. 2 Make sure you have the following items:
• Printer • Power cord • Setup Guide with a publications CD • Operator panel language overlays • Drivers CD • Wire bail • Operator...
Setup Guide - Page 18
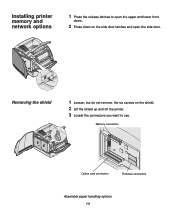
Installing printer memory and network options
1 Press the release latches to open the upper and lower front
doors.
2 Press down on the side door latches and open the side door.
Removing the shield
1 Loosen, but do not remove, the six screws on the shield. 2 Lift the shield up and off the printer. 3 Locate the connectors you want...
Setup Guide - Page 19
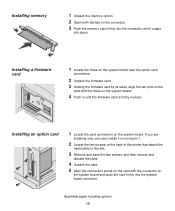
... the memory card firmly into the connector until it snaps
into place.
Installing a firmware card
1 Locate the holes on the system board near the option card
connectors.
2 Unpack the firmware card. 3 Holding the firmware card by its sides, align the two pins on the
card with the holes on the system board.
4 Push in until the firmware card is firmly in place.
Installing an option card
1 Locate...
Setup Guide - Page 27
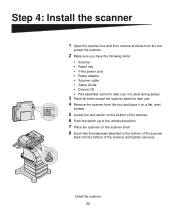
...Install the scanner
1 Open the scanner box and then remove all items from the box
except the scanner.
2 Make sure you have the following items:
• Scanner • Paper tray • Y-line power cord • Power adapter • Scanner cable • Setup Guide • Drivers CD • Pad assembly (store for later use, not used during setup... and tighten securely.
Install the scanner 23
Setup Guide - Page 32
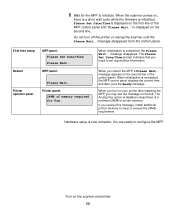
... of the MFP control panel and "Please Wait..." is displayed on the second line.
Do not turn off the printer or unplug the scanner until the Please Wait... message disappears from the control panel.
First time setup Restart
MFP panel: Please Set Date/Time Please Wait...
MFP panel:
Printer operator panel
Please Wait...
Printer panel: 24MB of memory required for Fax...
When initialization...
Setup Guide - Page 35
... with the drivers CD.
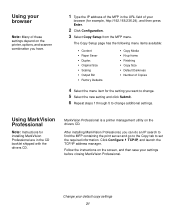
MarkVision Professional is a printer management utility on the drivers CD.
After installing MarkVision Professional, you can do an IP search to find the MFP containing the print server and go to the Copy tab to set the required information. Click Configure TCP/IP, and launch the TCP/IP address manager.
Follow the instructions on the...
Setup Guide - Page 39

... automatically.
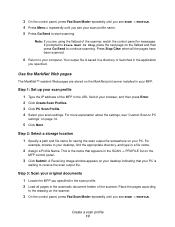
To set the fax transmission log options:
1 Type the IP address of the MFP in the URL field of your
browser, and then press Enter.
2 Click Configuration. 3 Under the MFP heading, click Fax Setup. 4 Click Configuration. 5 Set your options for printing the transmission logs and output
bins.
6 When you finish, click Submit.
See your printer documentation for supported paper sizes...
User's Reference - Page 17
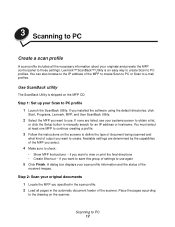
... 1: Set up your Scan to PC profile 1 Launch the ScanBack Utility. If you installed the software using the default directories, click
Start, Programs, Lexmark, MFP, and then ScanBack Utility.
2 Select the MFP you want to use. If none are listed, see your systems person to obtain a list,
or click the Setup button to manually search for an IP address or...
User's Reference - Page 18
... Image window appears on your desktop indicating that your PC is
waiting to receive the scan output file.
Step 3: Scan your original documents
1 Locate the MFP you specified in the scan profile. 2 Load all pages in the automatic document feeder of the scanner. Place the pages according
to the drawing on the scanner.
3 On the control panel, press Fax/Scan...