Lexmark X2310 driver and firmware
Related Lexmark X2310 Manual Pages
Download the free PDF manual for Lexmark X2310 and other Lexmark manuals at ManualOwl.com
User's Guide - Page 2

... outlet that is near the product and easily accessible.
• Refer service or repairs, other than those described in the user documentation, to a professional service person.
CAUTION: Do not set up this product or make any electrical or cabling connections, such as the power supply cord or telephone, during a lightning storm.
Conventions
Note: A note identifies...
User's Guide - Page 7
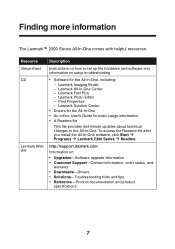
... last-minute updates about technical changes to the All-In-One. To access the Readme file after you install the All-In-One software, click Start Æ Programs Æ Lexmark 2300 Series Æ Readme.
http://support.lexmark.com
Information on:
• Upgrades-Software upgrade information • Customer Support-Contact information, order status, and
warranty • Downloads-Drivers •...
User's Guide - Page 8
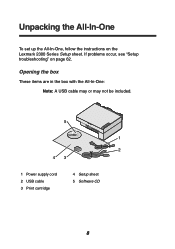
Unpacking the All-In-One
To set up the All-In-One, follow the instructions on the Lexmark 2300 Series Setup sheet. If problems occur, see "Setup troubleshooting" on page 62.
Opening the box
These items are in the box with the All-In-One: Note: A USB cable may or may not be included.
5
1
2 43
1 Power supply cord 2 USB cable 3 Print cartridge
4 Setup sheet 5 Software CD
8
User's Guide - Page 10
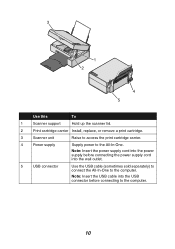
... support
Hold up the scanner lid.
2
Print cartridge carrier Install, replace, or remove a print cartridge.
3
Scanner unit
Raise to access the print cartridge carrier.
4
Power supply
Supply power to the All-In-One.
Note: Insert the power supply cord into the power supply before connecting the power supply cord into the wall outlet.
5
USB connector
Use the USB cable (sometimes...
User's Guide - Page 12

...-In-One software includes these components:
• Lexmark Imaging Studio (for quick access to each task) • Lexmark All-In-One Center (for managing tasks and print options) • Lexmark Fast Pics (for quick digital photo selection and printing) • Lexmark Photo Editor (for improving photo size, composition, and
quality)
• Print Properties (for changing printer settings) •...
User's Guide - Page 14
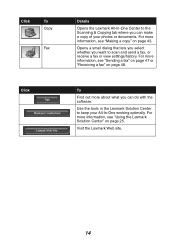
... a copy" on page 43.
Opens a small dialog that lets you select whether you want to scan and send a fax, or receive a fax or view settings/history. For more information, see "Sending a fax" on page 47 or "Receiving a fax" on page 48.
To
Find out more about what you can do with the software.
Use the tools in the Lexmark...
User's Guide - Page 18
... the Lexmark Solution Center. Clicking Maintain/Troubleshoot lets you choose from these topics:
• Maintain or fix quality problems • Troubleshoot All-In-One problems • Device status and ink levels • More printing ideas and how-to's • Contact information • Advanced (skin, voice, and communication options) • View the software version and...
User's Guide - Page 20

9 Select a Paper size in printer. 10 Select the Number of copies. 11 Click the Print Now button to print the photos.
Using the Lexmark Photo Editor
To open the Lexmark Photo Editor, click Start Æ Programs Æ Lexmark 2300 Series Æ Lexmark Photo Editor.
You can also open the Lexmark Photo Editor from the All-In-One Center...
User's Guide - Page 26
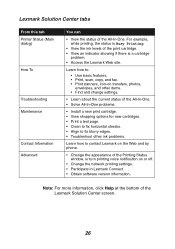
.... • Troubleshoot other ink problems.
Learn how to contact Lexmark on the Web and by phone.
• Change the appearance of the Printing Status window, or turn printing voice notification on or off.
• Change the network printing settings. • Participate in Lexmark Connect. • Obtain software version information.
Note: For more information, click Help at the bottom...
User's Guide - Page 39
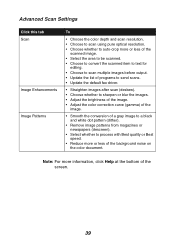
... scan resolution. • Choose to scan using pure optical resolution. • Choose whether to auto-crop more or less of the
scanned image. • Select the area to be scanned. • Choose to convert the scanned item to text for
editing. • Choose to scan multiple images before output. • Update the list of programs to send scans. • Update the default fax driver...
User's Guide - Page 48
..., see
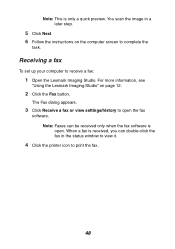
"Using the Lexmark Imaging Studio" on page 12.
2 Click the Fax button.
The Fax dialog appears.
3 Click Receive a fax or view settings/history to open the fax
software. Note: Faxes can be received only when the fax software is open. When a fax is received, you can double-click the fax in the status window to view it.
4 Click the printer icon to print...
User's Guide - Page 49
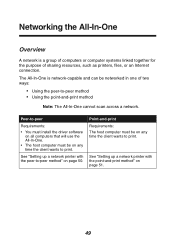
...-and-print method
Note: The All-In-One cannot scan across a network.
Peer-to-peer
Requirements:
• You must install the driver software on all computers that will use the All-In-One.
• The host computer must be on any time the client wants to print.
See "Setting up a network printer with the peer-to-peer method" on page...
User's Guide - Page 50
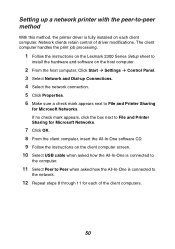
..., the printer driver is fully installed on each client computer. Network clients retain control of driver modifications. The client computer handles the print job processing.
1 Follow the instructions on the Lexmark 2300 Series Setup sheet to
install the hardware and software on the host computer.
2 From the host computer, Click Start Æ Settings Æ Control Panel. 3 Select Network and Dial...
User's Guide - Page 51
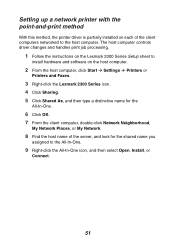
..., the printer driver is partially installed on each of the client computers networked to the host computer. The host computer controls driver changes and handles print job processing.
1 Follow the instructions on the Lexmark 2300 Series Setup sheet to
install hardware and software on the host computer.
2 From the host computer, click Start Æ Settings Æ Printers or
Printers and Faxes...
User's Guide - Page 62
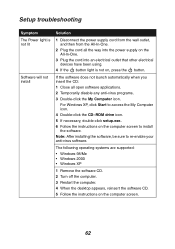
... the My Computer icon. 4 Double-click the CD-ROM drive icon. 5 If necessary, double-click setup.exe. 6 Follow the instructions on the computer screen to install the software. Note: After installing the software, be sure to re-enable your anti-virus software.
The following operating systems are supported: • Windows 98/Me • Windows 2000 • Windows XP
1 Remove the software CD. 2 Turn...
User's Guide - Page 63
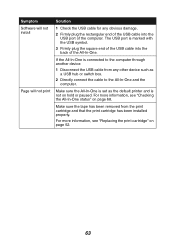
Symptom Software will not install
Page will not print
Solution
1 Check the USB cable for any obvious damage.
2 Firmly plug the rectangular end of the USB cable into the USB port of the computer. The USB port is marked with the USB symbol.
3 Firmly plug the square end of the USB cable into the back of the All-In-One.
If the All-In-One...
User's Guide - Page 64
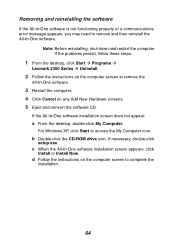
... the All-In-One software installation screen does not appear:
a From the desktop, double-click My Computer.
For Windows XP, click Start to access the My Computer icon.
b Double-click the CD-ROM drive icon. If necessary, double-click
setup.exe.
c When the All-In-One software installation screen appears, click
Install or Install Now.
d Follow the instructions on the computer screen to complete the...
User's Guide - Page 75
... Images 17 Scanning &
Copying 16 All-In-One parts 9 All-In-One software 12
B
banner paper 29 borderless printing 35
C
cartridge aligning 56 cleaning 57 installing 54 ordering 60 preserving 59 removing 52 replacing 52
changing print settings 33
cleaning print cartridge nozzles 57 scanner glass 59
coated paper 30 Contact Information
tab 26 control panel...
User's Guide - Page 76
... 66 Printer Status tab 26 printing
borderless photos 35 documents 33 photos 34 projects collating copies 36 creating a booklet 36 faxing 47 making a poster 36 printing a banner 36 printing a greeting
card 36 printing a photo 36 printing last page
first 36 printing on an
envelope 36 scanning a photograph
to e-mail 41
R
receiving a fax 48 recycling 60 reinstalling software...
User's Guide - Page 77

... uninstalling 64 specialty paper banner paper 29 envelopes 31 greeting cards 29 photo/glossy paper 28 postcards 29 transparencies 30 supplies ordering 60 recycling 60
install 62 Troubleshooting tab 26
U
understanding Lexmark Solution Center 25 Print Properties 22
uninstalling software 64 USB cable 60
W
Web site, Lexmark 60 wiping print cartridge
nozzles 58
T
top cover 9 transparencies 30...