Lexmark X852E - Mfp driver and firmware
Drivers and firmware downloads for this Lexmark item
Related Lexmark X852E Manual Pages
Download the free PDF manual for Lexmark X852E and other Lexmark manuals at ManualOwl.com
User's Reference - Page 2

... STATES GOVERNMENT RESTRICTED RIGHTS This software and documentation are provided with RESTRICTED RIGHTS. Use, duplication or disclosure by the Government is subject to restrictions as set forth in subparagraph (c)(1)(ii) of the Rights in Technical Data and Computer Software clause at DFARS 252.2277013 and in applicable FAR provisions: Lexmark International, Inc., Lexington, KY 40550...
User's Reference - Page 6
... been scanned.
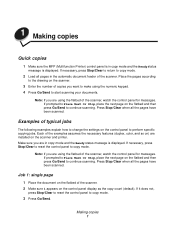
Examples of typical jobs
The following examples explain how to change the settings on the control panel to perform specific copying jobs. Each of the examples assumes the necessary features (duplex, color, and so on) are installed on the scanner and printer. Make sure you are in copy mode and the Ready status message is displayed...
User's Reference - Page 17
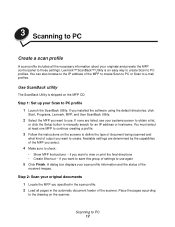
... 1: Set up your Scan to PC profile 1 Launch the ScanBack Utility. If you installed the software using the default directories, click
Start, Programs, Lexmark, MFP, and then ScanBack Utility.
2 Select the MFP you want to use. If none are listed, see your systems person to obtain a list,
or click the Setup button to manually search for an IP address or...
User's Reference - Page 18
... Image window appears on your desktop indicating that your PC is
waiting to receive the scan output file.
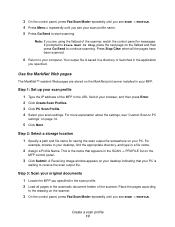
Step 3: Scan your original documents
1 Locate the MFP you specified in the scan profile. 2 Load all pages in the automatic document feeder of the scanner. Place the pages according
to the drawing on the scanner.
3 On the control panel, press Fax/Scan...
User's Reference - Page 19
... window changes to Image
Received. Once your scan output file appears in the list, you can select it and launch an application to open the file.
Note: PC Scan Profiles are not stored. Once they are used, they disappear from the control panel list.
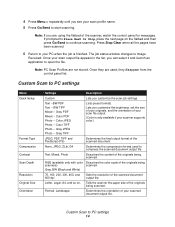
Custom Scan to PC settings
Menu Quick Setup
Format Type Compression Contrast Scan Depth Resolution...
User's Reference - Page 34
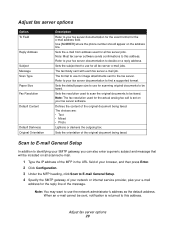
... To Field
Reply Address
Subject Message Scan Type Paper Size Fax Resolution
Default Content
Default Darkness Original Orientation
Description
Refer to your fax server documentation for the exact format for the e-mail address field. Use [NUMBER] where the phone number should appear on the address line.
Sets the e-mail from address used for all fax server jobs. Note: Most fax server software sends...
User's Reference - Page 39
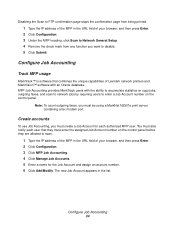
... Lexmark network printers and MarkVision™ software with an Oracle database. MFP Job Accounting provides MarkTrack users with the ability to accumulate statistics on copy jobs, outgoing faxes, and scan to network jobs by requiring users to enter a Job Account number on the control panel.
Note: To count outgoing faxes, you must be using a MarkNet N2501e print server containing a fax modem port...
User's Reference - Page 43
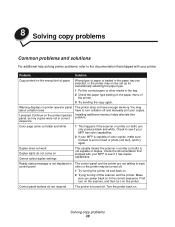
... paper type setting on the paper menu of the printer.
3 Try sending the copy again.
Warning displays on printer operator panel about collation area
I pressed Continue on the printer operator panel, but my copies were not in correct sequence
The printer does not have enough memory. You may have to turn collation off and manually sort your copies.
Installing additional memory helps alleviate...
User's Reference - Page 45

... appears in the top line of the control panel display. Toner cartridge door is open. This message does not display for all scanner and printer combinations.
Message appears if user presses Duplex on the MFP control panel, but the duplex option is not installed correctly on the printer.
Check printer documentation for information about installing the duplex option.
Copy error messages 40
User's Reference - Page 47
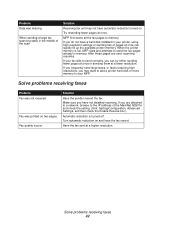
... at once.
MFP first scans all the fax pages to memory.
If you do not have a hard disk installed in your printer, using high resolution settings or sending lots of pages at once can rapidly fill up the available printer memory. When the printer memory is full, MFP dials and attempts to send the fax pages already in memory. After those pages are sent, scanning resumes.
If...
User's Reference - Page 59

... 6
J
job accounts setting a password 35
K
keypad description, control panel 19
M
MarkNet print server 13, 24 MarkTrack software 34 MarkVision software 34 menus
Fax log 27 Fax send 26
N
N-up copying 6
P
paper jams 52 print server 13, 24 problem solving
copying 38 multiple pages feed 53 no duplex lights on 6 paper jam 53 paper skew 53 receiving faxing 42 scan unit is...
Setup Guide - Page 3

... containing the fax modem port, follow all safety precautions of any equipment into which the card is being installed.
• Never install or use this equipment in wet locations.
• Before attempting to access the printer compartment where the option card is installed, you must remove the fax phone line cable first from the wall outlet, and then from the fax modem port of the...
Setup Guide - Page 4

... printer 17 Step 4: Install the scanner 23 Step 5: Install the feed tray and paper stop 24 Step 6: Attach cables and power cords 26 Step 7: Turn on the scanner and printer 28 Step 8: Change your default copy settings 30 Step 9: Set send and receive fax information 32 Step 10: Set up network scanning 37 Step 11: Verify MFP setup 40 Step 12: Distribute MFP user instructions 41 Solve setup...
Setup Guide - Page 17
... of the screws of the previously installed drawer.
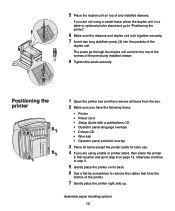
8 Tighten the posts securely.
Positioning the printer
1 Open the printer box and then remove all items from the box. 2 Make sure you have the following items:
• Printer • Power cord • Setup Guide with a publications CD • Operator panel language overlays • Drivers CD • Wire bail • Operator...
Setup Guide - Page 19
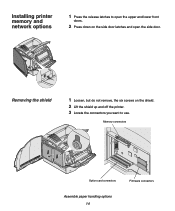
... open the side door.
Removing the shield
1 Loosen, but do not remove, the six screws on the shield. 2 Lift the shield up and off the printer. 3 Locate the connectors you want to use.
Memory connectors
Option card connectors
Firmware connectors
Assemble paper handling options 14
Setup Guide - Page 20
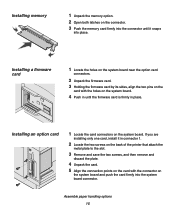
... the memory card firmly into the connector until it snaps
into place.
Installing a firmware card
1 Locate the holes on the system board near the option card
connectors.
2 Unpack the firmware card. 3 Holding the firmware card by its sides, align the two pins on the
card with the holes on the system board.
4 Push in until the firmware card is firmly in place.
Installing an option card
1 Locate...
Setup Guide - Page 28
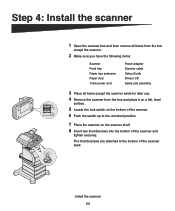
Step 4: Install the scanner
1 Open the scanner box and then remove all items from the box
except the scanner.
2 Make sure you have the following items:
Scanner Feed tray Paper tray extension Paper stop Y-line power cord
Power adapter Scanner cable Setup Guide Drivers CD Spare pad assembly...
tighten securely.
The thumbscrews are attached to the bottom of the scanner shelf.
Install the scanner 23
Setup Guide - Page 34
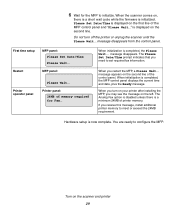
... of the MFP control panel and "Please Wait..." is displayed on the second line.
Do not turn off the printer or unplug the scanner until the Please Wait... message disappears from the control panel.
First time setup Restart
MFP panel: Please Set Date/Time Please Wait...
MFP panel:
Printer operator panel
Please Wait...
Printer panel: 24MB of memory required for Fax...
When initialization...
Setup Guide - Page 36
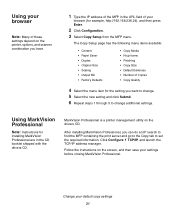
... with the drivers CD.
MarkVision Professional is a printer management utility on the drivers CD.
After installing MarkVision Professional, you can do an IP search to find the MFP containing the print server and go to the Copy tab to set the required information. Click Configure TCP/IP, and launch the TCP/IP address manager.
Follow the instructions on the...
Setup Guide - Page 40
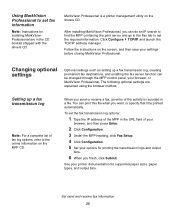
... with the drivers CD.
MarkVision Professional is a printer management utility on the drivers CD.
After installing MarkVision Professional, you can do an IP search to find the MFP containing the print server and go to the Fax tab to set the required information. Click Configure TCP/IP, and launch the TCP/IP address manager.
Follow the instructions on the...