MSI CR620 driver and firmware


Related MSI CR620 Manual Pages
Download the free PDF manual for MSI CR620 and other MSI manuals at ManualOwl.com
User Manual - Page 3

... ...3-2 Connecting the AC Power ...3-2 Using the Battery Power...3-4 ECO Engine -- Power Saving Function 3-10 Power Management in Windows OS 3-12 Energy Saving Tips...3-14
Basic Operations ...3-15 Safety and Comfort Tips...3-15 Having a Good Work Habit...3-16 Knowing the Keyboard ...3-17 Knowing the Touchpad ...3-24 About Hard Disk Drive...3-27 Using the Optical Drive Device 3-28
Connecting the...
User Manual - Page 4
Preface
1-4
ExpressCard Installation...3-37 Removing the ExpressCard 3-37 Installing the ExpressCard ...3-37
Safely Remove Hardware ...3-39 Components Replacement and Upgrade 3-40
BIOS Setup
About BIOS Setup...4-2 When to Use BIOS Setup...4-2 How to Run BIOS Setup...4-2 Control Keys ...4-3
BIOS Setup Menu...4-4 Main menu...4-5 Advanced menu...4-7 Boot menu ...4-9 Security menu...4-10 Save & ...
User Manual - Page 5
...digital device, pursuant to part 15 of the FCC rules. These limits are designed to provide reasonable protection against harmful interference in a residential installation. This equipment generates, uses and radiates radio frequency energy, and, if not installed and used in accordance with the instructions...132; Consult the dealer or an experienced radio TV technician for help.
NOTE Š The ...
User Manual - Page 8
...~240V before connecting the equipment to the power outlet. Š Always unplug the AC power cord before installing any add-on card or module to the equipment. Š Always disconnect the AC power cord or uninstall the battery pack or... that could damage the equipment or cause an electrical shock.
Place the power cord in a way that people are unlikely to step on it. Do not place anything on top of...
User Manual - Page 9
Preface
1-9
When installing the coaxial cable to the TV Tuner, it is necessary to ensure that the metal shield is reliable connected to protective earthing system of the building.
Cable distribution system should be grounded (earthed) in accordance with ANSI/NFPA 70, the National Electrical Code (NEC), in particular Section 820.93, Grounding of Outer...
User Manual - Page 10

... to the environment and health Š Easily dismantled and recycled Š Reduced use of natural resources by encouraging recycling Š Extended product lifetime through easy upgrades Š Reduced solid waste production through take-back policy
Environmental Policy Š The product has been designed to enable proper reuse of parts and recycling...
User Manual - Page 24
...satisfaction.
Manual Map
This User's Manual provides instructions and illustrations on how to operate this notebook. It is recommended to read this manual carefully ...instructions on using keyboard, touchpad, hard disk drive, and optical storage drive. Beside, the steps of installing and uninstalling the battery; and the procedures of connecting the various external devices, communication devices...
User Manual - Page 25

...above may change without notice.
Introductions
Chapter 4, BIOS Setup, provides information on BIOS Setup program and allows you to configure the system ...:
Notebook
Quick Start Manual
High-capacity Li-ion battery
AC adapter and power cord
Carry bag (optional)
All-in-one application disk, containing the full version of user's manual, drivers, utilities, and optional recovery function, etc..
User Manual - Page 29
Introductions
2-7
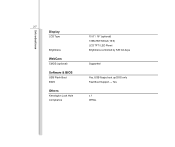
Display
LCD Type
Brightness
WebCam
CMOS (optional)
Software & BIOS
USB Flash Boot BIOS
Others
Kensington Lock Hole Compliance
15.6" / 16" (optional) 1366x768 WXGA (16:9) LCD TFT/ LED Panel Brightness controlled by K/B hot-keys
Supported
Yes, USB floppy boot up DOS only Fast Boot Support --- Yes
x 1 WHQL
User Manual - Page 33
....
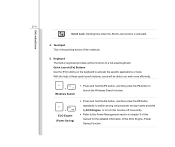
4. Touchpad This is the pointing device of the notebook.
5. Keyboard The built...Windows Search function.
+ ECO Engine (Power Saving)
Š Press and hold the Fn button, and then press the F5 button repeatedly to switch among various power saving modes provided by ECO Engine, or to turn this function off recurrently.
Š Refer to the Power Management section in chapter 3 of this manual...
User Manual - Page 46
Getting Started
3-5
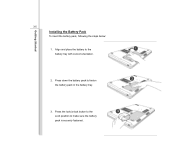
Installing the Battery Pack
To insert the battery pack, following the steps below:
1. Align and place the battery to the battery tray with correct orientation.
2. Press down the battery pack to fasten the battery pack in the battery tray.
1 2
3. Press the lock/unlock button to the
3
Lock position to make sure the battery
pack is securely fastened.
User Manual - Page 50
... the system or Save-to-Disk.
Š Plug in an external AC/DC adapter. Š You can use the system, suspend system operation or shut down and turn off the system
without interrupting the charging process. Š The battery pack uses Lithium-ion battery cells that have no "memory effect." It is
unnecessary...
User Manual - Page 53
... the power management settings in Windows OS: 1. Power Options in Windows OS allow you to control the power management features of your
display, hard drive, and battery. Go to the Start menu and click on the Control Panel. Click on the System and Maintenance. 2. Then click on the Power Options. 3. Then select a power plan that meets your personal needs 4. The Shut Down Computer...
User Manual - Page 55

... monitor after a period of user inactivity. Š Utilize the Fn and F12 sleep mode keys to turn into power saving mode. Š Tune the settings in Power Options under Windows OS to optimize the computer's power
management. Š Always disconnect the AC power cord or uninstall the battery pack or switch off the wall socket if
the...
User Manual - Page 61
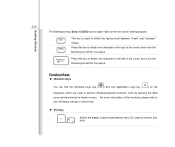
... key ( ) on the keyboard, which are used to perform Windows-specific functions, such as opening the Start menu and launching the shortcut menu. For more information of the two keys, please refer to your Windows manual or online help.
„ [Fn] Key
Switch the display output mode between the LCD, external monitor and both. +
User Manual - Page 66
... Microsoft or IBM PS/2 driver in your Windows operating system. The Mouse Properties in Control Panel allows you to change... the configuration.
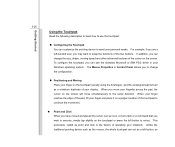
„ Positioning and Moving Place your finger on the touchpad (usually using the forefinger), and the rectangular pad will act as a miniature duplicate of your display...
User Manual - Page 68
Getting Started
3-27
About Hard Disk Drive
Your notebook is equipped with a 2.5-inch hard disk drive. The hard disk drive is a storage device with much higher speed and larger capacity than other storage devices, such as the floppy disk drive and optical storage device. Therefore, it is usually used to install the operating system and software applications.
To avoid unexpected data loss in your ...
User Manual - Page 72

..., digital camera, webcam, printer, and external optical storage device, ete.. To connect these devices, install the drivers for each device first if necessary, and then connect the device to the notebook. This notebook is capable to auto detect the USB devices installed, and if there is no detection of the devices, please manually enable the USB devices by going to Start Menu / Control Panel...
User Manual - Page 82
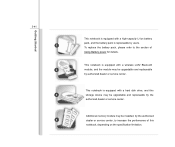
... section of Using Battery power for details.
This notebook is equipped with a wireless LAN/ Bluetooth module, and the module may be upgradable and replaceable by authorized dealer or service center.
This notebook is equipped with a hard disk drive, and this storage device may be upgradable and replaceable by the authorized dealer or service center.
Additional memory module may be installed, by the...
User Manual - Page 88
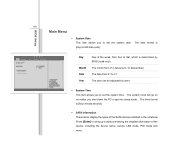
... allows you to set the system time. The system clock will go on no matter you shut down the PC or get into sleep mode. The time format is [hour:minute:second].
Š SATA Information These items display the types of the SATA devices installed in the notebook. Press [Enter] to bring up a window showing the detailed...