MSI P43T driver and firmware

Related MSI P43T Manual Pages
Download the free PDF manual for MSI P43T and other MSI manuals at ManualOwl.com
User Guide - Page 2
... Windows&#...Support
If a problem arises with your system and no solution can be obtained from the user's manual, please contact your place of purchase or local distributor. Alternatively, please try the following help resources for further guidance.
◙ Visit the MSI website for FAQ, technical guide, BIOS updates, driver updates,
and other information: http://www.msi.com/index.php?func=service...
User Guide - Page 4
... the user's authority to operate the equipment. Notice 2 Shielded interface cables and A.C. power cord, if any, must be used in order to comply with the emission limits.
VOIR LA NOTICE D'INSTALLATION AVANT DE RACCORDER AU RESEAU.
Micro-Star International MS-7519
This device complies with Part 15 of the FCC Rules. Operation is subject...
User Guide - Page 9
MS-7519 Appendix A Realtek Audio A-1
Installing the Realtek HD Audio Driver A-2 Software Configuration A-4 Hardware Setup A-19 Appendix B Overclocking Center B-1 Activating Overclocking Center B-2 System Info B-3 DOT B-4
ix
User Guide - Page 15

Packing Checklist
MS-7519
MSI mainboard
MSI Driver/Utility DVD
SATA Cable (Optional)
Power Cable
Standard Cable for IDE Devices
Back IO Shield
User's Guide
* The pictures are for reference only and may vary from the packing contents of the product you purchased.
1-5
User Guide - Page 17
... chapter provides you with the information about hardware setup procedures. While doing the installation, be careful in holding the components and follow the installation procedures. For some components, if you install in the wrong orientation, the components will not work properly. Use a grounded wrist strap before handling computer components. Static electricity may damage the components...
User Guide - Page 19
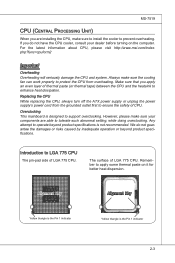
... heat dissipation.
Replacing the CPU While replacing the CPU, always turn off the ATX power supply or unplug the power supply's power cord from the grounded outlet first to ensure the safety of CPU.
Overclocking This mainboard is designed to support overclocking. However, please make sure your components are able to tolerate such abnormal setting, while doing overclocking...
User Guide - Page 20
▍ Hardware Setup
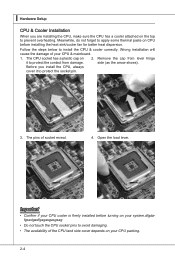
CPU & Cooler Installation
When you are installing the CPU, make sure the CPU has a cooler attached on the top to prevent overheating. Meanwhile, do not forget to apply some thermal paste on CPU before installing the heat sink/cooler fan for better heat dispersion.
Follow the steps below to install the CPU & cooler correctly. Wrong installation will
cause the...
User Guide - Page 22
▍ Hardware Setup
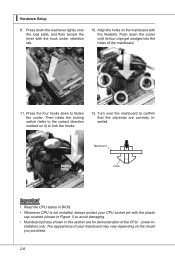
9. Press down the load lever lightly onto the load plate, and then secure the lever with the hook under retention ... the clip-ends are correctly inserted.
Mainboard
locking switch
Hook
Important
• Read the CPU status in BIOS. • Whenever CPU is not installed, always protect your CPU socket pin with the plastic
cap covered (shown in Figure 1) to avoid damaging. ...
User Guide - Page 23
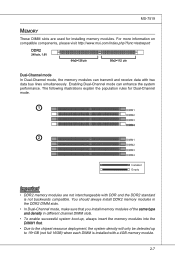
... slots are used for installing memory modules. For more information on compatible components, please visit http://www.msi.com/index.php?func=testreport
DDR2
240-pin, 1.8V
64x2=128 pin
56x2=112 pin
Dual-Channel mode
In Dual-Channel mode, the memory modules can transmit and receive data with two data bus lines simultaneously. Enabling...
User Guide - Page 24
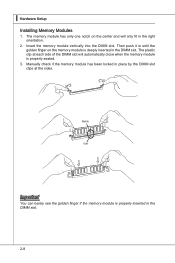
...Setup Installing Memory Modules
1. The memory module has only one notch on the center and will only fit in the right orientation.
2. Insert the memory module vertically into the DIMM slot. Then push it in until the golden finger on the memory...of the DIMM slot will automatically close when the memory module is properly seated.
3. Manually check if the memory module has been locked in place by the ...
User Guide - Page 28
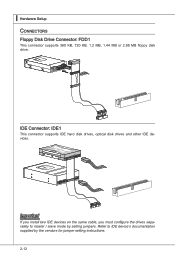
...IDE Connector: IDE1
This connector supports IDE hard disk drives, optical disk drives and other IDE devices.
Fl opMpySDI FlopMpySDIFlopMpySDI Kdkldkddfkkakfskkdskkdakaddfdddffdfkad-...install two IDE devices on the same cable, you must configure the drives separately to master / slave mode by setting jumpers. Refer to IDE device's documentation supplied by the vendors for jumper setting instructions...
User Guide - Page 30
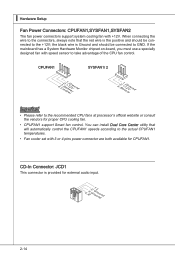
...; Please refer to the recommended CPU fans at processor's official website or consult the vendors for proper CPU cooling fan.
• CPUFAN1 support Smart fan control. You can install Dual Core Center utility that will automatically control the CPUFAN1 speeds according to the actual CPUFAN1 temperatures.
• Fan cooler set with 3 or 4 pins power connector are both available for...
User Guide - Page 37
...7519
Slots
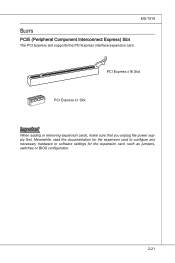
PCIE (Peripheral Component Interconnect Express) Slot
The PCI Express slot supports the PCI Express interface expansion card.
PCI Express x16 Slot
PCI Express x1 Slot
Important
When adding or removing expansion cards, make sure that you unplug the power supply first. Meanwhile, read the documentation for the expansion card to configure any necessary hardware or software settings for the...
User Guide - Page 38
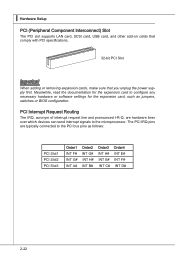
... Setup PCI (Peripheral Component Interconnect) Slot
The PCI slot supports LAN card, SCSI card, USB card, and other add-on cards that comply with PCI specifications.
32-bit PCI Slot
Important
When adding or removing expansion cards, make sure that you unplug the power supply first. Meanwhile, read the documentation for the expansion card to configure any necessary hardware or software settings...
User Guide - Page 61
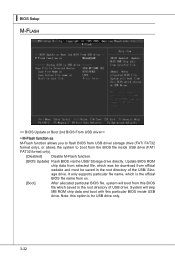
...Setup M-Flash
== BIOS Update or Boot 2nd BIOS From USB drive==
▶ M-Flash function as
M-Flash function allows you to flash BIOS from USB drive/ storage drive (FAT/ FAT32 format only), or allows the system to boot from the BIOS file inside USB drive (FAT/ FAT32 format only).
[Disabled]
Disable M-Flash function.
[BIOS Update] Flash BIOS via the USB/ Storage drive directly. Update BIOS ROM...
User Guide - Page 67
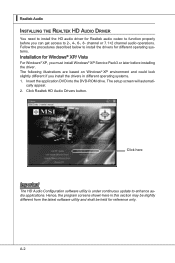
... on Windows® XP environment and could look slightly different if you install the drivers in different operating systems. 1. Insert the application DVD into the DVD-ROM drive. The setup screen will automati-
cally appear. 2. Click Realtek HD Audio Drivers button.
Click here
Important
The HD Audio Configuration software utility is under continuous update to enhance audio applications. Hence...
User Guide - Page 68
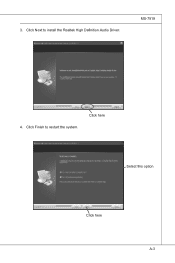
3. Click Next to install the Realtek High Definition Audio Driver.
MS-7519
4. Click Finish to restart the system.
Click here
Select this option
Click here Click here
A-3
User Guide - Page 69

▍ Realtek Audio Software Configuration
After installing the audio driver, you are able to use the 2-, 4-, 6- or 8- channel audio feature now. Click the audio icon from the system tray at the lower-right corner of the screen to activate the HD Audio Configuration. It is also available to enable the audio driver by clicking the Realtek HD Audio Manager from the Control Panel.
Double click
A-4
User Guide - Page 87
...; Realtek Audio
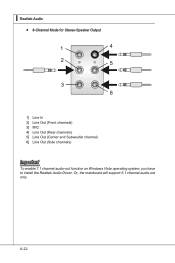
■ 8-Channel Mode for Stereo-Speaker Output
1] Line In 2] Line Out (Front channels) 3] MIC 4] Line Out (Rear channels) 5] Line Out (Center and Subwoofer channel) 6] Line Out (Side channels)
Important
To enable 7.1 channel audio-out function on Windows Vista operating system, you have to install the Realtek Audio Driver. Or, the mainboard will support 5.1 channel audio-out...
User Guide - Page 88
... and powerful utility that MSI has spent much research and efforts to develop, helps users to monitor or configure the hardware status of MSI Mainboard in windows, such as CPU clock, voltage, fan speed and temperature. Before you install the Overclocking Center, please make sure the system has meet the following requirements: 1. 256MB system memory. 2. CD-ROM drive for software installation...