Samsung CLX-9350ND driver and firmware


Related Samsung CLX-9350ND Manual Pages
Download the free PDF manual for Samsung CLX-9350ND and other Samsung manuals at ManualOwl.com
Installation Guide - Page 2

... any direct or indirect damages, arising from or related to use of this user's guide. • Samsung and Samsung logo are trademarks of Samsung Electronics Co., Ltd. • PCL and PCL 6 are trademarks of Hewlett-Packard Company. • Microsoft, Windows, and Windows Vista are either registered trademarks or trademarks of Microsoft Corporation. • PostScript 3 is a trademark...
Installation Guide - Page 3

...41
INITIAL SETTINGS AND TESTING OF THE MACHINE
Initial setting 43 Print adjustment (Dual cassette feeder or High capacity feeder 49 DADF skew test and adjustment 52
Skew test 52 DADF adjustment 55
INSTALLING THE SUPPLIED SOFTWARE
Supplied software 59 System requirements 60
Windows 60 Macintosh 60 Linux 60 UNIX 61 Installing a network connected machine's driver 61 Windows 61
Contents_...
Installation Guide - Page 4
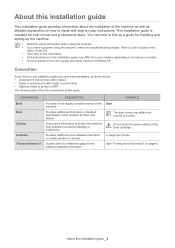
About this installation guide
1 .
This installation guide provides information about the installation of the machine as well as detailed explanation on how to install with step-by-step instructions. This installation guide is valuable for both novice and professional users. You can refer to this as a guide for installing and setting up the machine.
• Read the safety information before using...
Installation Guide - Page 5
... instructions for setting up the options for printing. (See the User's Guide.)
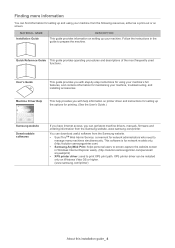
Samsung website
Downloadable softwares
If you have Internet access, you can get latest machine drivers, manuals, firmware and ordering information from the Samsung website, www.samsung.com/printer.
You can download useful software from the Samsung website. • SyncThruTM Web Admin Service: convenient for network...
Installation Guide - Page 6

... • Loading paper • Connecting a printer cable • Turning the machine on
Be sure to go through the following before setting up the hardware: • If you are installing the machine after moving it from a cold to warm location, leave the machine unpacked for at
least two hours so that the machine is fully adapted to...
Installation Guide - Page 8
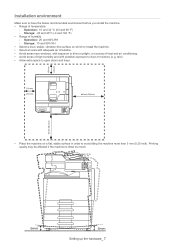
... humidity - Operation: 20 and 80% RH - Storage: 10 and 90% RH • Select a level, stable, vibration-free surface on which to install the machine. • Select an area with adequate air circulation. • Avoid areas near windows, with exposure to direct sunlight, or sources of ... 5 mm (0.20 inch). Printing quality may be affected if the machine is tilted too much.
Setting up the hardware_ 7
Installation Guide - Page 11
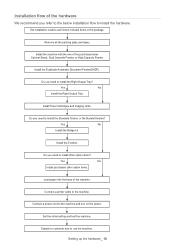
... the Booklet finisher?
Yes
No
Install the Bridge kit.
Install the Finisher.
Do you need to install other option items?
Yes
No
Install purchased other option items.
Load paper into the trays of the machine.
Connect a printer cable to the machine.
Connect a power cord to the machine and turn on the power.
Set the initial setting and test the machine.
Explain...
Installation Guide - Page 12
...may differ depending on the country
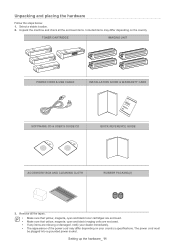
TONER CARTRIDGE
IMAGING UNIT
POWER CORD & USB CABLE
INSTALLATION GUIDE & WARRANTY CARD
SOFTWARE CD & USER'S GUIDE CD
QUICK REFERENCE GUIDE
ACCESSORY BOX AND CLEANING CLOTH
RUBBER PACKING(2)
3. Remove... power cord may differ depending on your country's specifications. The power cord must be plugged into a grounded power socket.
Setting up the hardware_ 11
Installation Guide - Page 13
... items. To install the item, refer to its installation guide.
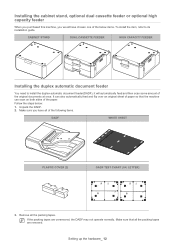
CABINET STAND
DUAL CASSETTE FEEDER
HIGH CAPACITY FEEDER
Installing the duplex automatic document feeder
You need to install the duplex automatic document feeder(DADF), it will automatically feed and then scan some amount of...DADF may not operate normally. Make sure that all the packing tapes are removed.
Setting up the hardware_ 12
Installation Guide - Page 24
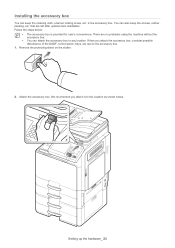
...box. You can also keep the screws, rubber packing, etc. that are left after optional item installation. Follow the steps below:
• The accessory box is provided for user's convenience. There are... box to any location. When you attach the accessory box, consider possible disturbance of the DADF, control panel, trays, etc due to the accessory box.
1. Remove the protecting sheet on the sticker....
Installation Guide - Page 25
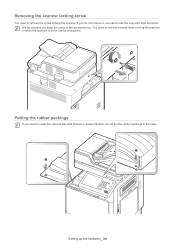
... need to remove the screw locking the scanner. If you do not remove it, you cannot use the copy and scan functions. We recommend you keep the screw in the accessory box. You need to lock the scanner when... use for a long time.
Putting the rubber packings
If you need to install the optional standard finisher or booklet finisher, do not put the rubber packings in the holes.
Setting up the hardware_ 24
Installation Guide - Page 26

Installing the right tray (face up)
Right tray is optional for CLX-9250 series. The right tray is recommended for printing or copying on media that require a straight-through paper path, such as thick paper, envelopes, labels, and transparencies. The right tray can hold up to 150 sheets ...
Installation Guide - Page 28
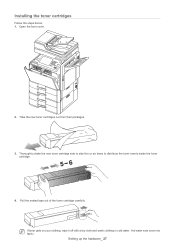
Installing the toner cartridges
Follow the steps below: 1. Open the front cover.
2. Take the new toner cartridges out from their packages.
3. Thoroughly shake the new toner ... of the toner cartridge carefully. If toner gets on your clothing, wipe it off with a dry cloth and wash clothing in cold water. Hot water sets toner into fabric.
Setting up the hardware_ 27
Installation Guide - Page 29
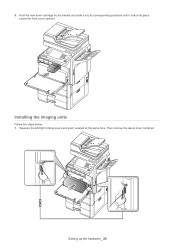
5. Hold the new toner cartridge by the handle and slide it into its corresponding positions until it locks into place. Leave the front cover opened.
Installing the imaging units
Follow the steps below: 1. Squeeze the left/right locking levers and push outward at the same time. Then remove the waste toner container.
Setting up the hardware_ 28
Installation Guide - Page 34
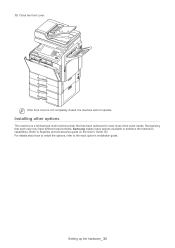
... function printer that has been optimized to meet most of the users needs. Recognizing that each user may have different requirements, Samsung makes many options available to enhance the machine's capabilities. Refer to Supplies and Accessories guide on the User's Guide CD. For details about how to install the options, refer to the each option's installation guide.
Setting...
Installation Guide - Page 60
... documents management. • Samsung Scan Manager: You can find out about Scan Manager program and installed
scan driver's condition. • SetIP: Use this program to set your machine's TCP/IP addresses. • Network PC Fax: You can send a fax from your computer without going to the machine. • XPS printer driver: Use XML Paper Specification (XPS) printer driver to print documents for...
Installation Guide - Page 61
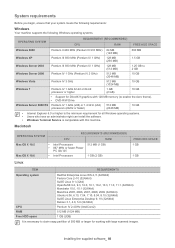
...x86) or 1.4 GHz (x64) processors (2GHz or faster)
512 MB (2048 MB)
10 GB
• Internet Explorer 6.0 or higher is the minimum requirement for all Windows operating systems. • Users who have an administrator right can install the software. • Windows Terminal Service is compatable with this machine.
Macintosh
OPERATING SYSTEM
CPU
REQUIREMENTS (RECOMMENDED) RAM
Mac OS X 10.5 Mac...
Installation Guide - Page 62
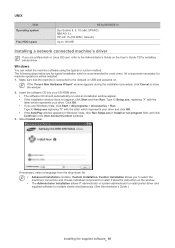
... that the machine is connected to the network or USB and powered on.
If the "Found New Hardware Wizard" window appears during the installation procedure, click Cancel to close the window.
2. Insert the software CD into your CD-ROM drive. • The software CD should automatically run and an installation window appear. • If the installation window does not appear, click Start and then...
Installation Guide - Page 63
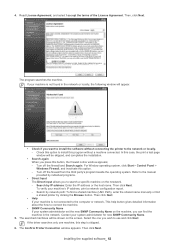
... Next. To verify your machine's IP address, print a network configuration report. - Search by network path: To find a shared machine (UNC Path), enter the shared name manually or find a shared printer by clicking the Browse button. Then click Next.
• Help If your machine is not connected to the computer or network, This help button gives detailed information...
Installation Guide - Page 64
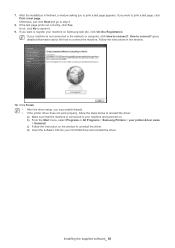
... below to reinstall the driver. a) Make sure that the machine is connected to your machine and powered on. b) From the Start menu, select Programs or All Programs > Samsung Printers > your printer driver name > Uninstall. c) Follow the instruction on the window to uninstall the driver. d) Insert the software CD into your CD-ROM drive and reinstall the driver.
Installing the supplied software_ 63