Samsung LN-T405HA driver and firmware
Related Samsung LN-T405HA Manual Pages
Download the free PDF manual for Samsung LN-T405HA and other Samsung manuals at ManualOwl.com
Open Source Guide (ENGLISH) - Page 1
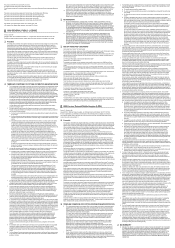
...version 2) and LGPL (version 2.1).
The original manual has wrong versions of the GPL and LGPL.
To send inquiries and requests for questions regarding open sources, contact Samsung via Email (vdswmanager@samsung. com).
This product uses some software programs which are distributed under the Independent JPEG Group.
This product uses some software... used to control compilation and installation of the ...
Open Source Guide (ENGLISH) - Page 2
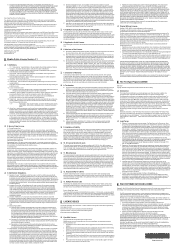
... SUSTAINED BY YOU OR THIRD PARTIES OR A FAILURE OF THE LIBRARY TO OPERATE WITH ANY OTHER SOFTWARE), EVEN IF SUCH HOLDER OR OTHER PARTY HAS BEEN ADVISED OF THE POSSIBILITY OF SUCH DAMAGES.
... you want it to be of the greatest possible use to the public, we recommend making it free software that everyone can redistribute and change. You can do so by permitting redistribution under these terms (or,...
Quick Guide (easy Manual) (ver.1.0) (English) - Page 3

... Connection Panel 4 Remote Control 5 Installing Batteries in the Remote Control 6
Connections
Connecting VHF and UHF Antennas 6 Connecting Cable TV 7 Connecting a VCR 8 Connecting a Camcorder 9 Connecting a DVD Player/Set-Top Box 9 Connecting a DVD Player/Set-Top Box via HDMI...... 10 Connecting a DVD Player/Set-Top Box via DVI ........ 10 Connecting a Digital Audio System 11 Connecting...
Quick Guide (easy Manual) (ver.1.0) (English) - Page 6
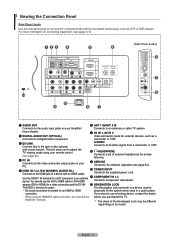
...to adjust the TV viewing angle using your remote control. (see page 66.)
8 HEADPHONE Connects a set of external headphones for private
listening
4 PC IN Connects to the video and audio output jacks on your
PC.
9 SERVICE Connector for software upgrades (see page 62).
5 HDMI IN 1,2,3 /DVI IN(HDMI1) (AUDIO R/L) Connects to the HDMI jack of a device with an HDMI output.
0 POWER INPUT Connects the...
Quick Guide (easy Manual) (ver.1.0) (English) - Page 7
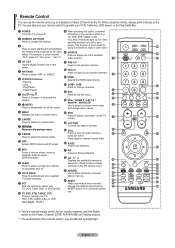
... your remote control to operate your VCR, Cable box, DVD player, or Set-Top/Cable Box.
1 POWER Turns the TV on and off.
2 NUMERIC BUTTONS Press to change the channel.
3 - Press to select additional channels(digital and analog) being broadcast by the same station. For example, to select channel "54-3", press "54", then press "-" and "3".
4 CH LIST Used to display...
Quick Guide (easy Manual) (ver.1.0) (English) - Page 8
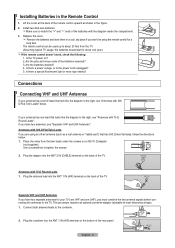
... the remote control doesn't work, check the following: 1. Is the TV power on? 2. Are the plus and minus ends of the batteries reversed? 3. Are the batteries drained? 4. Is there a power outage, or is the power cord unplugged? 5. Is there a special fluorescent light or neon sign nearby?
Connections
Connecting VHF and UHF Antennas
If your antenna has a set...
Quick Guide (easy Manual) (ver.1.0) (English) - Page 12
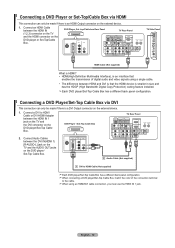
...(High Bandwidth Digital Copy Protection) coding feature installed. Each DVD player/Set-Top Cable Box has a different back panel configuration.
Connecting a DVD Player/Set-Top Cable Box via DVI
This connection can only be made if there is a DVI Output connector on the external device.
1. Connect a DVI to HDMI Cable or DVI-HDMI Adapter between the HDMI IN 1 jack on the TV and the DVI connector on...
Quick Guide (easy Manual) (ver.1.0) (English) - Page 15
... the button on the front of the panel.
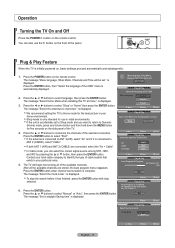
Plug & Play Feature
When the TV is initially powered on, basic settings proceed automatically and subsequently:
1. Press the POWER button on the remote control. The message "Menu language, Shop Mode, Channels and Time will be set." is
displayed.
Press the ENTER button, then "Select the language of the OSD" menu...
Quick Guide (easy Manual) (ver.1.0) (English) - Page 32
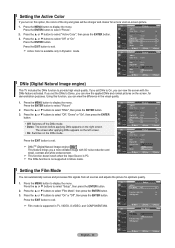
...PC. The DNle function is not supported in Movie mode.
TV
Picture
▲More
Color Tone : Cool1
►
Detailed settings
►
Size
: 16 : 9
►
Digital NR : Auto
►
Active ...supported in TV, VIDEO, S-VIDEO, and COMPONENT480i.
TV
Setup
▲More
Film Mode : Off
►
PIP
►
Function Help : On
►
SW Upgrade
►
Move
Enter
Return
TV
...
Quick Guide (easy Manual) (ver.1.0) (English) - Page 33
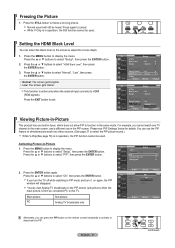
...) when the main picture is from an connected PC to this TV.
Main picture PC
Sub picture Analog TV broadcasts only
Move
Enter
Return
TV
PIP
PIP Position Channel
:
Off
:
On
: Cable 3
Move
Enter
Return
Alternately, you can press the PIP button on the remote control repeatedly to activate or deactivate the PIP.
English - 31
continued...
Quick Guide (easy Manual) (ver.1.0) (English) - Page 34
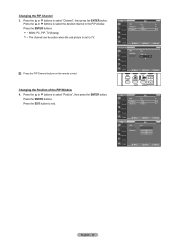
... be active when the sub picture is set to TV.
Press the PIP Channel buttons on the remote control.
TV
PIP
PIP
: On
►
Position
:
►
Channel
: Cable 3
►
Move
Enter
Return
TV
PIP
PIP Position Channel
: On
:
▲
: CabCleab3le 3
▼
Move
Enter
Return
Changing the Position of the PIP Window 4. Press the ▲ or ▼ buttons to...
Quick Guide (easy Manual) (ver.1.0) (English) - Page 46
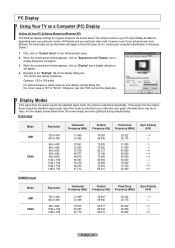
PC Display
Using Your TV as a Computer (PC) Display
Setting Up Your PC Software (Based on Windows XP) The Windows display-settings for a typical computer are shown below. The actual screens on your PC will probably be different, depending upon your particular version of Windows and your particular video card. However, even if your actual screens look different, the same basic set-up information ...
Quick Guide (easy Manual) (ver.1.0) (English) - Page 56
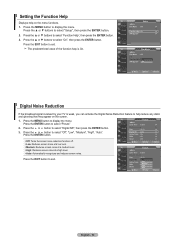
... may appear on the screen.
1. Press the MENU button to display the menu. Press the ENTER button to select "Picture"
TV
Picture
▲More
Color Tone : Cool1
►
2. Press the or button to select "Digital NR", then press the ENTER button.
Detailed settings
►
Size
: 16 : 9
►
3. Press the or ...
Quick Guide (easy Manual) (ver.1.0) (English) - Page 57
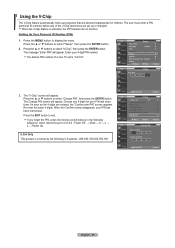
... button to display the menu. Press the ▲ or ▼ buttons to select "Setup", then press the ENTER button.
2. Press the ▲ or ▼ buttons to select "V-Chip", then press the ENTER button. The message "Enter PIN" will appear. Enter your 4 digit PIN number.
The default PIN number of a new TV set is "0-0-0-0".
TV
Setup
Plug & Play...
Quick Guide (easy Manual) (ver.1.0) (English) - Page 58
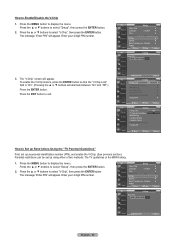
... (PIN), and enable the V-Chip. (See previous section.) Parental restrictions can be set up using either of two methods: The TV guidelines or the MPAA rating.
1. Press the MENU button to display the menu. Press the ▲ or ▼ buttons to select "Setup", then press the ENTER button.
2. Press the ▲ or ▼ buttons...
Quick Guide (easy Manual) (ver.1.0) (English) - Page 59
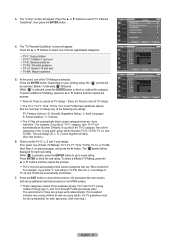
..., the TV guidelines must be set up separately for each age group. (See next step.)
TV
V-Chip
V-Chip Lock
: On
►
TV Parental Guidelines
►
MPAA Rating
►
Canadian English
►
Canadian French ►
Downloadable U.S. Rating
►
Change PIN
►
Move
Enter
Return
TV
TV Parental Guidelines
ALL FV V S
TV-Y TV-Y7
TV-G TV-PG TV-14 TV-MA
L D
Allow...
Quick Guide (easy Manual) (ver.1.0) (English) - Page 60
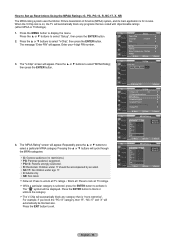
...).
1. Press the MENU button to display the menu. Press the ▲ or ▼ buttons to select "Setup", then press the ENTER button.
2. Press the ▲ or ▼ buttons to select "V-Chip", then press the ENTER button. The message "Enter PIN" will appear. Enter your 4 digit PIN number.
TV
Setup
Plug & Play ►
Language
: English ►...
Quick Guide (easy Manual) (ver.1.0) (English) - Page 64
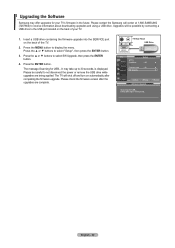
...-SAMSUNG (7267864) to receive information about downloading upgrades and using a USB drive. Upgrades will be possible by connecting a USB drive to the USB port located on the back of your TV.
1. Insert a USB drive containing the firmware upgrade into the SERVICE port on the back of the TV.
2. Press the MENU button to display the menu. Press the ▲ or ▼ buttons to select "Setup", then...
Quick Guide (easy Manual) (ver.1.0) (English) - Page 65
....
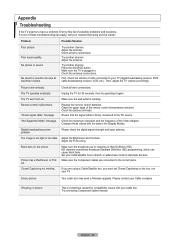
Replace the remote control batteries. Clean the upper edge of the remote control (transmission window). Check the battery terminals. Ensure that the signal cable is firmly connected to the PC source.
"Not Supported Mode" message. Check the maximum resolution and the frequency of the Video Adapter. Compare these values with the data in the Display Modes.
Digital broadcasting screen problem...
Quick Guide (easy Manual) (ver.1.0) (English) - Page 68
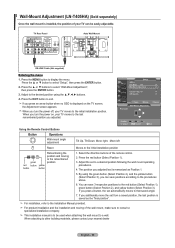
Wall-Mount Adjustment (LN-T405HA) (Sold separately)
Once the wall mount is installed, the position of your TV can be easily adjustable.
TV Rear Panel
Auto Wall-Mount
EX-LINK Cable (Not supplied)
Entering the menu
1. Press the MENU button to display the menu. Press the ▲ or ▼ button to select "Setup", then press the ENTER button.
2. Press...