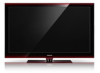
Samsung PN50A760T1F driver and firmware
Related Samsung PN50A760T1F Manual Pages
Download the free PDF manual for Samsung PN50A760T1F and other Samsung manuals at ManualOwl.com
Open Source Guide (ENGLISH) - Page 1
...version 2) and LGPL (version 2.1).
The original manual has wrong versions of the GPL and LGPL.
To send inquiries and requests for questions regarding open sources, contact Samsung via Email (vdswmanager@samsung. com).
This product uses some software programs which are distributed under the Independent JPEG Group.
This product uses some software... used to control compilation and installation of the ...
Open Source Guide (ENGLISH) - Page 2
... SUSTAINED BY YOU OR THIRD PARTIES OR A FAILURE OF THE LIBRARY TO OPERATE WITH ANY OTHER SOFTWARE), EVEN IF SUCH HOLDER OR OTHER PARTY HAS BEEN ADVISED OF THE POSSIBILITY OF SUCH DAMAGES.
... you want it to be of the greatest possible use to the public, we recommend making it free software that everyone can redistribute and change. You can do so by permitting redistribution under these terms (or,...
Quick Guide (ENGLISH) - Page 3
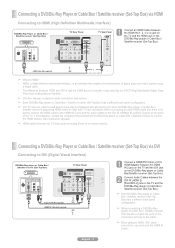
... HDMI and DVI is that the HDMI device is smaller in size and has the HDCP (High Bandwidth Digital Copy Protection) coding feature installed.
➢ DVI also requires a separate audio connection (see below).
➢ Each DVD/Blu-Ray player or Cable Box / Satellite receiver (Set-Top Box) has a different back panel configuration.
➢ The TV may not output sound and pictures may be displayed...
User Manual (ENGLISH) - Page 4
... USB Memory
Storage 110
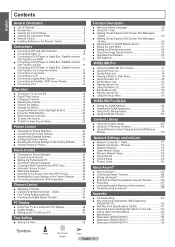
Network Settings and InfoLink
■ Network Connection - Cable 111 ■ Network Connection - Wireless 113 ■ Network Selection 113 ■ Cable Network Setup 114 ■ Wireless Network Setup 116 ■ Using InfoLink 119 ■ InfoLink Setup 122 ■ Product Guide 123
About Anynet+
■ What is Anynet 124 ■ Connecting Anynet+ Devices...
User Manual (ENGLISH) - Page 11
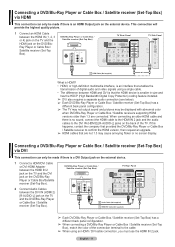
... HDMI and DVI is that the HDMI device is smaller in size and
has the HDCP (High Bandwidth Digital Copy Protection) coding feature installed.
➢ DVI also requires a separate audio connection (see below). ➢ Each DVD/Blu-Ray Player or Cable Box / Satellite receiver (Set-Top Box) has a
different back panel configuration.
➢ The TV may not output sound and pictures may be displayed...
User Manual (ENGLISH) - Page 34
... when the main
picture is from an external device connected to HDMI 1,HDMI2/DVI, HDMI 3, HDMI 4, Component 1, 2 or PC.
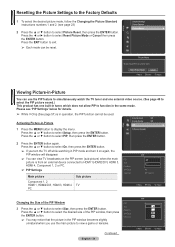
➢ PIP Settings
Main picture
Component 1, 2 HDMI 1, HDMI2/DVI, HDMI 3, HDMI 4 PC
Sub picture TV
PIP Size Position Air/Cable Channel
PIP
: OOffff : On : : Air : DTV Air 7-1
Move
Enter
Return
Changing the Size of the PIP Window
3 Press the ▲ or ▼ button to...
User Manual (ENGLISH) - Page 49
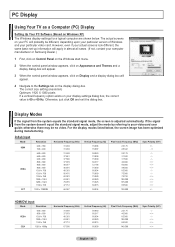
PC Display
Using Your TV as a Computer (PC) Display
Setting Up Your PC Software (Based on Windows XP) The Windows display-settings for a typical computer are shown below. The actual screens on your PC will probably be different, depending upon your particular version of Windows and your particular video card. However, even if your actual screens look different, the same basic set-up information ...
User Manual (ENGLISH) - Page 57
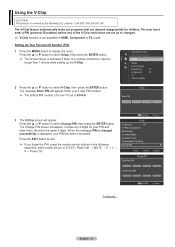
... is no remote control key input for
longer than 1 minute while setting up the V-Chip.
Setup
Cable Network Setup Wireless Network Setup
V-Chip
►
Caption
External Settings
Entertainment
: Off
Energy Saving
: Off
PIP
Software Upgrade
2 Press the ▲ or ▼ button to select V-Chip, then press the ENTER button. The message Enter PIN will appear. Enter your 4 digit PIN number...
User Manual (ENGLISH) - Page 58
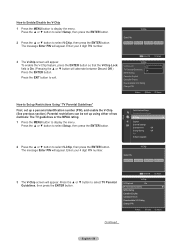
... up using either of two methods: The TV guidelines or the MPAA rating.
1 Press the MENU button to display the menu. Press the ▲ or ▼ button to select Setup, then press the ENTER button.
Setup
Cable Network Setup Wireless Network Setup
V-Chip
►
Caption
External Settings
Entertainment
: Off
Energy Saving
: Off
PIP
Software Upgrade
2 Press the ▲ or ▼ button...
User Manual (ENGLISH) - Page 60
... are coded with objectionable ratings (either MPAA or TV-Ratings).
1 Press the MENU button to display the menu. Press the ▲ or ▼ button to select Setup, then press the ENTER button.
Setup
Cable Network Setup Wireless Network Setup
V-Chip
►
Caption
External Settings
Entertainment
: Off
Energy Saving
: Off
PIP
Software Upgrade
2 Press the ▲ or ▼ button to...
User Manual (ENGLISH) - Page 61
...appear. Enter your 4 digit PIN number.
Setup
Cable Network Setup Wireless Network Setup
V-Chip
►
Caption
External Settings
Entertainment
: Off
Energy Saving
: Off
PIP
Software Upgrade
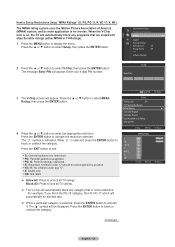
V-Chip
Enter PIN
*...Return
V-Chip
V-Chip Lock
: On
TV Parental Guidelines
MPAA Rating
Canadian English
►
Canadian French
Downloadable U.S. Rating
Change PIN
Move
Enter
Return...
User Manual (ENGLISH) - Page 62
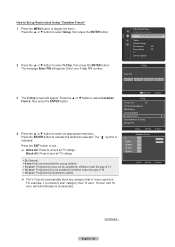
...appear. Enter your 4 digit PIN number.
Setup
Cable Network Setup Wireless Network Setup
V-Chip
►
Caption
External Settings
Entertainment
: Off
Energy Saving
: Off
PIP
Software Upgrade
V-Chip
Enter PIN
*... PIN
V-Chip
V-Chip Lock
: On
TV Parental Guidelines
MPAA Rating
Canadian English
Canadian French
Downloadable U.S. Rating
Change PIN
Move
Enter
Canadian French...
User Manual (ENGLISH) - Page 63
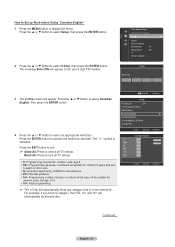
... button to select V-Chip, then press the ENTER button. The message Enter PIN will appear. Enter your 4 digit PIN number.
Setup
Cable Network Setup Wireless Network Setup
V-Chip
►
Caption
External Settings
Entertainment
: Off
Energy Saving
: Off
PIP
Software Upgrade
V-Chip
Enter PIN
*
*
*
*
0~9 Enter PIN
Return
3 The V-Chip screen will appear. Press the ▲ or ▼...
User Manual (ENGLISH) - Page 65
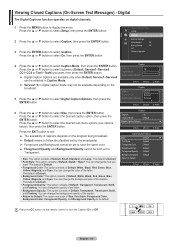
... the ENTER button to select Caption. Press the ▲ or ▼ button to select On, then press the ENTER button.
Setup
Wireless Network Setup V-Chip
Caption
►
External Settings
Entertainment
: Off
Energy Saving
: Off
PIP
Software Upgrade
4 Press the ▲ or ▼ button to select Caption Mode, then press the ENTER button. Press the ▲ or ▼...
User Manual (ENGLISH) - Page 66
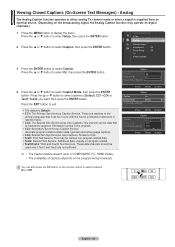
... operate on digital channels.)
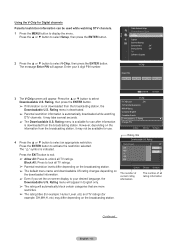
1 Press the MENU button to display the menu. Press the ▲ or ▼ button to select Setup, then press the ENTER button.
2 Press the ▲ or ▼ button to select Caption, then press the ENTER button.
Setup
Wireless Network Setup V-Chip
Caption
►
External Settings
Entertainment
: Off
Energy Saving
: Off
PIP
Software Upgrade
3 Press...
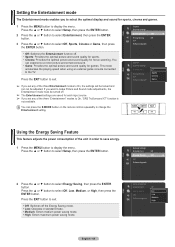
User Manual (ENGLISH) - Page 67
....
1 Press the MENU button to display the menu. Press the ▲ or ▼ button to select Setup, then press the ENTER button.
2 Press the ▲ or ▼ button to select External Settings, then press the ENTER button.
Setup
V-Chip Caption
External Settings
►
Entertainment
: Off
Energy Saving
: Off
PIP
Software Upgrade
3 Press the ENTER button to select...
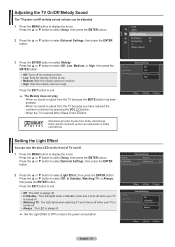
User Manual (ENGLISH) - Page 68
... press the E.MODE button on the remote control repeatedly to change the Entertainment setting.
Setup
Caption External Settings
Entertainment
: OOffff
►
Energy Saving PIP Software Upgrade
: OSffports Cinema
Game
Using the Energy Saving Feature
This feature adjusts the power consumption of the unit in order to save energy.
1 Press the MENU button to display the menu. Press the ▲...
User Manual (ENGLISH) - Page 69
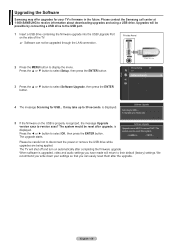
... Samsung call center at 1-800-SAMSUNG to receive information about downloading upgrades and using a USB drive. Upgrades will be possible by connecting a USB drive to the USB port.
1 Insert a USB drive containing the firmware upgrade into the USB Upgrade Port on the side of the TV.
➢ Software can not be upgraded through the LAN connection.
TV side Panel
2 Press the MENU button to display...
User Manual (ENGLISH) - Page 97
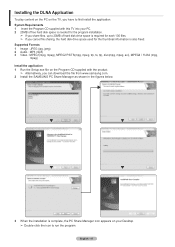
... cancel file sharing, the hard disk drive space used for the thumbnail information is also freed. Supported Formats 1 Image : JPEG (jpg, jpeg) 2 Audio : MP3 (mp3) 3 Video : MPEG1(mpg, mpeg), MPEG2 PS/TS(mpg, mpeg, trp, ts, tp), divx(mpg, mpeg, avi), MPEG4 / H.264 (mpg,
mpeg) Install the application 1 Run the Setup.exe file on the Program...
User Manual (ENGLISH) - Page 116
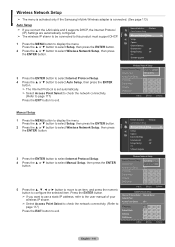
... menu is activated only if the Samsung Infolink Wireless adapter is connected. (See page 113)
Auto Setup ➣ If you connect the LAN cable and it supports DHCP, the Internet Protocol
(IP) Settings are automatically configured. ➣ The wireless IP sharer to be connected to this product must support DHCP.
1 Press the MENU button to display the menu. Press the ▲ or...