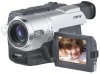
Sony CCD TRV608 - Hi8 Camcorder With 3.0" LCD driver and firmware
Drivers and firmware downloads for this Sony item
Related Sony CCD TRV608 Manual Pages
Download the free PDF manual for Sony CCD TRV608 and other Sony manuals at ManualOwl.com
Operating Instructions - Page 3
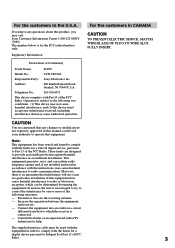
...Conformity
Trade Name:
SONY
Model No.:
CCD-TRV608
Responsible Party: Sony Electronics lnc.
Address:
680 Kinderkamack Road, Oradell, NJ 07649 U.S.A.
Telephone No.:
201-930-6972
This device complies with Part15 ...an experienced radio/TV technician for help.
The supplied interface cable must be used with the
equipment in order to comply with the limits for a
digital device pursuant to ...
Operating Instructions - Page 5
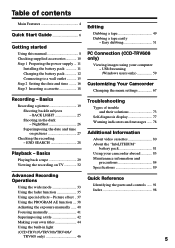
... the power supply ... 11
Installing the battery pack 11 Charging the battery pack 12 Connecting to a wall outlet 15 Step 2 Setting the date and time ........ 16 Step 3 Inserting a cassette 18
Editing
Dubbing a tape 49 Dubbing a tape easily
- Easy dubbing 51
PC Connection (CCD-TRV608 only)
Viewing images using your computer - USB Streaming (Windows users only 59
Customizing Your Camcorder...
Operating Instructions - Page 6
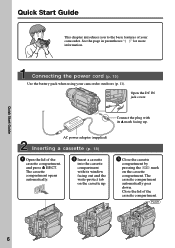
Quick Start Guide
This chapter introduces you to the basic features of your camcorder. See the page in parentheses "( )" for more information.
Connecting the power cord (p. 15)
Use the battery pack when using your camcorder outdoors (p. 11).
Open the DC IN jack cover.
Connect the plug with its v mark facing up.
AC power adaptor (supplied)
Inserting...
Operating Instructions - Page 9
Getting started
Using this manual
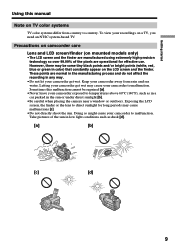
Note on TV color systems
TV color systems differ from country to country. To view your recordings on a TV, you need an NTSC system-based TV.
Precautions on camcorder care
Lens and LCD screen/finder (on mounted models only)
•The LCD screen and the finder are manufactured using extremely high-precision technology so over...
Operating Instructions - Page 10
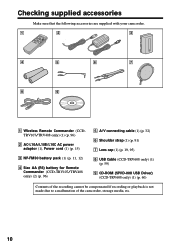
... battery for Remote Commander (CCD-TRV107/TRV408 only) (2) (p. 96)
5 A/V connecting cable (1) (p. 32)
6 Shoulder strap (1) (p. 91)
7 Lens cap (1) (p. 19, 95)
8 USB Cable (CCD-TRV608 only) (1) (p. 59)
9 CD-ROM (SPVD-008 USB Driver) (CCD-TRV608 only) (1) (p. 60)
Contents of the recording cannot be compensated if recording or playback is not made due to a malfunction of the camcorder, storage media...
Operating Instructions - Page 11
Getting started
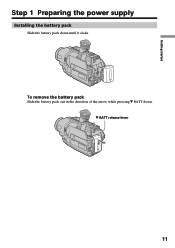
Step 1 Preparing the power supply
Installing the battery pack
Slide the battery pack down until it clicks.
To remove the battery pack
Slide the battery pack out in the direction of the arrow while pressing V BATT down. V BATT release lever
11
Operating Instructions - Page 12
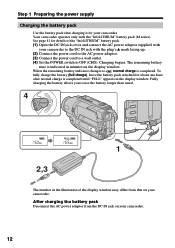
... connect the AC power adaptor supplied with
your camcorder to the DC IN jack with the plug's v mark facing up. (2) Connect the power cord to the AC power adaptor. (3) Connect the power cord to a wall outlet. (4) Set the POWER switch to OFF (CHG). Charging begins. The remaining battery
time is indicated in minutes on the display window. When the...
Operating Instructions - Page 13
... the display window roughly indicates the recording time with the viewfinder.
Until your camcorder calculates the actual remaining battery time "- - - - min" appears in the display window.
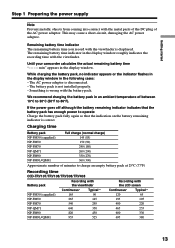
While charging the battery pack, no indicator appears or the indicator flashes in the display window in the following cases: - The AC power adaptor is disconnected. - The battery pack is not installed properly...
Operating Instructions - Page 18
...record in the Hi8
system, use Hi8
video cassettes.
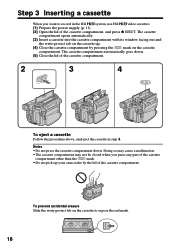
(1) Prepare the power supply (p. 11).
(2) Open the lid of the cassette compartment, and press Z EJECT. The cassette
compartment opens automatically.
(3) Insert a cassette into the cassette compartment with its window...other than the
mark.
•Do not pick up your camcorder by the lid of the cassette compartment.
To prevent accidental ...
Operating Instructions - Page 19
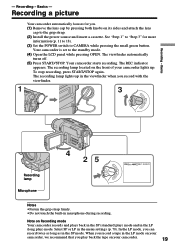
... grip strap. (2) Install the power source and insert a cassette. See "Step 1" to "Step 3" for more
information (p. 11 to 18). (3) Set the POWER switch to CAMERA while pressing the small green button.
Your camcorder is set to the standby mode. (4) Open the LCD panel while pressing OPEN. The viewfinder automatically
turns off. (5) Press START/STOP. Your camcorder starts recording. The REC...
Operating Instructions - Page 29
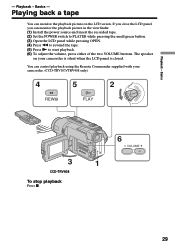
... the viewfinder. (1) Install the power source and insert the recorded tape. (2) Set the POWER switch to PLAYER while pressing the small green button. (3) Open the LCD panel while pressing OPEN. (4) Press m to rewind the tape. (5) Press N to start playback. (6) To adjust the volume, press either of the two VOLUME buttons. The speaker
on your camcorder is silent when...
Operating Instructions - Page 38
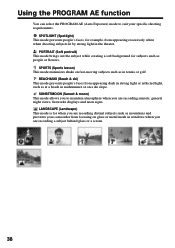
... allows you to maintain atmosphere when you are recording sunsets, general night views, fireworks displays and neon signs.
LANDSCAPE (Landscape) This mode is for when you are recording distant subjects such as mountains and prevents your camcorder from focusing on glass or metal mesh in windows when you are recording a subject behind glass or a screen.
38
Operating Instructions - Page 46
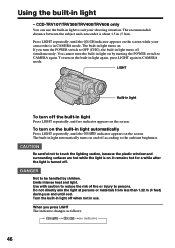
...TRV608 only
You can use the built-in light to suit your shooting situation. The recommended distance between the subject and camcorder is about 1.5 m (5 feet).
Press LIGHT repeatedly, until the
indicator appears on the screen while your
camcorder is in CAMERA mode. The built-in light turns on.
If you turn the POWER...lighting section, because the plastic window and surrounding surfaces are hot ...
Operating Instructions - Page 59
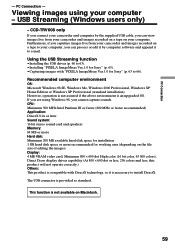
... using your computer - USB Streaming (Windows users only)
- CCD-TRV608 only
If you connect your camcorder and computer by the supplied USB cable, you can view images live from your camcorder and images recorded on a tape on your computer. Furthermore, if you caputure images live from your camcorder and images recorded on a tape to your computer, you can process or edit it by computer software and...
Operating Instructions - Page 60
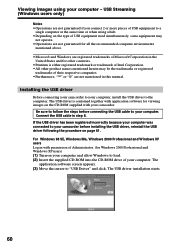
... to your camcorder before installing the USB driver, reinstall the USB driver following the procedure on page 61.
For Windows 98 SE, Windows Me, Windows 2000 Professional and Windows XP users Log in with permission of Administrator. (for Windows 2000 Professional and Windows XP users) (1) Turn on your computer and allow Windows to load. (2) Insert the supplied CD-ROM into the CD-ROM drive of your...
Operating Instructions - Page 61
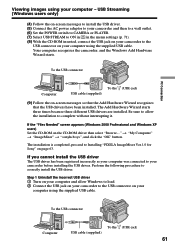
... the USB driver. (5) Connect the AC power adaptor to your camcorder and then to a wall outlet. (6) Set the POWER switch to CAMERA or PLAYER. (7) Select USB STREAM to ON in in the menu settings (p. 71). (8) With the CD-ROM inserted, connect the USB jack on your camcorder to the
USB connector on your computer using the supplied USB cable. Your computer recognises the camcorder, and the Windows Add...
Operating Instructions - Page 62
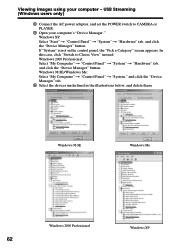
Viewing images using your computer - USB Streaming (Windows users only)
3 Connect the AC power adaptor, and set the POWER switch to CAMERA or PLAYER.
4 Open your computer's "Device Manager." Windows XP: Select "Start" t "Control Panel" t "System" t "Hardware" tab, and click the "Device Manager" button. If "System" is not in the control panel, the "Pick a Category" screen appears. In this case, ...
Operating Instructions - Page 63
... using your computer - USB Streaming (Windows users only)
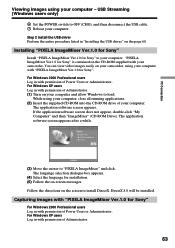
6 Set the POWER switch to OFF (CHG), and then disconnect the USB cable. 7 Reboot your computer.
Step 2 Install the USB driver Perform the entire procedure listed in "Installing the USB driver" on the page 60.
Installing "PIXELA ImageMixer Ver.1.0 for Sony"
Install "PIXELA ImageMixer Ver.1.0 for Sony" to your computer. "PIXELA ImageMixer...
Operating Instructions - Page 66
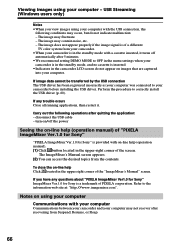
... to your camcorder before installing the USB driver. Perform the procedure to correctly install the USB driver (p. 60).
If any trouble occurs Close all running applications, then restart it.
Carry out the following operations after quitting the application: - disconnect the USB cable - turn on/off the power
Seeing the on-line help (operation manual) of "PIXELA ImageMixer Ver.1.0 for Sony"
"PIXELA...
Operating Instructions - Page 76
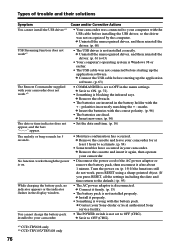
...)
• The AC power adaptor is disconnected. c Connect it firmly. (p. 15)
• The battery pack is not installed properly. c Install it properly.
• Something is wrong with the battery pack. c Contact your Sony dealer or local authorized Sony service facility.
• The POWER switch is not set to OFF (CHG). c Set it to OFF (CHG).
*1) CCD-TRV608 only *2) CCD-TRV107/TRV408 only...