Sony DCR DVD7 - DVD Handycam Camcorder driver and firmware
Drivers and firmware downloads for this Sony item

Related Sony DCR DVD7 Manual Pages
Download the free PDF manual for Sony DCR DVD7 and other Sony manuals at ManualOwl.com
Operating Guide - Page 3

... supplied interface cable must be used with the equipment in order to comply with the limits for a digital device pursuant to Subpart B of Part 15 of FCC Rules.
Notes on use Your camcorder is supplied with 2 kinds of operations guides.
- "Operating guide" (This manual) - "First Step Guide" for using the supplied
software (stored on the supplied CD-ROM)
On using...
Operating Guide - Page 4
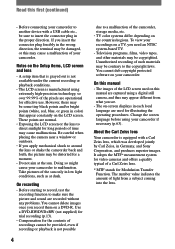
... system-based TV. • Television programs, films, video tapes, and other materials may be copyrighted. Unauthorized recording of such materials may be contrary to the copyright laws. You cannot dub copyright protected software on your camcorder.
On this manual
• The images of the LCD screen used on this manual are captured using a digital still camera, and thus...
Operating Guide - Page 7
... deleting 34 Indicators displayed during recording/playback 35 Remote Commander 37 Playing the picture on a TV 38
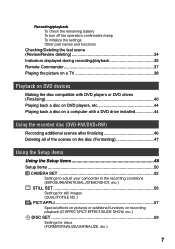
Playback on DVD devices
Making the disc compatible with DVD players or DVD drives (Finalizing 40 Playing back a disc on DVD players, etc 44 Playing back a disc on a computer with a DVD drive installed 44
Using the recorded disc (DVD-RW/DVD+RW)
Recording additional scenes after...
Operating Guide - Page 8
...
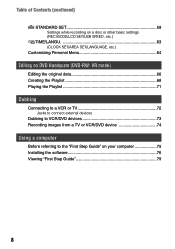
Editing on DVD Handycam (DVD-RW: VR mode)
Editing the original data 66 Creating the Playlist 68 Playing the Playlist 71
Dubbing
Connecting to a VCR or TV 72 Jacks to connect external devices
Dubbing to VCR/DVD devices 73 Recording images from a TV or VCR/DVD device 74
Using a computer
Before referring to the "First Step Guide" on your computer 75 Installing the software 76 Viewing...
Operating Guide - Page 11
Enjoying your DVD Handycam
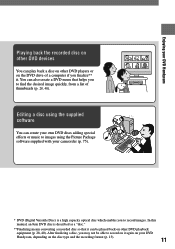
Playing back the recorded disc on other DVD devices
You can play back a disc on other DVD players or on the DVD drive of a computer if you finalize** it. You can also create a DVD menu that helps you to find the desired image quickly, from a list of thumbnails (p. 28, 40).
Editing a disc using the supplied software
You...
Operating Guide - Page 16
...
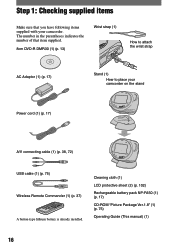
How to place your camcorder on the stand
Power cord (1) (p. 17)
A/V connecting cable (1) (p. 38, 72)
USB cable (1) (p. 75) Wireless Remote Commander (1) (p. 37) A button-type lithium battery is already installed.
Cleaning cloth (1)
LCD protective sheet (2) (p. 102)
Rechargeable battery pack NP-FA50 (1) (p. 17)
CD-ROM "Picture Package Ver.1.8" (1) (p. 75)
Operating Guide (This manual) (1)
16
Operating Guide - Page 18
...camcorder and the DC plug.
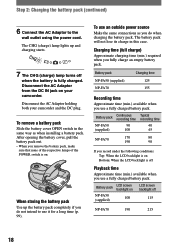
To remove a battery pack Slide the battery cover OPEN switch in the same way as when installing a battery pack. After opening the battery cover, pull the battery pack out.
• When you remove the battery pack, make sure that none of the respective lamps of the POWER...Continuous recording time
90 100
Typical recording time
40 45
NP-FA70
170 190
80 90
If you record ...
Operating Guide - Page 44
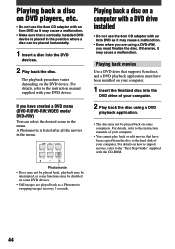
... back movies
Use a DVD drive that supports 8cm discs, and a DVD playback application must have been installed on your computer.
1 Insert the finalized disc into the
DVD drive of your computer.
2 Play back the disc using a DVD
playback application.
• The disc may not be played back on some computers. For details, refer to the instruction manuals of your computer.
• You cannot...
Operating Guide - Page 45
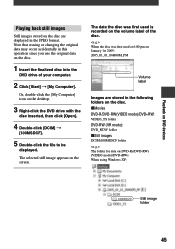
..., double-click the [My Computer] icon on the desktop.
3 Right-click the DVD drive with the
disc inserted, then click [Open].
4 Double-click [DCIM]
[100MSDCF].
5 Double-click the file to be
displayed.
The selected still image appears on the screen.
The date the disc was first used is recorded on the volume label...
Operating Guide - Page 52
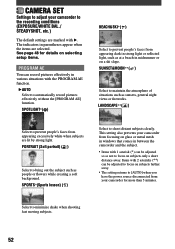
CAMERA SET
Settings to adjust your camcorder to the recording conditions (EXPOSURE/WHITE BAL./ STEADYSHOT, etc.)
The default settings are marked with . The indicators in parentheses appear when the items are selected. See page 48 for details on selecting setup items.
PROGRAM AE
You can record pictures effectively in various situations with the PROGRAM AE function.
AUTO...
Operating Guide - Page 53
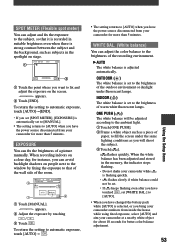
... you set [SPOT METER], [EXPOSURE] is
automatically set to [MANUAL]. • The setting returns to [AUTO] when you have
the power source disconnected from your camcorder for more than 5 minutes.
EXPOSURE
You can fix the brightness of a picture manually. When recording indoors on a clear day, for instance, you can avoid backlight shadows on people next to the window by...
Operating Guide - Page 75
... Package software does not support Macintosh computer.
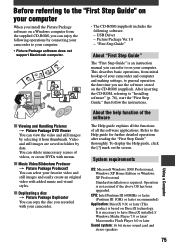
• The CD-ROM (supplied) includes the following software. - USB Driver - Picture Package Ver.1.8 - "First Step Guide"
About "First Step Guide"
The "First Step Guide" is an instruction manual you can refer to on your computer. This describes basic operations, from initial hookup of your camcorder and computer and making settings, to...
Operating Guide - Page 76
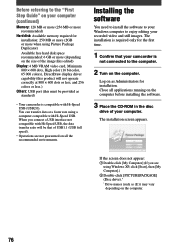
... your Windows computer to enjoy editing your recorded video and still images. The installation is required only for the first time.
1 Confirm that your camcorder is
not connected to the computer.
2 Turn on the computer.
Log on as Administrators for installation. Close all applications running on the computer before installing the software.
3 Place the CD-ROM in the disc
drive...
Operating Guide - Page 77
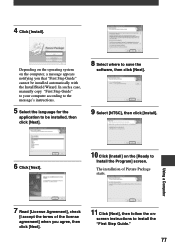
... In such a case, manually copy "First Step Guide" to your computer according to the message's instructions.
5 Select the language for the
application to be installed, then click [Next].
8 Select where to save the
software, then click [Next].
9 Select [NTSC], then click [Install].
6 Click [Next].
10 Click [Install] on the [Ready to
Install the Program] screen.
The installation of Picture Package...
Operating Guide - Page 78
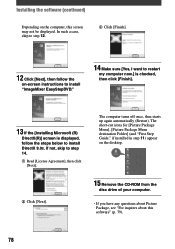
...). The short-cut icons for [Picture Package Menu], [Picture Package Menu destination Folder] (and "First Step Guide," if installed in step 11) appear on the desktop.
Click [Next].
15 Remove the CD-ROM from the
disc drive of your computer.
• If you have any questions about Picture Package, see "For inquires about this software" (p. 79).
78
Operating Guide - Page 79
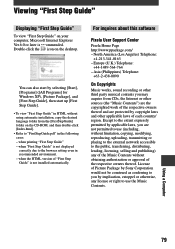
... CD-ROM, and then double-click [Index.html].
• Refer to "FirstStepGuide.pdf" in the following cases: - when printing "First Step Guide" - when "First Step Guide" is not displayed correctly due to the browser setting even in recommended environment. - when the HTML version of "First Step Guide" is not installed automatically.
For inquires about this software
Pixela User Support Center...
Operating Guide - Page 90

...sure that [SONY DDX-C1000 USB Device] appears in [DVD/CD-ROM drives], [Generic volume] in [Storage volumes], and [USB Mass Storage Device] in [Universal Serial Bus controllers] respectively. When all the devices appear, the USB driver is installed correctly. If any of these devices are not shown, install the USB driver. Place the supplied CD-ROM in the disc drive on your computer. ...
Operating Guide - Page 91
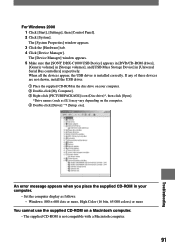
...sure that [SONY DDX-C1000 USB Device] appears in [DVD/CD-ROM drives], [Generic volume] in [Storage volumes], and [USB Mass Storage Device] in [Universal Serial Bus controllers] respectively. When all the devices appear, the USB driver is installed correctly. If any of these devices are not shown, install the USB driver. Place the supplied CD-ROM in the disc drive on your computer. ...
Operating Guide - Page 101
... inside the casing, unplug your camcorder and have it checked by a Sony dealer before operating it any further.
• Avoid rough handling, disassembling, modifying, physical shock, or impact such as hammering, dropping or stepping on the product. Be particularly careful of the lens.
• Keep the POWER switch set to OFF (CHG) when you...
Operating Guide - Page 103
... because this may cause the camcorder to malfunction.
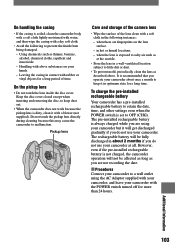
Pickup lens
Care and storage of the camera lens
• Wipe the surface...installed rechargeable battery
Your camcorder has a pre-installed rechargeable battery to retain the date, time, and other settings even when the POWER switch is set to OFF (CHG). The pre-installed rechargeable battery is always charged while you are using your camcorder...