Sony DCR-HC30 - Handycam Camcorder - 680 KP driver and firmware
Drivers and firmware downloads for this Sony item
Related Sony DCR-HC30 Manual Pages
Download the free PDF manual for Sony DCR-HC30 and other Sony manuals at ManualOwl.com
Computer Applications Guide - Page 2
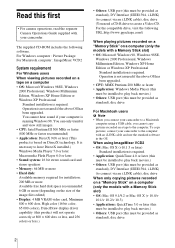
... the above OS has been upgraded. • CPU: MMX Pentium 200 MHz or faster • Application: Windows Media Player (this must be installed to play back movies.) • Others: USB port (this must be provided as standard), disc drive
For Macintosh users b Note • When you connect your camcorder to a Macintosh
computer using a USB cable, you cannot copy pictures recorded on a tape to the...
Computer Applications Guide - Page 4
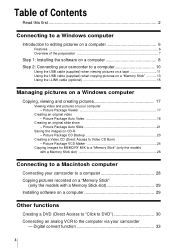
... ...6 Overview of the preparation 7
Step 1: Installing the software on a computer 8 Step 2: Connecting your camcorder to a computer 10
Using the USB cable (supplied) when viewing pictures on a tape 11 Using the USB cable (supplied) when copying pictures on a "Memory Stick 13 Using the i.LINK cable (optional 15
Managing pictures on a Windows computer
Copying, viewing and creating pictures 17...
Computer Applications Guide - Page 6
Connecting to a Windows computer
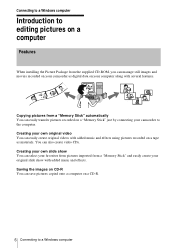
Introduction to editing pictures on a computer
Features
When installing the Picture Package from the supplied CD-ROM, you can manage still images and movies recorded on your camcorder as digital data on your computer along with several features.
Copying pictures from a "Memory Stick" automatically You can easily transfer pictures recorded on a "Memory Stick" just ...
Computer Applications Guide - Page 7
...time only)
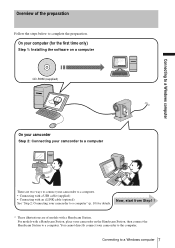
Step 1: Installing the software on a computer
CD-ROM (supplied)
Connecting to a Windows computer
On your camcorder
Step 2: Connecting your camcorder to a computer
There are two ways to connect your camcorder to a computer. • Connecting with a USB cable (supplied) • Connecting with an i.LINK cable (optional) See "Step 2: Connecting your camcorder to a computer" (p. 10) for...
Computer Applications Guide - Page 8
... your camcorder and the computer.
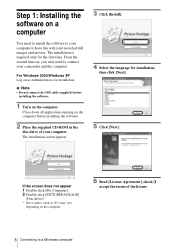
For Windows 2000/Windows XP Log on as Administrators for installation.
b Note
• Do not connect the USB cable (supplied) before installing the software.
1 Turn on the computer.
Close down all applications running on the computer before installing the software.
2 Place the supplied CD-ROM in the
disc drive of your computer. The installation screen appears...
Computer Applications Guide - Page 9

...].
7 Select where to save the software, then
click [Next].
The computer turns off once, then starts up again automatically (Restart). The short-cut icons for [Picture Package Menu] and [Picture Package Menu destination Folder] appear on the desktop.
8 Click [Install] on the [Ready to Install
the Program] screen. The installation starts.
When DirectX 9.0b or later...
Computer Applications Guide - Page 11
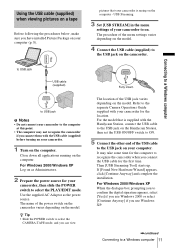
... POWER switch to select the
CAMERA-TAPE mode, and you can view
The location of the USB jack varies depending on the model. Refer to the separate Camera Operations Guide supplied with your camcorder for the location. For the model that is supplied with the Handycam Station, connect the USB cable to the USB jack on the Handycam Station, then set the USB...
Computer Applications Guide - Page 13

...] ([All Programs] for Windows XP), [Picture Package], [Handycam Tools], and [USB Streaming Tool], then start up [USB Streaming Tool].
Using the USB cable (supplied) when copying pictures on a "Memory Stick"
When you connect your camcorder and the computer, [Picture Package Menu] starts up, then pictures recorded on a "Memory Stick" are automatically copied to the computer. Before following the...
Computer Applications Guide - Page 16
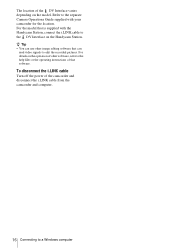
.... Refer to the separate Camera Operations Guide supplied with your camcorder for the location. For the model that is supplied with the Handycam Station, connect the i.LINK cable to the DV Interface on the Handycam Station. z Tip • You can use other image editing software that can
read video signals to edit the recorded pictures. For details on...
Computer Applications Guide - Page 17
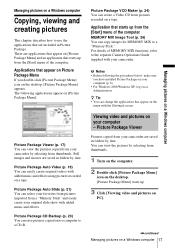
... [Start] menu of the computer
MEMORY MIX Image Tool (p. 26) You can copy images for MEMORY MIX to a "Memory Stick." For details of MEMORY MIX functions, refer to the separate Camera Operations Guide supplied with your camcorder.
b Notes • Before following the procedures below, make sure
you have installed Picture Package on your computer (p. 8). • For Windows 2000/Windows XP, log on as...
Computer Applications Guide - Page 26
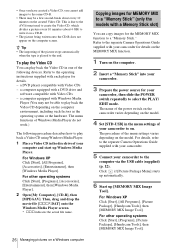
...of the menu settings varies depending on the model. For details, refer to the separate Camera Operations Guide supplied with your camcorder.
5 Connect your camcorder to the
computer via the USB cable (supplied) (p. 12). Click if [Picture Package Menu] starts up automatically.
6 Start up [MEMORY MIX Image
Tool].
For Windows XP Click [Start], [All Programs], [Picture Package], [Handycam Tools], then...
Computer Applications Guide - Page 29
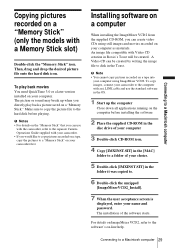
... file to the hard disk before playing.
b Notes • For details on the "Memory Stick" that you can use
with the camcorder, refer to the separate Camera Operations Guide supplied with your camcorder. • If you would like to copy pictures recorded on a tape, copy the pictures to a "Memory Stick" on your camcorder first.
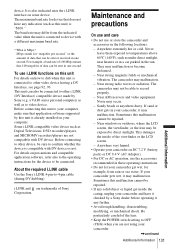
Installing software on a computer
When installing the ImageMixer VCD2...
Computer Applications Guide - Page 30
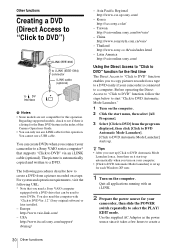
... DVD feature in the index of the Camera Operations Guide. • You can only use an i.LINK cable for this operation. You cannot use a USB cable.
You can create DVDs when you connect your camcorder to a Sony VAIO series computer* that supports "Click to DVD" via an i.LINK cable (optional). The picture is automatically copied and written to a DVD.
The following...
Computer Applications Guide - Page 33
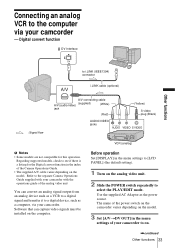
... Guide supplied with your camcorder with the operations guide of the analog video unit
You can convert an analog signal output from an analog device such as a VCR to a digital signal and transfer it to a digital device, such as a computer, via your camcorder. Software that can capture video signals must be installed on the computer.
VCR (analog)
Before operation
Set [DISPLAY] in the menu settings...
Computer Applications Guide - Page 36
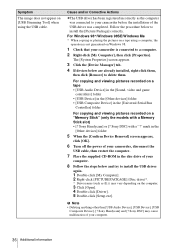
... with a Memory Stick slot) • [? Sony Handycam] or [? Sony DSC] with a "?" mark in the
[Other devices] folder
5 When the [Confirm Device Removal] screen appears,
click [OK].
6 Turn off the power of your camcorder, disconnect the
USB cable, then restart the computer.
7 Place the supplied CD-ROM in the disc drive of your
computer.
8 Follow the steps below and try to install the USB driver
again...
Computer Applications Guide - Page 37

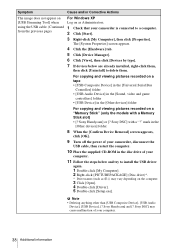
...with a Memory Stick slot) • [? Sony Handycam] or [? Sony DSC] with a "?" mark in the
[Other devices] folder
7 When the [Confirm Device Removal] screen appears,
click [OK].
8 Turn off the power of your camcorder, disconnect the
USB cable, then restart the computer.
9 Place the supplied CD-ROM in the disc drive of your
computer.
10 Follow the steps below and try to install the USB driver
again...
Computer Applications Guide - Page 38
... a Memory Stick slot) • [? Sony Handycam] or [? Sony DSC] with a "?" mark in the
[Other devices] folder
8 When the [Confirm Device Removal] screen appears,
click [OK].
9 Turn off the power of your camcorder, disconnect the
USB cable, then restart the computer.
10 Place the supplied CD-ROM in the disc drive of your
computer.
11 Follow the steps below and try to install the USB driver
again...
Computer Applications Guide - Page 39
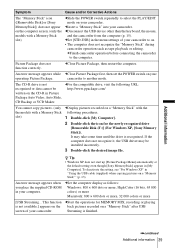
... Package Menu] automatically at
the default setting even though [Sony MemoryStick] appears in [My Computer]. To deactivate the setting, see "For Windows XP" in "Using the USB cable (supplied) when copying pictures on a "Memory Stick"" (p. 13).
An error message appears when you place the supplied CD-ROM in your computer.
cSet the computer display as follows: Windows: 800 × 600 dots or more...
Computer Applications Guide - Page 41

... 30 Copying pictures on a
"Memory Stick" .... 13, 29
D
Digital convert function......33 Direct Access to "Click to
DVD 30 Direct Access to Video CD
Burn 24 DirectX 9.0b 9 DV Interface 15, 30, 33 DVD 30
H
Handycam Station 7, 11, 13, 16, 28
I
i.LINK cable 10, 15, 18, 30, 33
ImageMixer VCD2 29 Install 8
M
Macintosh 28 MEMORY MIX 26 "Memory...
Camera Operations Guide - Page 131
... (DV Interface) compatible device made by Sony (e.g. a VAIO series personal computer) as well as to video device. Before connecting this unit to your computer, make sure that application software supported by this unit is already installed on your computer. Some i.LINK compatible video device such as Digital Televisions, DVD recorders/players, and MICROMV recorders/players are not compatible with...