Sony DCR PC101 - Handycam Camcorder - 1.0 Megapixel driver and firmware

Related Sony DCR PC101 Manual Pages
Download the free PDF manual for Sony DCR PC101 and other Sony manuals at ManualOwl.com
Operating Instructions - Page 2
... that may be of sufficient magnitude to constitute a risk of electric shock to persons.
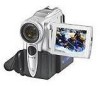
Trade Name:
SONY
Model No.:
DCR-PC101
Responsible Party: Sony Electronics Inc.
Address:
680 Kinderkamack Road,
Oradell, NJ 07649 U.S.A.
Telephone No.:
201-930-6972
This device complies with Part 15 of the FCC
Rules. Operation is subject to the following two
conditions...
Operating Instructions - Page 3
... your camcorder.
1
2
3
4
5
6
7
8
9
q;
qa
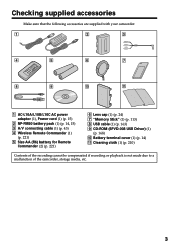
1 AC-L10A/L10B/L10C AC power adaptor (1), Power cord (1) (p. 15)
2 NP-FM50 battery pack (1) (p. 14, 15) 3 A/V connecting cable (1) (p. 43) 4 Wireless Remote Commander (1)
(p. 221) 5 Size AA (R6) battery for Remote
Commander (2) (p. 221)
6 Lens cap (1) (p. 24) 7 "Memory Stick" (1) (p. 113) 8 USB cable (1) (p. 163) 9 CD-ROM (SPVD-008 USB Driver...
Operating Instructions - Page 163
...
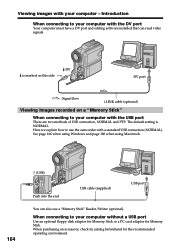
USB cable (supplied)
i.LINK cable (optional)
Computer environment requirements
USB port, editing software
DV port, editing software
"Memory Stick" stills and movies
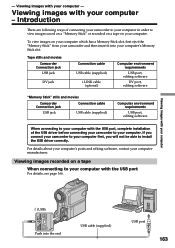
Camcorder Connection jack
USB jack
Connection cable USB cable (supplied)
Computer environment requirements
USB port, editing software
When connecting to your computer with the USB port, complete installation of the USB driver...
Operating Instructions - Page 164
...to use the camcorder with a standard USB connection (NORMAL). See page 166 when using Windows and page 180 when using Macintosh.
164
(USB) Push into the end
USB cable (supplied)
USB port
You can also use a "Memory Stick" Reader/Writer (optional).
When connecting to your computer without a USB port
Use an optional floppy disk adaptor for Memory Stick or a PC card adaptor for Memory Stick. When...
Operating Instructions - Page 166
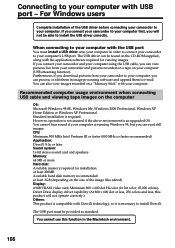
... to your computer's USB port. The USB driver can be found on the CD-ROM supplied, along with the application software required for viewing images. If you connect your camcorder and your computer using the USB cable, you can view pictures live from your camcorder and pictures recorded on a tape on your computer (USB streaming function). Furthermore, if you download pictures from your camcorder to...
Operating Instructions - Page 167
... with USB port - For Windows users
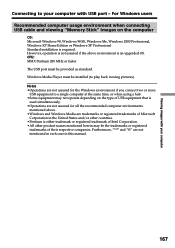
Recommended computer usage environment when connecting USB cable and viewing "Memory Stick" images on the computer
OS: Microsoft Windows 98, Windows 98 SE, Windows Me, Windows 2000 Professional, Windows XP Home Edition or Windows XP Professional Standard installation is required. However, operation is not assured if the above environment is an upgraded OS. CPU...
Operating Instructions - Page 168
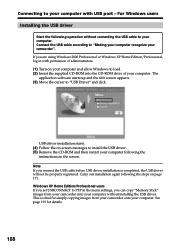
... your computer and allow Windows to load. (2) Insert the supplied CD-ROM into the CD-ROM drive of your computer. The
application software starts up and the title screen appears. (3) Move the cursor to "USB Driver" and click.
USB driver installation starts. (4) Follow the on-screen messages to install the USB driver. (5) Remove the CD-ROM and then restart your computer following the
instructions on...
Operating Instructions - Page 169
... computer with USB port - For Windows users
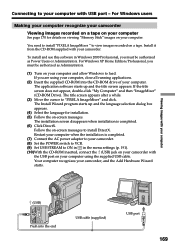
Making your computer recognize your camcorder
Viewing images recorded on a tape on your computer
See page 170 for details on viewing "Memory Stick" images on your computer.
You need to install "PIXELA ImageMixer " to view images recorded on a tape. Install it from the CD-ROM supplied with your camcorder.
To install and use this software in Windows 2000...
Operating Instructions - Page 170
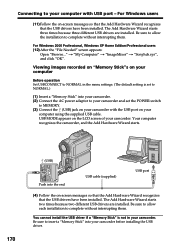
... recorded on "Memory Stick"s on your computer
Before operation Set USBCONNECT to NORMAL in the menu settings. (The default setting is set to NORMAL.)
(1) Insert a "Memory Stick" into your camcorder. (2) Connect the AC power adaptor to your camcorder and set the POWER switch
to MEMORY. (3) Connect the (USB) jack on your camcorder with the USB port on your
computer using the supplied USB cable. USB...
Operating Instructions - Page 171
... install the USB driver.
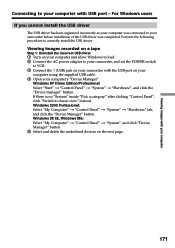
Viewing images recorded on a tape
Step 1: Uninstall the incorrect USB driver 1 Turn on your computer and allow Windows to load. 2 Connect the AC power adaptor to your camcorder, and set the POWER switch
to VCR. 3 Connect the (USB) jack on your camcorder with the USB port on your
computer using the supplied USB cable. 4 Open your computer's "Device Manager".
Windows...
Operating Instructions - Page 173
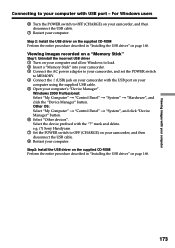
...2: Install the USB driver on the supplied CD-ROM Perform the entire procedure described in "Installing the USB driver" on page 168. Viewing images recorded on a "Memory Stick" Step1: Uninstall the incorrect USB driver 1 Turn on your computer and allow Windows to load. 2 Insert a "Memory Stick" into your camcorder. 3 Connect the AC power adaptor to your camcorder, and set the POWER switch
to MEMORY...
Operating Instructions - Page 174
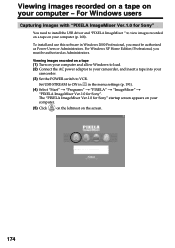
... install and use this software in Windows 2000 Professional, you must be authorized as Power Users or Administrators. For Windows XP Home Edition/Professional, you must be authorized as Administrators.
Viewing images recorded on a tape (1) Turn on your computer and allow Windows to load. (2) Connect the AC power adaptor to your camcorder, and insert a tape into your
camcorder.
(3) Set the POWER...
Operating Instructions - Page 177
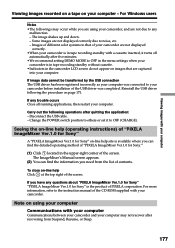
... the USB driver following the procedure on page 171.
If any trouble occurs Close all running applications, then restart your computer.
Carry out the following operations after quitting the application: - Disconnect the USB cable. - Change the POWER switch position to others or set it to OFF (CHARGE).
Seeing the on-line help (operating instructions) of "PIXELA ImageMixer Ver.1.0 for Sony...
Operating Instructions - Page 178
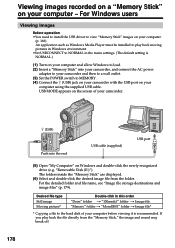
... AC power
adaptor to your camcorder and then to a wall outlet. (3) Set the POWER switch to MEMORY . (4) Connect the (USB) jack on your camcorder with the USB port on your
computer using the supplied USB cable. USB MODE appears on the screen of your camcorder.
178
(USB) Push into the end
USB cable (supplied)
USB port
(5) Open "My Computer" on Windows and double-click the newly recognized drive...
Operating Instructions - Page 180
... camcorder.
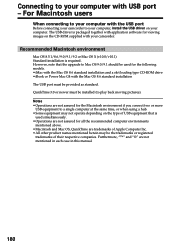
Recommended Macintosh environment
Mac OS 8.5.1/8.6/9.0/9.1/9.2 or Mac OS X (v10.0/v10.1) Standard installation is required. However, note that the upgrade to Mac OS 9.0/9.1 should be used for the following models. •iMac with the Mac OS 8.6 standard installation and a slot loading type CD-ROM drive •iBook or Power Mac G4 with the Mac OS 8.6 standard installation The USB port...
Operating Instructions - Page 181
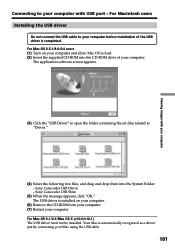
... Turn on your computer and allow Mac OS to load. (2) Insert the supplied CD-ROM into the CD-ROM drive of your computer.
The application software screen appears.
(3) Click the "USB Driver" to open the folder containing the six files related to "Driver."
(4) Select the following two files, and drag and drop them into the System Folder: - Sony Camcorder USB Driver - Sony Camcorder USB Shim
(5) When...
Operating Instructions - Page 182
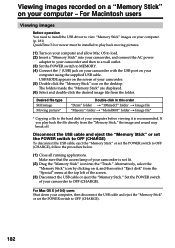
...allow Mac OS to load. (2) Insert a "Memory Stick" into your camcorder, and connect the AC power
adaptor to your camcorder and then to a wall outlet. (3) Set the POWER switch to MEMORY. (4) Connect the (USB) jack on your camcorder with the USB port on your
computer using the supplied USB cable. USB MODE appears on the screen of your camcorder. (5) Double click the "Memory Stick" icon on the desktop...
Operating Instructions - Page 183
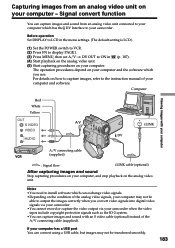
... digital video signals via your camcorder. •You cannot record or capture the video output via your camcorder when the video tapes include copyright protection signals such as the ID-2 system. •You can capture images and sound with an S video cable (optional) instead of the A/V connecting cable (supplied).
If your computer has a USB port You can connect using a USB cable...
Operating Instructions - Page 199
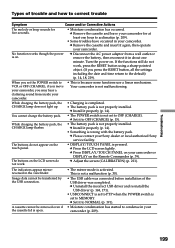
... a malfunction (p. 30).
• The USB cable was connected before installation of the USB driver was completed. c Uninstall the incorrect USB driver and re-install the USB driver (p. 168, 171).
• USBCONNECT is set to PTP when the POWER switch is set to MEMORY. c Set it to NORMAL (p. 191).
• Moisture condensation has started to condense in your camcorder (p. 209).
Troubleshooting
199
Operating Instructions - Page 207
... equipment. Before connecting this unit to your computer, make sure that application software supported by this unit is already installed on your computer. For details on precautions when connecting this unit, also refer to the instruction manuals for the equipment to be connected.
Required i.LINK Cable
Use the Sony i.LINK 4-pin-to-4-pin cable (during DV dubbing). i.LINK and are...