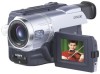
Sony DCR-TRV140 - Digital8 Camcorder With 2.5" LCD driver and firmware
Drivers and firmware downloads for this Sony item
Related Sony DCR-TRV140 Manual Pages
Download the free PDF manual for Sony DCR-TRV140 and other Sony manuals at ManualOwl.com
Operating Instructions - Page 3
... questions about this product, you may call: Sony Customer Information Center 1-800-222-SONY (7669) The number below is for the FCC related matters only.
Regulatory Information
Declaration of Conformity
Trade Name:
SONY
Model No.:
DCR-TRV140
Responsible Party: Sony Electronics lnc.
Address:
680 Kinderkamack Road, Oradell, NJ, 07649 U.S.A.
Telephone No.:
201-930-6972
This device complies...
Operating Instructions - Page 5
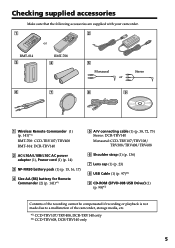
...: DCR-TRV140 Monaural: CCD-TRV107/TRV108/ TRV308/TRV408/TRV608
6 Shoulder strap (1) (p. 136)
7 Lens cap (1) (p. 23)
8 USB Cable (1) (p. 97)*2)
9 CD-ROM (SPVD-008 USB Driver) (1) (p. 98)*2)
Contents of the recording cannot be compensated if recording or playback is not made due to a malfunction of the camcorder, storage media, etc.
*1) CCD-TRV107/TRV408, DCR-TRV140 only *2) CCD-TRV608, DCR-TRV140...
Operating Instructions - Page 6
...
Using this manual 10 Step 1 Preparing the power supply ... 13
Installing the battery pack 13 Charging the battery pack 14 Connecting to a wall outlet 18 Step 2 Setting the date and time ........ 19 Step 3 Inserting a cassette 21
Recording - Basics
Recording a picture 23 Shooting backlit subjects - BACK LIGHT 29 Shooting in the dark - NightShot/ Super NightShot (DCR-TRV140 only)/ Color...
Operating Instructions - Page 7
... only desired scenes - Digital program editing (DCR-TRV140 only 83 Recording from video (DCR-TRV140 only 93 Inserting a scene from a VCR - Insert Editing (DCR-TRV140 only 95
PC Connection (CCD-TRV608, DCR-TRV140 only)
Viewing images using your computer - USB Streaming (Windows users only 97
Customizing Your Camcorder
Changing the menu settings 105
Troubleshooting
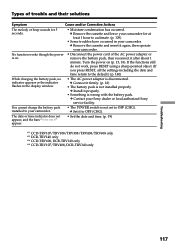
Types of trouble and their...
Operating Instructions - Page 8
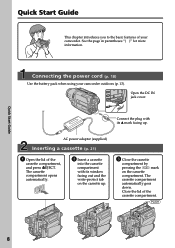
Quick Start Guide
This chapter introduces you to the basic features of your camcorder. See the page in parentheses "( )" for more information.
Connecting the power cord (p. 18)
Use the battery pack when using your camcorder outdoors (p. 13).
Open the DC IN jack cover.
Connect the plug with its v mark facing up.
AC power adaptor (supplied)
Inserting...
Operating Instructions - Page 12
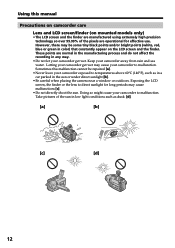
... this malfunction cannot be repaired [a].
•Never leave your camcorder exposed to temperatures above 60°C (140°F), such as in a car parked in the sun or under direct sunlight [b].
•Be careful when placing the camera near a window or outdoors. Exposing the LCD screen, the finder or the lens to direct sunlight for...
Operating Instructions - Page 13
Getting started
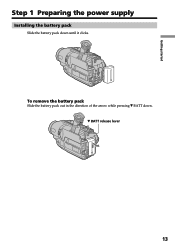
Step 1 Preparing the power supply
Installing the battery pack
Slide the battery pack down until it clicks.
To remove the battery pack
Slide the battery pack out in the direction of the arrow while pressing V BATT down. V BATT release lever
13
Operating Instructions - Page 14
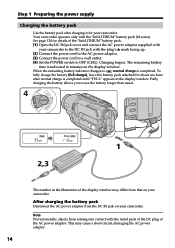
... connect the AC power adaptor supplied with
your camcorder to the DC IN jack with the plug's v mark facing up. (2) Connect the power cord to the AC power adaptor. (3) Connect the power cord to a wall outlet. (4) Set the POWER switch to OFF (CHG). Charging begins. The remaining battery
time is indicated in minutes on the display window. When the...
Operating Instructions - Page 15
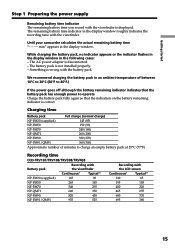
... the display window roughly indicates the recording time with the viewfinder.
Until your camcorder calculates the actual remaining battery time "- - - - min" appears in the display window.
While charging the battery pack, no indicator appears or the indicator flashes in the display window in the following cases:
- The AC power adapter is disconnected. - The battery pack is not installed properly...
Operating Instructions - Page 21
... mode in the menu settings, the recording
time is the 3/4 of the indicated time on Hi8 /Digital8 tape.*1)
•If you use standard 8 mm tape, be sure to play back the tape on this camcorder.
Mosaic noise may appear when you play back standard 8 mm tape on other
camcorders (including other DCR-TRV140.)*1)
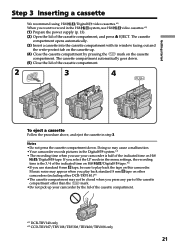
•The cassette compartment...
Operating Instructions - Page 23
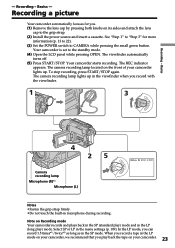
... grip strap. (2) Install the power source and insert a cassette. See "Step 1" to "Step 3" for more
information (p. 13 to 22). (3) Set the POWER switch to CAMERA while pressing the small green button.
Your camcorder is set to the standby mode. (4) Open the LCD panel while pressing OPEN. The viewfinder automatically
turns off. (5) Press START/STOP. Your camcorder starts recording. The REC...
Operating Instructions - Page 33
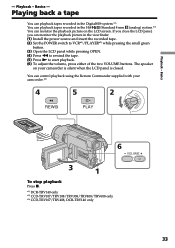
... playback tapes recorded in the Digital8 system.*1) You can playback tapes recorded in the Hi8 /Standard 8 mm (analog) system.*2) You can monitor the playback picture on the LCD screen. If you close the LCD panel, you can monitor the playback picture in the viewfinder. (1) Install the power source and insert the recorded tape. (2) Set the POWER switch to VCR*1)/PLAYER*2) while...
Operating Instructions - Page 97
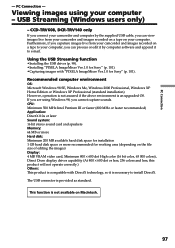
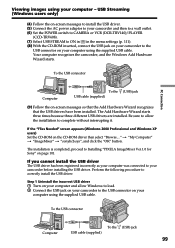
...your computer - USB Streaming (Windows users only)
- CCD-TRV608, DCR-TRV140 only
If you connect your camcorder and computer by the supplied USB cable, you can view images live from your camcorder and images recorded on a tape on your computer. Furthermore, if you caputure images live from your camcorder and images recorded on a tape to your computer, you can process or edit it by computer software...
Operating Instructions - Page 98
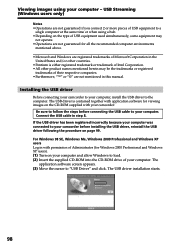
... to your camcorder before installing the USB driver, reinstall the USB driver following the procedure on page 99.
For Windows 98 SE, Windows Me, Windows 2000 Professional and Windows XP users Log in with permission of Administrator (for Windows 2000 Professional and Windows XP users). (1) Turn on your computer and allow Windows to load. (2) Insert the supplied CD-ROM into the CD-ROM drive of your...
Operating Instructions - Page 99
... images using your computer - USB Streaming (Windows users only)
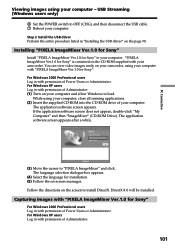
(4) Follow the on-screen messages to install the USB driver. (5) Connect the AC power adaptor to your camcorder and then to a wall outlet. (6) Set the POWER switch to CAMERA or VCR (DCR-TRV140)/PLAYER
(CCD-TRV608). (7) Select USB STREAM to ON in in the menu settings (p. 111). (8) With the CD-ROM inserted, connect the USB jack on your...
Operating Instructions - Page 101
... using your computer - USB Streaming (Windows users only)
6 Set the POWER switch to OFF (CHG), and then disconnect the USB cable. 7 Reboot your computer.
Step 2 Install the USB driver Perform the entire procedure listed in "Installing the USB driver" on the page 98.
Installing "PIXELA ImageMixer Ver.1.0 for Sony"
Install "PIXELA ImageMixer Ver.1.0 for Sony" to your computer. "PIXELA ImageMixer...
Operating Instructions - Page 104
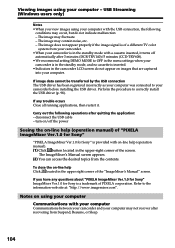
... to your camcorder before installing the USB driver. Perform the procedure to correctly install the USB driver (p. 98).
If any trouble occurs Close all running applications, then restart it.
Carry out the following operations after quitting the application: - disconnect the USB cable - turn on/off the power
Seeing the on-line help (operation manual) of "PIXELA ImageMixer Ver.1.0 for Sony"
"PIXELA...
Operating Instructions - Page 116
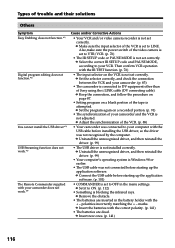
Types of trouble and their solutions
Others
Symptom Easy Dubbing does not function.*1)
Digital program editing does not function.*2)
You cannot install the USB driver.*3) USB Streaming function does not work.*3)
The Remote Commander supplied with your camcorder does not work.*4)
Cause and/or Corrective Actions
• Your VCR and/or video camera recorder is not set correctly. c Make sure the ...
Operating Instructions - Page 117
... authorized Sony service facility.
You cannot charge the battery pack installed to your camcorder.
• The POWER switch is not set to OFF (CHG). c Set it to OFF (CHG).
The date or time indicator does not appear, and the bars appear.
• Set the date and time. (p. 19)
*1) CCD-TRV107/TRV108/TRV308/TRV408/TRV608 only *2) DCR-TRV140 only *3) CCD-TRV608, DCR-TRV140...
Operating Instructions - Page 127
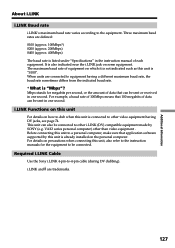
... . Before connecting this unit to a personal computer, make sure that application software supported by this unit is already installed on the personal computer. For details on precautions when connecting this unit, also refer to the instruction manuals for the equipment to be connected.
Required i.LINK Cable
Use the Sony i.LINK 4-pin-to-4-pin cable (during DV dubbing). i.LINK and are...