Sony DCR-TRV30 - Digital Video Camera Recorder driver and firmware
Related Sony DCR-TRV30 Manual Pages
Download the free PDF manual for Sony DCR-TRV30 and other Sony manuals at ManualOwl.com
Operating Instructions - Page 3
... to which the receiver is connected. - Consult the dealer or an experienced radio/TV technician for help. The shielded interface cable supplied with this equipment must be used with this equipment in order to comply with the limits for a digital device pursuant to Subpart B of Part 15 of FCC Rules.
For customers in CANADA...
Operating Instructions - Page 5
...
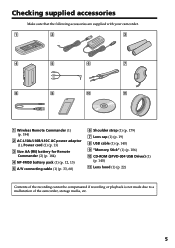
qa
1 Wireless Remote Commander (1) (p. 184)
2 AC-L10A/L10B/L10C AC power adaptor (1), Power cord (1) (p. 13)
3 Size AA (R6) battery for Remote Commander (2) (p. 184)
4 NP-FM50 battery pack (1) (p. 12, 13)
5 A/V connecting cable (1) (p. 33, 68)
6 Shoulder strap (1) (p. 179) 7 Lens cap (1) (p. 19) 8 USB cable (1) (p. 140) 9 "Memory Stick" (1) (p. 106) q; CD-ROM (SPVD-004 USB Driver) (1)
(p. 140...
Operating Instructions - Page 6
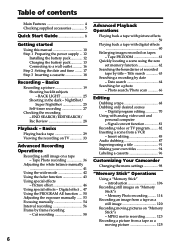
... desired scenes
- Digital program editing 70 Using with analog video unit and
personal computer - Signal convert function 81 Recording video or TV program ......... 82 Inserting a scene from a VCR - Insert editing 85 Audio dubbing 87 Superimposing a title 91 Making your own titles 94 Labeling a cassette 96
Customizing Your Camcorder
Changing the menu settings 98
"Memory Stick" Operations...
Operating Instructions - Page 8
...Guide
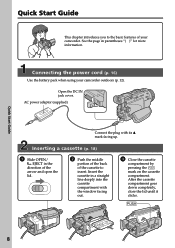
This chapter introduces you to the basic features of your camcorder. See the page in parentheses "( )" for more information.
Connecting the power cord (p. 16)
Use the battery pack when using your camcorder outdoors (p. 12). Open the DC IN jack cover.
AC power...in a straight line deeply into the cassette compartment with the window facing out.
3 Close the cassette
compartment by pressing the ...
Operating Instructions - Page 11
...manual
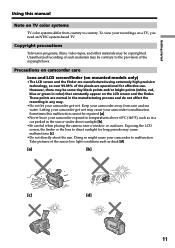
Note on TV color systems
TV color systems differ from country to country. To view your recordings on a TV, you need an NTSC system-based TV.
Copyright precautions
Television programs, films, video tapes, and other materials may be copyrighted. Unauthorized recording...direct sunlight [b].
•Be careful when placing the camera near a window or outdoors. Exposing the LCD screen, the finder...
Operating Instructions - Page 12
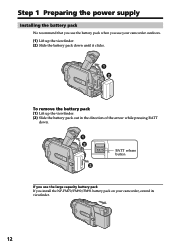
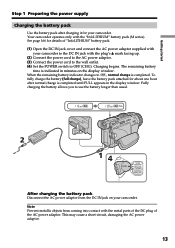
Step 1 Preparing the power supply
Installing the battery pack
We recommend that you use the battery pack when you use your camcorder outdoors. (1) Lift up the viewfinder. (2) Slide...the direction of the arrow while pressing BATT
down.
1 2
2
BATT release button
If you use the large capacity battery pack If you install the NP-FM70/FM90/FM91 battery pack on your camcorder, extend its viewfinder.
12
Operating Instructions - Page 13
... about one hour after normal charge is completed until FULL appears in the display window. Fully charging the battery allows you to use the battery longer than usual.
2
14
POWER
VCR OFF(CHG) CAMERA
MEMORY
After charging the battery pack
Disconnect the AC power adaptor from the DC IN jack on your camcorder.
Note Prevent metallic...
Operating Instructions - Page 14
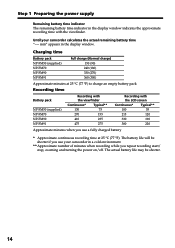
Step 1 Preparing the power supply
Remaining battery time indicator The remaining battery time indicator in the display window indicates the approximate recording time with the viewfinder.
Until your camcorder calculates the actual remaining battery time "---- min" appears in the display window.
Charging time
Battery pack NP-FM50 (supplied) NP-FM70 NP-FM90 NP-FM91
Full charge (Normal...
Operating Instructions - Page 17
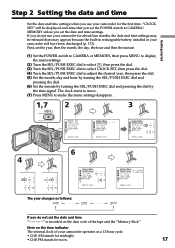
... (bars may appear) because the built-in rechargeable battery installed in your camcorder will have been discharged (p. 172). First, set the year, then the month, the day, the hour and then the minute.
(1) Set the POWER switch to CAMERA or MEMORY, then press MENU to display the menu settings.
(2) Turn the SEL/PUSH EXEC dial to select , then...
Operating Instructions - Page 18
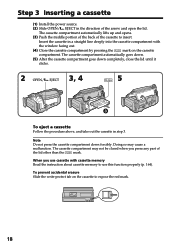
...Install the power source.
(2) Slide OPEN/ EJECT in the direction of the arrow and open the lid.
The cassette compartment automatically lifts up and opens.
(3) Push the middle portion of the back of the cassette to insert.
Insert the cassette in a straight line deeply into the cassette compartment with
the window...cassette with cassette memory Read the instruction about cassette memory to use ...
Operating Instructions - Page 19
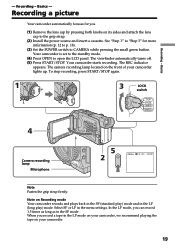
... is set to the standby mode.
(4) Press OPEN to open the LCD panel. The viewfinder automatically turns off. (5) Press START/STOP. Your camcorder starts recording. The REC indicator
appears. The camera recording lamp located on the front of your camcorder lights up. To stop recording, press START/STOP again.
1
3
LOCK
switch
POWER
VCR OFF(CHG) CAMERA
MEMORY
4
Camera recording lamp...
Operating Instructions - Page 29
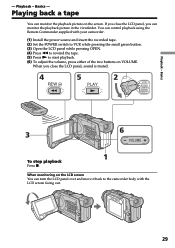
...picture in the viewfinder. You can control playback using the Remote Commander supplied with your camcorder.
(1) Install the power source and insert the recorded tape. (2) Set the POWER switch to VCR while pressing the ...
When you close the LCD panel, sound is muted.
4
REW
5
PLAY
2
POWER
VCR OFF(CHG) CAMERA
MEMORY
3
6
VOLUME
1
To stop playback
Press x.
When monitoring on the LCD screen ...
Operating Instructions - Page 37
...
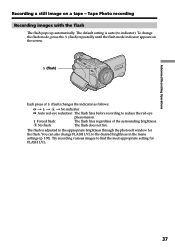
phenomenon.
Forced flash:
The flash fires regardless of the surrounding brightness.
No flash:
The flash does not fire.
The flash is adjusted to the appropriate brightness through the photocell window for the flash. You can also change FLASH LVL to the desired brightness in the menu settings (p. 100). Try recording various images to find the most appropriate setting for FLASH LVL.
37
Operating Instructions - Page 50
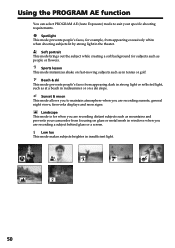
... you to maintain atmosphere when you are recording sunsets, general night views, fireworks displays and neon signs.
Landscape This mode is for when you are recording distant subjects such as mountains and prevents your camcorder from focusing on glass or metal mesh in windows when you are recording a subject behind glass or a screen.
Low lux...
Operating Instructions - Page 81
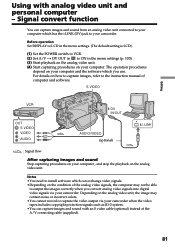
... POWER switch to VCR. (2) Set A/V t DV OUT in to ON in the menu settings (p. 100). (3) Start playback on the analog video unit. (4) Start capturing procedures on your computer. The operation procedures
depend on your computer and the software which you use. For details on how to capture images, refer to the instruction manual of computer and software.
S VIDEO
DV IN/OUT
OUT S VIDEO VIDEO
AUDIO...
Operating Instructions - Page 139
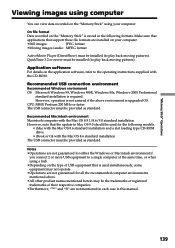
...environment is upgraded OS.
CPU: MMX Pentium 200 MHz or faster The USB connector must be provided as standard.
Recommended Macintosh environment
Macintosh computer with the Mac OS 8.5.1/8.6/9.0 standard installation However, note that the update to Mac OS 9.0 should be used for the following models.
• iMac with the Mac OS 8.6 standard installation and a slot loading type CD-ROM drive
•...
Operating Instructions - Page 140
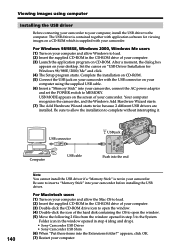
... your desktop. Set the cursor on "USB Driver Installation for Windows 98/98SE/2000/Me" and click. (4) The Setup program starts. Complete the installation on CD-ROM. (5) Connect the USB jack on your camcorder with the USB connector on your computer using the supplied USB cable. (6) Insert a "Memory Stick" into your camcorder, connect the AC power adaptor and set the POWER switch to MEMORY. USB MODE...
Operating Instructions - Page 143

... computer may not recover after recovering from Suspend, Resume, or Sleep.
Image file storage destinations and image files
Image files recorded with your camcorder are grouped in folders by recording mode. The meanings of the file names are as follows. ssss stands for any number within the range from 0001 to 9999.
For Windows 98 users (The drive...
Operating Instructions - Page 160
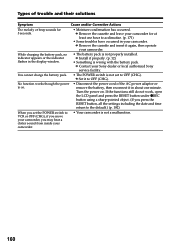
... indicator appears or the indicator flashes in the display window.
• The battery pack is not properly installed. c Install it properly. (p. 12)
• Something is wrong with the battery pack. c Contact your Sony dealer or local authorized Sony service facility.
You cannot charge the battery pack. • The POWER switch is not set to OFF (CHG). c Set it to OFF (CHG...
Operating Instructions - Page 169
...other i.LINK (DV) compatible equipment made by SONY (e.g. VAIO series personal computer) other than video equipment. Before connecting this unit to a personal computer, make sure that application software supported by this unit is already installed on the personal computer. For details on precautions when connecting this unit, also refer to the instruction manuals for the equipment to be connected...