Sony DCR-TRV840 - Digital Handycam Camcorder driver and firmware
Related Sony DCR-TRV840 Manual Pages
Download the free PDF manual for Sony DCR-TRV840 and other Sony manuals at ManualOwl.com
PIXELA ImageMixer 1.0 Manual - Page 1
... to the Windows version. The screenshots for Windows and Macintosh differ slightly. Moreover, images may vary according to monitor specifications.
q Due to the fact that the most recent information related to this software has not been added to the manual, please consult the Read Me file, included on the CD-ROM.
Using this manual
This manual explains all...
PIXELA ImageMixer 1.0 Manual - Page 2
... of Apple Computer, Inc. q In addition, the company names and brand names referenced in this manual
are themselves the trademarks, registered trademarks, and products of the respective companies.
Warning
1. All rights related to the user manual and software produced by our company (henceforth, 'product'), both of which are stored on the installation CD-ROM, belong solely...
PIXELA ImageMixer 1.0 Manual - Page 4
... use the software program (henceforth, "this program") and its add-ons, such as the user guide.
Consented matter
You are granted the nonexclusive, nontransferable right to install and use one copy of this program on a single computer.
The primary user of this program may copy parts thereof for backup purposes, with all usage rights, as set forth...
PIXELA ImageMixer 1.0 Manual - Page 6
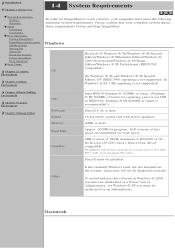
... ® XP Professional (IBM PC/AT compatible)
(In Windows ® 98 and Windows ® 98 Second Edition, DV (IEEE1394) capturing is not supported. In Windows ® 98, USB capturing is not supported)
Chapter 4 Movie Editing Environment
Chapter 5 Layout Environment
Chapter 6 Image Editor
CPU
Software Sound Memory Hard Disk
Graphics
Intel MMX ® Pentium ® 200MHz or faster. (Pentium...
PIXELA ImageMixer 1.0 Manual - Page 8
1-2 Setup
Installation
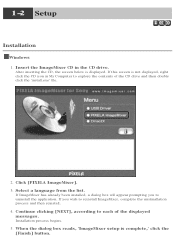
Windows 1. Insert the ImageMixer CD in the CD drive.
After inserting the CD, the screen below is displayed. If this screen is not displayed, right click the CD icon in My Computer to explore the contents of the CD drive and then double click the 'install.exe' file.
2. Click [PIXELA ImageMixer]. 3. Select a language from the list.
If ImageMixer...
PIXELA ImageMixer 1.0 Manual - Page 9
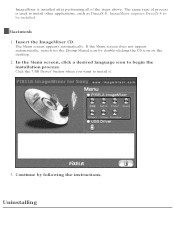
... Menu screen appears automatically. If the Menu screen does not appear automatically, search for the [Setup Menu] icon by double-clicking the CD icon on the desktop.
2. In the Menu screen, click a desired language icon to begin the installation process.
Click the 'USB Driver' button when you want to install it.
3. Continue by following the instructions.
Uninstalling
PIXELA ImageMixer 1.0 Manual - Page 36
...name of the CD-ROM device installed on your computer. From there, click the Properties button, and finally the Properties tab. On this screen, make sure that there is no check next to "Enable digital CD audio for this CDROM device."
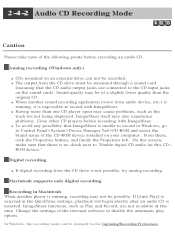
Digital recording
q If digital recording from the CD drive is not possible, try analog recording.
Macintosh supports only digital recording
Recording in Macintosh When...
PIXELA ImageMixer 1.0 Manual - Page 144
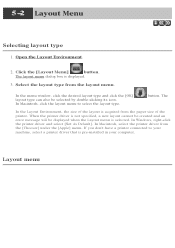
... layout cannot be created and an error message will be displayed when the Layout menu is selected. In Windows, right-click the printer driver and select [Set As Default]. In Macintosh, select the printer driver from the [Chooser] under the [Apple] menu. If you don't have a printer connected to your machine, select a printer driver that is pre-installed in your computer.
Layout menu
Operating Instructions - Page 94
... recorded on a tape on your computer (USB Streaming function). Furthermore, if you capture images recorded on a tape from your camcorder to your computer, you can process or edit them in image processing software and append them to e-mail.
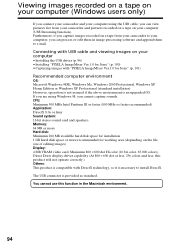
Connecting with USB cable and viewing images on your computer
•Installing the USB driver (p. 96) •Installing "PIXELA ImageMixer Ver.1.0 for Sony...
Operating Instructions - Page 96

...your computer and allow Windows to load. (2) Insert the supplied CD-ROM into the CD-ROM drive of your computer. The
application software screen appears. (3) Move the cursor to "USB Driver" and click. This starts USB driver installation.
(4) Follow the on-screen messages to install the USB driver. (5) Connect the AC power adaptor to your camcorder and then to a wall outlet. (6) Set the POWER switch...
Operating Instructions - Page 97
...of the USB driver was completed. Perform the following procedure to correctly install the USB driver. Step 1: Uninstall the incorrect USB driver 1 Turn on your computer and allow Windows to load. 2 Connect the USB connector on your computer to the (USB) jack on your camcorder using the USB cable supplied with your camcorder. 3 Connect the AC power adaptor, and set the POWER switch to CAMERA or VCR...
Operating Instructions - Page 99
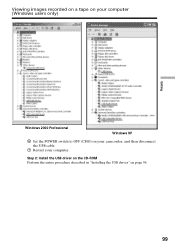
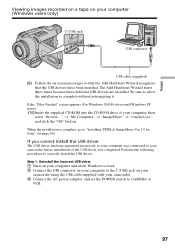
Viewing images recorded on a tape on your computer (Windows users only)
Editing
Windows 2000 Professional
Windows XP
6 Set the POWER switch to OFF (CHG) on your camcorder, and then disconnect the USB cable.
7 Restart your computer.
Step 2: Install the USB driver on the CD-ROM Perform the entire procedure described in "Installing the USB driver" on page 96.
99
Operating Instructions - Page 100
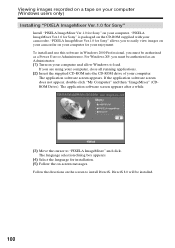
...-ROM supplied with your camcorder. "PIXELA ImageMixer Ver.1.0 for Sony" allows you to easily view images on your camcorder on your computer for your enjoyment. To install and use this software in Windows 2000 Professional, you must be authorized as a Power User or Administrator. For Windows XP, you must be authorized as an Administrator. (1) Turn on your computer and allow Windows to load...
Operating Instructions - Page 101
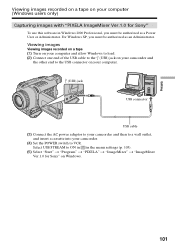
... Ver.1.0 for Sony"
To use this software in Windows 2000 Professional, you must be authorized as a Power User or Administrator. For Windows XP, you must be authorized as an Administrator.
Viewing images
Viewing images recorded on a tape (1) Turn on your computer and allow Windows to load. (2) Connect one end of the USB cable to the (USB) jack on your camcorder and
the other...
Operating Instructions - Page 104

... incorrectly as your computer was connected to your camcorder before installation of the USB driver was completed. Reinstall the USB driver following the procedure on page 97.
If any trouble occurs Close all running applications, then restart it.
Carry out the following operations after quitting the application: - Disconnect the USB cable - Change the POWER switch setting or set it to OFF...
Operating Instructions - Page 156
... cable in step 6.
If the USB driver has been registered incorrectly because your computer was connected to your camcorder before installation of the USB driver was completed. Reinstall the USB driver following the procedure on page 158.
(1) Turn on the power of your computer and allow Windows to load. (2) Insert the supplied CD-ROM into the CD-ROM drive of your computer. The
application software...
Operating Instructions - Page 157
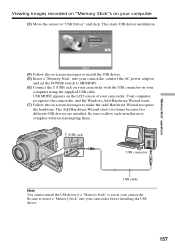
... messages to install the USB driver. (5) Insert a "Memory Stick" into your camcorder, connect the AC power adaptor
and set the POWER switch to MEMORY. (6) Connect the (USB) jack on your camcorder with the USB connector on your
computer using the supplied USB cable. USB MODE appears on the LCD screen of your camcorder. Your computer recognizes the camcorder, and the Windows Add Hardware Wizard...
Operating Instructions - Page 158
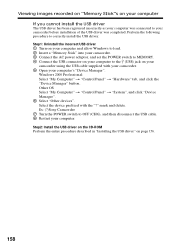
...Turn on your computer and allow Windows to load. 2 Insert a "Memory Stick" into your camcorder. 3 Connect the AC power adaptor, and set the POWER switch to MEMORY. 4 Connect the USB connector on your computer to the (USB) jack on your
camcorder using the USB cable supplied with your camcorder. 5 Open your computer's "Device Manager".
Windows 2000 Professional: Select "My Computer" t "Control Panel...
Operating Instructions - Page 160

...iMac with the Mac OS 8.6 standard installation and a slot loading type CD-ROM drive •iBook or Power Mac G4 with the Mac OS 8.6 standard installation The USB connector must be provided as standard.
Installing the USB driver
Before connecting your camcorder to your computer, install the USB driver on the computer. The USB driver is packaged together with application software for viewing images...
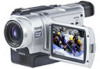
Marketing Specifications - Page 2
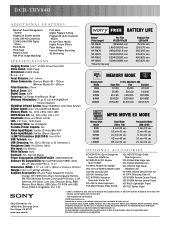
... x 101mm x 207mm) Weight: 2 lbs 3 oz (1015g) w/Battery Supplied Accessories: AC-L10 Power Adapter/In Camera
Charger, NP-FM50 InfoLithium Rechargeable Battery, RMT-814 Wireless Remote Commander® Remote, 2 AA Batteries, A/V Cable, Lens Cap, Shoulder Strap, 8MB Memory Stick Media, USB Cable, CD-ROM with USB Driver (PIXELA ImageMixer Ver. 1.0)
BATTERY LIFE
Battery* (Fully charged)
Rec Time VF...