Sony DCRPC1000 - DCR-PC1000 MiniDV Handycam Camcorder driver and firmware
Drivers and firmware downloads for this Sony item

Related Sony DCRPC1000 Manual Pages
Download the free PDF manual for Sony DCRPC1000 and other Sony manuals at ManualOwl.com
Operating Guide - Page 3

... with the limits for a digital device pursuant to Subpart B of Part 15 of FCC Rules.
Notes on use
Your camcorder is supplied with two kinds of operations guides. - "Operating Guide" (This manual) - "First Step Guide" for connecting the
camcorder to a computer and using the supplied software (stored on the supplied CD-ROM)
On the types of recording media you can use in...
Operating Guide - Page 7
... 69 Marking images on the "Memory Stick Duo" with specific information
(Image protection/Print mark 69 Printing recorded images (PictBridge compliant printer 70 Jacks to connect external devices 72
Using a computer
Before referring to the "First Step Guide" on your computer 73 Installing the software and "First Step Guide" on a computer 75 Viewing "First Step Guide 80 Creating a DVD...
Operating Guide - Page 8
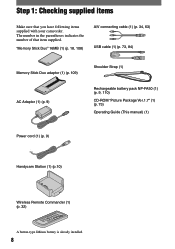
... cable (1) (p. 34, 63) USB cable (1) (p. 73, 84)
Memory Stick Duo adaptor (1) (p. 109) AC Adaptor (1) (p. 9)
Shoulder Strap (1)
Rechargeable battery pack NP-FA50 (1) (p. 9, 110) CD-ROM "Picture Package Ver.1.7" (1) (p. 73) Operating Guide (This manual) (1)
Power cord (1) (p. 9)
Handycam Station (1) (p.10)
Wireless Remote Commander (1) (p. 32)
A button-type lithium battery is already installed...
Operating Guide - Page 17
... or a "Memory Stick Duo"
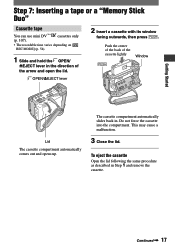
Cassette tape
You can use mini DV
cassettes only
(p. 107).
• The recordable time varies depending on [
REC MODE] (p. 54).
1 Slide and hold the OPEN/
EJECT lever in the direction of the arrow and open the lid.
OPEN/EJECT lever
2 Insert a cassette with its window
facing outwards...
Operating Guide - Page 40
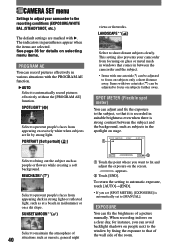
... automatic exposure, touch [AUTO][END].
• If you set [SPOT METER], [EXPOSURE] is automatically set to [MANUAL].
EXPOSURE
You can fix the brightness of a picture manually. When recording indoors on a clear day, for instance, you can avoid backlight shadows on people next to the window by fixing the exposure to that of the wall...
Operating Guide - Page 44

... performed optically, and after that, up to 120 × zoom is performed digitally.
STEADYSHOT
You can compensate for camera shake (the default setting is [ON]). Set [STEADYSHOT] to [OFF] ( ) when using a tripod (optional) or the conversion lens (optional).
PROGRES.REC
You can reduce image blur when recording moving pictures on tapes, intended for import to your computer...
Operating Guide - Page 72
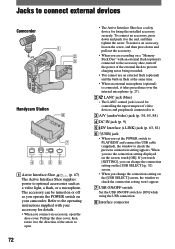
...; The LANC control jack is used for controlling the tape transport of video devices and peripherals connected to it.
A/V (audio/video) jack (p. 34, 63, 84)
DC IN jack (p. 9)
DV Interface (i.LINK) jack (p. 63, 81)
(USB) jack • When you set the POWER switch to PLAY/EDIT and connect the USB cable (supplied), the window to check...
Operating Guide - Page 73

... recorded on a tape.
About "First Step Guide"
"First Step Guide" is an instruction manual you can refer to on your computer. This "First Step Guide" describes basic operations, from initial hookup of your camcorder and computer and making settings, to general operation the first time you use the software and "First Step Guide" stored on the CD-ROM (supplied). After installing the CD-ROM...
Operating Guide - Page 74
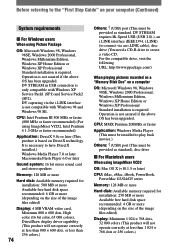
... upgraded.
CPU: MMX Pentium 200MHz or faster
Application: Windows Media Player (This must be installed to play back movies.)
Others: (USB) port (This must be provided as standard), disc drive
For Macintosh users When using ImageMixer VCD2
OS: Mac OS X (v10.1.5 or later)
CPU: iMac, eMac, iBook, PowerBook, PowerMac G3/G4/G5 series
Memory: 128 MB or more
Hard disk: Available memory...
Operating Guide - Page 75
...: (USB) port (This must be provided as standard)
• When you connect your camcorder to a Macintosh computer using a USB cable (supplied), you cannot copy pictures recorded on a tape to the computer. To copy recordings from a tape, connect your camcorder to the computer with an i.LINK cable (optional) and use the standard software in the OS.
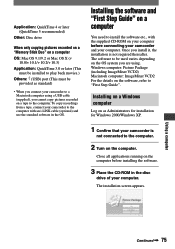
Installing the software and "First Step Guide" on...
Operating Guide - Page 76
...with the InstallShield Wizard. In such a case, manually copy "First Step Guide" to your computer according to the message's instructions.
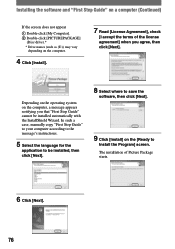
5 Select the language for the
application to be installed, then click [Next].
8 Select where to save the
software, then click [Next].
9 Click [Install] on the [Ready to
Install the Program] screen. The installation of Picture Package starts.
6 Click [Next].
76
Operating Guide - Page 77
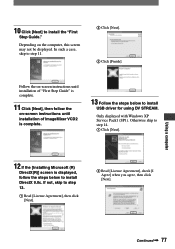
... [Next]. Click [Finish].
Follow the on-screen instructions until installation of "First Step Guide" is complete.
11 Click [Next], then follow the
on-screen instructions until installation of ImageMixer VCD2 is complete.
13 Follow the steps below to install
USB driver for using DV STREAM.
Only displayed with Windows XP Service Pack1 (SP1). Otherwise skip to step 14. Click...
Operating Guide - Page 78
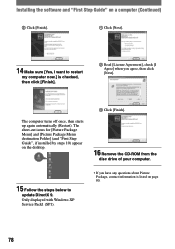
... Package Menu destination Folder] (and "First Step Guide", if installed by steps 10) appear on the desktop.
Click [Finish].
16 Remove the CD-ROM from the
disc drive of your computer.
15 Follow the steps below to
update DirectX 9.
Only displayed with Windows XP Service Pack1 (SP1).
• If you have any questions about Picture Package, contact information is listed...
Operating Guide - Page 79

... the [FirstStepGuide] folder, to your computer.
6 Copy [IMXINST.SIT] in the [MAC]
folder of the CD-ROM to a folder of your choice.
7 Double-click [IMXINST.SIT] in the
folder it was copied to.
8 Double-click the unzipped
[ImageMixerVCD2_Install].
9 When the user acceptance screen
is displayed, enter your name and password. The installation of ImageMixer VCD2 starts.
• For...
Operating Guide - Page 80
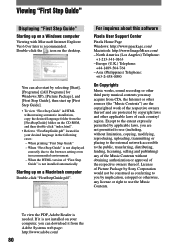
... printing "First Step Guide" - When "First Step Guide" is not displayed
correctly due to the browser setting even in recommended environment. - When the HTML version of "First Step Guide" is not installed automatically.
Starting up on a Macintosh computer Double-click "FirstStepGuide.pdf".
For inquires about this software
Pixela User Support Center
Pixela Home Page Windows: http://www.ppackage...
Operating Guide - Page 81
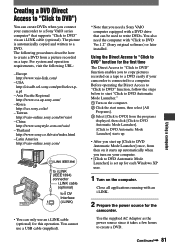
...
• You can only use an i.LINK cable (optional) for this operation. You cannot use a USB cable (supplied).
* Note that you need a Sony VAIO computer equipped with a DVD drive that can be used to write DVDs. You also need the computer with "Click to DVD Ver.1.2" (Sony original software) or later installed.
Using the Direct Access to "Click to DVD...
Operating Guide - Page 84
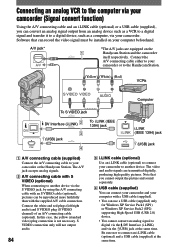
... and an i.LINK cable (optional) or a USB cable (supplied), you can convert an analog signal output from an analog device such as a VCR to a digital signal and transfer it to a digital device, such as a computer, via your camcorder. Software that can record the video signal must be installed on your computer beforehand.
A/V jack* A/V
*The A/V jacks are equipped on the
1
Handycam Station and the...
Operating Guide - Page 99
...with Windows XP Service Pack1 (SP1) or Service Pack2 (SP2) supporting High-Speed USB (USB 2.0) device. • You cannot use DV STREAM via the USB connection and the i.LINK connection at the same time.
You cannot view the video recorded on a tape on a Macintosh computer. • When you connect your camcorder to a Macintosh computer using a USB cable (supplied), you cannot copy pictures recorded...
Operating Guide - Page 100

... copy video and still images to the Windows computer. • Display pictures recorded on a "Memory Stick Duo" with the following procedures. 1 Double-click [My Computer]. 2 Double-click the icon for the newly recognized drive [Removable Disk (F:)] ([Sony MemoryStick]). It may take some time until the drive is recognized. If the computer does not recognize it, the USB driver may be installed...
Operating Guide - Page 112
... i.LINK (DV Interface) compatible devices made by Sony (e.g. a VAIO series personal computer) as well as to video devices. Before connecting this unit to your computer, make sure that application software supported by this unit is already installed on your computer. Some i.LINK compatible video devices, such as Digital Televisions, DVD, MICROMV or HDV recorders/players are not compatible with DV...