Sony DSC-P7 - Cyber-shot Digital Still Camera driver and firmware
Related Sony DSC-P7 Manual Pages
Download the free PDF manual for Sony DSC-P7 and other Sony manuals at ManualOwl.com
Operating Instructions (primary manual) - Page 3
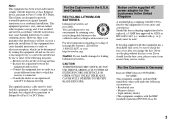
...digital device, pursuant to Part 15 of the FCC Rules. These limits are designed to provide reasonable protection against harmful interference in a residential installation. This equipment generates, uses, and can radiate radio frequency energy and, if not installed and used in accordance with the instructions...fuse cover, please contact your nearest Sony service station.
For the Customers in Germany...
Operating Instructions (primary manual) - Page 4
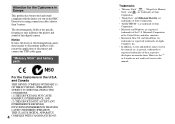
... may influence the picture and sound of this digital camera.
Notice If static electricity or electromagnetism causes data transfer to discontinue midway (fail), restart the application or disconnect and connect the USB cable again.
"Memory Stick" and battery pack
N50
For the Customers in the U.S.A. and Canada THIS DEVICE COMPLIES WITH PART 15 OF THE FCC...
Operating Instructions (primary manual) - Page 5
... examples of pictures in this manual are reproduced images, and are not actual images shot using this camera.
Do not aim the camera at the sun or other bright light This may cause irrecoverable damage to your eyes.
Back up recommendation To avoid the potential risk of data loss, always copy (back up) data to a disk.
5
Operating Instructions (primary manual) - Page 6
... a "Memory Stick 40
Copying still images to your computer
Copying still images to your computer .. 41 1 Installing the USB driver 42 2 Preparing your camera 43 3 Connecting your camera to your
computer 44 4 Copying images 45 5 Viewing the images on your
computer 48 For Macintosh users 51
Before advanced operations
How to setup and operate your camera...52 Changing menu settings 52...
Operating Instructions (primary manual) - Page 7

...Recording an enlarged image - Trimming 64
Playing back successive images (Slide show 64
Rotating still images 65
Editing movies 75 Cutting movies 75 Deleting unnecessary portions of movies 76
Copying movies to your computer ......... 77 For Windows 98, 98SE, 2000, Me users 77 For Windows...88
Menu items 89 SET UP items 93 Precautions... single screen 73
The "Memory Stick 96 The "InfoLITHIUM...
Operating Instructions (primary manual) - Page 8
...
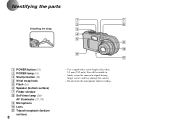
A POWER button (15) B POWER lamp (15) C Shutter button (22) D Wrist strap hook E Flash (26) F Speaker (bottom surface) G Finder window H Self-timer lamp (26)/
AF illuminator (27, 93) I Microphone J Lens K Tripod receptacle (bottom
surface)
8
1
7
2
8
3
4
5 9
0 6
qa
• Use a tripod with a screw length of less than 5.5 mm (7/32 inch). You will be unable to firmly secure the camera...
Operating Instructions (primary manual) - Page 23
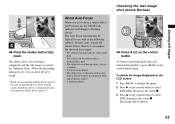
..., the shooting is completed, and the still image is saved in the "Memory Stick." When the Recording lamp goes out, you can shoot the next image.
• When you are shooting with the battery pack, if no tasks are performed for a while with the camera turned on, power is automatically shut off to preserve battery...
Operating Instructions (primary manual) - Page 41
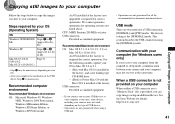
... the following models, update your OS to Mac OS 9.0 or 9.1. - iMac with Mac OS 8.6 installed at
the factory, and a slot loading type CD-ROM drive - iBook or Power Mac G4 with the Mac OS 8.6 installed at the factory USB connector: Provided as standard equipment
• If you connect two or more USB devices to your computer at one time, some devices, including your camera, may not work...
Operating Instructions (primary manual) - Page 42
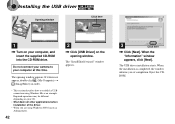
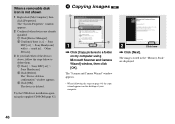
1 Installing the USB driver
Opening window
Click here
1
, Turn on your computer, and insert the supplied CD-ROM into the CD-ROM drive.
Do not connect your camera to your computer at this time.
The opening window appears. If it does not appear, double-click (My Computer) t
(ImageMixer) in order.
• This section describes how to establish a USB connection using Windows Me as an example...
Operating Instructions (primary manual) - Page 43
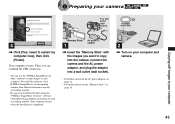
... DirectX when using the "PIXELA ImageMixer for Sony" software. Click [DirectX] and follow instructions on each succeeding window. Your computer restarts when the installation is completed.
"Memory Stick"
1
AC power 2 adaptor
, Insert the "Memory Stick" with the images you want to copy into the camera. Connect the camera and the AC power adaptor, and plug the adaptor into a wall outlet (wall...
Operating Instructions (primary manual) - Page 44
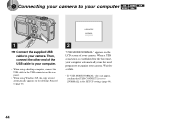
... your camera to your computer
USB MODE
NORMAL a a a a
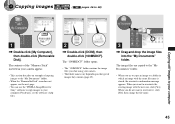
1
, Connect the supplied USB cable to your camera. Then, connect the other end of the USB cable to your computer.
• When using a desktop computer, connect the USB cable to the USB connector on the rear panel.
• When using Windows XP, the copy wizard automatically appears on the desktop. Proceed to page 46.
2
"USB MODE NORMAL...
Operating Instructions (primary manual) - Page 45
... computer
1
, Double-click [My Computer], then double-click [Removable Disk].
The contents of the "Memory Stick" inserted in your camera appear.
• This section describes an example of copying images to the "My Documents" folder.
• When the "Removable Disk" icon does not appear, see the next page.
• You can use the "PIXELA ImageMixer for Sony" software to copy...
Operating Instructions (primary manual) - Page 46
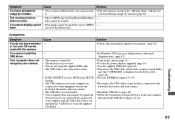
... below to delete them. 1 Click [ Sony DSC] or [ Sony Handycam]. 2 Click [Delete]. The "Device deletion confirmation" window appears. 3 Click [OK]. The device is deleted.
Try the USB driver installation again using the supplied CD-ROM (page 42).
4 Copying images
1
2
1
, Click [Copy pictures to a folder on my computer using Microsoft Scanner and Camera Wizard] window, then click [OK].
The "Scanner...
Operating Instructions (primary manual) - Page 48
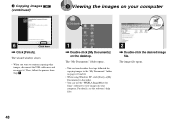
... the desktop.
The "My Documents" folder opens.
• This section describes the steps followed for copying images to the "My Documents" folder on pages 45 and 46.
• When using Windows XP, click [Start]t[My Documents] in that order.
• You can use the "PIXELA ImageMixer for Sony" software to view images on your computer. For...
Operating Instructions (primary manual) - Page 51
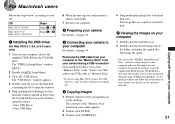
...your OS.
OS
Steps
Mac OS 8.5.1/8.6/9.0
Steps 1 to 5
Mac OS 9.1/9.2/ Mac OS X (v10.0/v10.1)
Steps 2 to 5
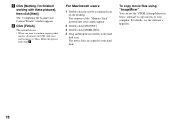
1 Installing the USB driver
(For Mac OS 8.5.1, 8.6, or 9.0 users only)
1 Turn on your computer, and set the supplied CD-ROM into the CD-ROM drive. The "PIXELA ImageMixer" window appears.
2 Double-click (Setup Menu).
3 Click (USB Driver). The "USB Driver" window appears.
4 Double-click the...
Operating Instructions (primary manual) - Page 78
... the desktop. The contents of the "Memory Stick" inserted into your camera appear.
2 Double-click [MSSONY]. 3 Double-click [MOML0001]. 4 Drag and drop the movie files to the hard
disk icon. The movie files are copied to your hard disk.
To copy movie files using "ImageMixer" You can use the "PIXELA ImageMixer for Sony" software to copy movies to your computer. For...
Operating Instructions (primary manual) - Page 83
...
device because you connected the camera and your computer with the USB cable before you installed the "USB Driver" from the supplied CD-ROM.
p Turn on the camera (page 15). p Use the AC power adaptor (supplied) (page 14). p Use the supplied USB cable (page 44). p Disconnect the USB cable, and securely connect it again. Make
sure that "USB MODE" is displayed on the LCD screen (page 44). p Set...
Operating Instructions (primary manual) - Page 102
...
Additional information
G
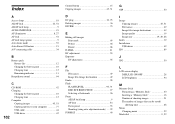
GIF 50
I
Image Copying images 45, 51 File names 49 Image file storage destinations 49 Image quality 19 Image size 19, 20, 88
Index 32 Installation
USB driver 42 ISO 89
J
JPG 50
L
LCD screen display DSPL/LCD ON/OFF 28 LCD brightness 94
M
Memory Stick Formatting a "Memory Stick 40 Inserting a "Memory Stick 18 Number of shooting...
Marketing Specifications - Page 1
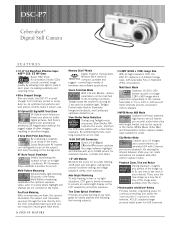
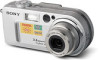
DSC-P7
Cyber-shot® Digital Still Camera
F E AT U R E S
➤1/1.8" 3.2 MegaPixel Effective Super
HAD™ CCD, 3.3 MP Gross Super HAD (Hole Accumulation Diode) CCDs provide excellent image
quality by allowing more light to pass to each pixel, increasing sensitivity and reducing noise.
➤Ultra Compact Design
Slim and sleek, the DSC-P7 is small enough to fit most any pocket...
Marketing Specifications - Page 2
... Software: Pixela® Image Mixer for Sony v1.0,
USB Driver SPVD-008 OS Compatibility: Microsoft® Windows® 98/98SE/Me/
2000 Professional/XP Home/Pro Macintosh® OS 8.5.1/8.6/9.0/9.1/9.2 Supplied Accessories: NP-FC10 InfoLithium® Rechargeable Battery, AC-LS1 AC Adapter/In-Camera Charger, A/V and USB cables, Wrist Strap, MSA-16A 16MB Memory Stick® Media; Software CD-ROM...