Sony DSC-P71 - Cyber-shot Digital Still Camera driver and firmware
Related Sony DSC-P71 Manual Pages
Download the free PDF manual for Sony DSC-P71 and other Sony manuals at ManualOwl.com
Operating Instructions (primary manual) - Page 3

...digital device, pursuant to Part 15 of the FCC Rules. These limits are designed to provide reasonable protection against harmful interference in a residential installation. This equipment generates, uses, and can radiate radio frequency energy and, if not installed and used in accordance with the instructions...USA/UL Certified power supply cord set, cord is Type...your nearest Sony service station.
For...
Operating Instructions (primary manual) - Page 6
... camera
In addition to malfunctions and inability to record images, this may render the "Memory...not affect the recording in any way.
• Be careful when placing the camera near a window or outdoors. ...camera wet
When taking pictures outdoors in the rain or under similar conditions, be careful not to get the camera wet. If moisture condensation occurs, see page 99 and follow the instructions...
Operating Instructions (primary manual) - Page 7
...
The photographs used as examples of pictures in this manual are reproduced images, and are not actual images shot using this camera.
Trademarks
• "Memory Stick,"
, "MagicGate Memory
Stick," and , are trademarks of Sony
Corporation.
•
is a trademark of Sony
Corporation.
• Microsoft and Windows are registered
trademarks of the U.S. Microsoft Corporation
in the United...
Operating Instructions (primary manual) - Page 8
... (3 images) screen 41
Formatting a "Memory Stick 43
Copying still images to your computer
Copying still images to your computer ...44 1 Installing the USB driver 45 2 Preparing your camera 46 3 Connecting your camera to your
computer 47 4 Copying images 48
When a removable disk icon is not shown 49
Copying images (for Windows XP users 49
Image file storage destinations and file names 51...
Operating Instructions (primary manual) - Page 9

... your computer ..........80 For Windows 98, 98SE, 2000, Me users 80 For Windows XP users 80 For Macintosh users 81
Troubleshooting
Troubleshooting 82 Warnings and messages 89 Self-Diagnostics Display 90 The number of images that can be saved/
shooting time 91
Additional information
Menu items 92 SET UP items 97 Precautions 99 The "Memory Stick...
Operating Instructions (primary manual) - Page 10
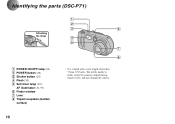
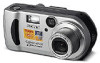
... parts (DSC-P71)
Attaching the strap
A POWER ON/OFF lamp (20) B POWER button (20) C Shutter button (26) D Flash (30) E Self-timer lamp (29)/
AF illuminator (31, 97) F Finder window G Lens H Tripod receptacle (bottom
surface)
1
2
3
6
4 5
7
8
• Use a tripod with a screw length of less than 5.5mm (7/32 inch). You will be unable to firmly secure the camera to tripods...
Operating Instructions (primary manual) - Page 12

... (continued) (DSC-P31)
1
2
3
5
Attaching
6
the strap
7
4 8
A POWER ON/OFF lamp (20) B POWER button (20) C Shutter button (26) D Flash (30) E Self-timer lamp (29)/
AF illuminator (31, 97) F Finder window G Lens H Tripod receptacle (bottom
surface)
• Use a tripod with a screw length of less than 5.5mm (7/32 inch). You will be unable to firmly secure the camera to...
Operating Instructions (primary manual) - Page 27
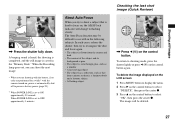
... the still image is saved in the "Memory Stick." When the Recording lamp goes out, you can shoot the next image.
• When you are shooting with the battery, if no tasks are performed for a while* with the camera turned on, power is automatically shut off to preserve battery power (page 20).
* When POWER SAVE is set to...
Operating Instructions (primary manual) - Page 44
... the following models, update your OS to Mac OS 9.0 or 9.1. - iMac with Mac OS 8.6 installed at
the factory, and a slot loading type CD-ROM drive - iBook or Power Mac G4 with the Mac OS 8.6 installed at the factory USB connector: Provided as standard equipment
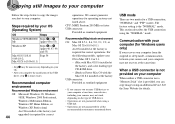
• If you connect two or more USB devices to your computer at one time, some devices, including your camera, may not work...
Operating Instructions (primary manual) - Page 45
... USB driver
Opening window
Click here
Copying still images to your computer
1
, Turn on your computer, and insert the supplied CD-ROM into the CD-ROM drive.
Do not connect your camera to your computer at this time.
The opening window appears. If it does not appear, double-click (My Computer) t
(ImageMixer) in order.
• This section describes how to establish a USB connection using Windows...
Operating Instructions (primary manual) - Page 46
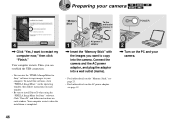
... camera
"Memory Stick"
To the wall outlet
(mains) 3 1
3
4
, Click "Yes, I want to restart my computer now," then click "Finish."
Your computer restarts. Then, you can establish the USB connection.
• You can use the "PIXELA ImageMixer for Sony" software to copy images to your computer. To install this software, click "PIXELA ImageMixer," on the operating window, then follow instructions...
Operating Instructions (primary manual) - Page 48
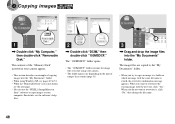
... the "Memory Stick" inserted in your camera appear.
• This section describes an example of copying images into the "My Documents" folder.
• When using Windows XP, see pages 49 to 51. • When the "Removable Disk" icon is not shown,
see the next page. • You can use the "PIXELA ImageMixer for
Sony" software to copy images...
Operating Instructions (primary manual) - Page 49
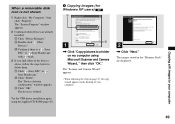
... to delete them. 1 Click " Sony DSC" or " Sony Handycam." 2 Click "Delete." The "Device deletion confirmation" window appears. 3 Click "OK." The device is deleted.
Try the USB driver installation again using the supplied CD-ROM (page 45).
4 Copying images (for Windows XP users)
1
2
1
, Click "Copy pictures to a folder on my computer using Microsoft Scanner and Camera Wizard, " then click "OK...
Operating Instructions (primary manual) - Page 53
... computer
Copying still images to your computer
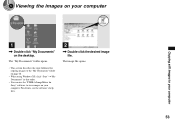
1
, Double-click "My Documents" on the desktop.
The "My Documents" folder opens.
• This section describes the steps followed for copying images to the "My Documents" folder on page 48.
• When using Windows XP, click "Start"t"My Documents" in that order.
• You can use the "PIXELA ImageMixer for Sony" software...
Operating Instructions (primary manual) - Page 54
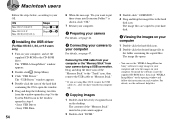
...to your OS.
OS
Steps
Mac OS 8.5.1/8.6/9.0
Steps 1 to 5
Mac OS 9.1/9.2/ Mac OS X(v10.0/v10.1)
Steps 2 to 5
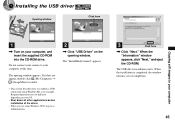
1 Installing the USB driver
(For Mac OS 8.5.1, 8.6, or 9.0 users only)
1 Turn on your computer, and set the supplied CD-ROM to the CD-ROM drive. The "PIXELA ImageMixer" window appears.
2 Double-click (Setup Menu).
3 Click "USB Driver." The "USB Driver" window appears.
4 Double-click the...
Operating Instructions (primary manual) - Page 80
... to copy movies you shot to your computer.
Preparations 1 Install the USB driver. 2 Insert the "Memory Stick" on which the
movies are stored, into your camera. Then, turn on the camera. 3 Connect the camera to your PC.
• For details, see page 44. • Step 1 is unnecessary when your OS is
Windows XP, Mac OS 9.1, Mac OS 9.2, or Mac OS X(v10.0/v10.1).
For Windows 98...
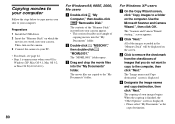
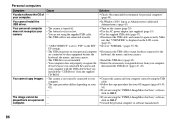
Operating Instructions (primary manual) - Page 82
... the display window shows "C:ss:ss", the selfdiagnostics function is working. Please see page 90.
2 Press the RESET button (pages 11, 13) on the bottom of the camera, then turn on the power again. (This will erase the date/time settings, etc.)
RESET button
Troubleshooting
3 Consult your Sony dealer or local authorized Sony service facility.
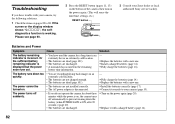
Batteries and Power
Symptom...
Operating Instructions (primary manual) - Page 86
... properly recognize the
device because you connected the camera and your computer with the USB cable before you installed the "USB Driver" from the supplied CD-ROM.
p Turn on the camera (page 20). p Use the AC power adaptor (not supplied) (page 19). p Use the supplied USB cable (page 47). p Disconnect the USB cable, and connect it again securely. Make
sure that "USB MODE" is displayed on the...
Operating Instructions (primary manual) - Page 106
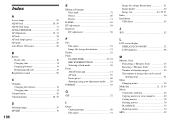
... mode) ..... 26 FORMAT 43
G
GIF 52
I
Image Copying images 48 File names 51
Image file storage destinations 51 Image quality 24 Image size 24, 25, 91 Index 36 Installation USB driver 45
J
JPG 52
L
LCD screen display DISPLAY/LCD ON/OFF 32 LCD brightness 98
M
Memory Stick Formatting a "Memory Stick 43 Inserting a "Memory Stick 23 Number of shooting images 25...
Marketing Specifications - Page 2
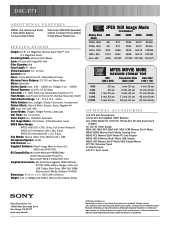
DSC-P71
ADDITIONAL FEATURES
MPEG1 Cue, Review and Divide 5 Mode White Balance 3:2 Aspect Ratio Mode
Video Output (PAL/NTSC Selectable) 4 Mode In-Camera Picture Effects 5 Step Manual Preset Focus
S P E C I F I C AT I O N S
Imager: 1/1.8" 3.2 MegaPixel effective Super HAD™ CCD
(3.3 MegaPixel Gross) Recording Media: Memory Stick® Media Zoom: 3X Optical/2X Digital/6X Total Filter ...