Sony DSC-S60 - Cyber-shot Digital Still Camera driver and firmware
Related Sony DSC-S60 Manual Pages
Download the free PDF manual for Sony DSC-S60 and other Sony manuals at ManualOwl.com
Marketing Specifications - Page 2
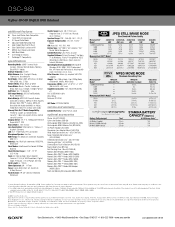
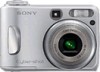
DSC-S60
Cyber-shot® Digital Still Camera
additional features
3 Cyber-shot Station Dock Compatible s 14-Bit DXP A/D Conversion s 3:2 Aspect Ratio Mode s Adjustable Color/Saturation/Hue s Auto Daylight Synchro Fill Flash s Clear Color/Clear Luminance NR s MPEG1 Cue, Review and Divide s Multi Burst Mode s Live Histogram Display s PictBridge™ Compatibility
specifications
Recording Media: ...
Operating Instructions - Page 9
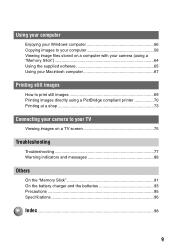
... your Windows computer 56 Copying images to your computer 58 Viewing image files stored on a computer with your camera (using a "Memory Stick 64 Using the supplied software 65 Using your Macintosh computer 67
Printing still images
How to print still images 69 Printing images directly using a PictBridge compliant printer 70 Printing at a shop 73
Connecting your camera to your TV
Viewing...
Operating Instructions - Page 56

...
Enjoying your W indow s com puter
For details on using a Macintosh computer, refer to "Using your Macintosh computer" (page 67).
Copying images to your computer (page 58)
Preparation
Viewing images on your computer
Installing the USB driver.
• Installation of the USB driver is not needed when using Windows XP.
Enjoying images using "PicturePackage" (page 65)
Viewing images saved on...
Operating Instructions - Page 57

... for using "PicturePackage"/"ImageMixer VCD2"
Software: Macromedia Flash Player 6.0 or later, Windows Media Player 7.0 or later, DirectX 9.0b or later
Sound card: 16-bit stereo sound card with speakers
Memory: 64 MB or more (128 MB or more is recommended.)
Hard Disk: Disk space required for installation-approximately 500 MB
Display: Video card (Direct Draw driver compliant) with 4 MB of VRAM...
Operating Instructions - Page 58
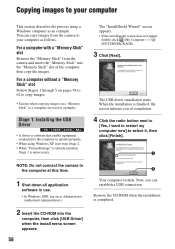
... the "Memory Stick" from the camera and insert the "Memory Stick" into the "Memory Stick" slot of the computer, then copy the images.
For a computer without a "Memory Stick" slot
Follow Stages 1 through 5 on pages 58 to 62 to copy images.
• Screens when copying images on a "Memory Stick" to a computer are used as examples.
Stage 1: Installing the USB Driver
• A driver is software that...
Operating Instructions - Page 65

... yet installed the USB driver
(page 58), do not connect the camera to the computer before you install the "PicturePackage" software (except for Windows XP). • In Windows 2000/XP, log on as Administrator. • When "PicturePackage" is installed, the USB driver is installed automatically.
1 Turn on your computer, and insert
the CD-ROM (supplied) into the CD-ROM drive.
The installation menu...
Operating Instructions - Page 67
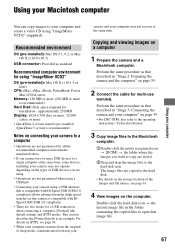
...-installed): Mac OS 9.1, 9.2, or Mac OS X (v10.0-v10.3)
USB connector: Provided as standard
Recommended computer environment for using "ImageMixer VCD2"
OS (pre-installed): Mac OS X (v10.1.5 or later)
CPU: iMac, eMac, iBook, PowerBook, Power Mac G3/G4 series
Memory: 128 MB or more (256 MB or more is recommended.)
Hard Disk: Disk space required for installation - approximately 250 MB
Display: 1024...
Operating Instructions - Page 82
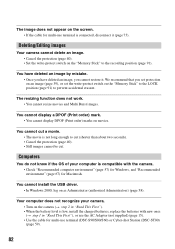
... camera. • Turn on the camera (t step 2 in "Read This First"). • When the battery level is low, install the charged batteries, replace the batteries with new ones (t step 1 in "Read This First"), or use the AC Adaptor (not supplied) (page 15). • Use the cable for multi-use terminal (DSC-S90/S80/S60) or Cyber-shot Station (DSC...
Operating Instructions - Page 83

... does not properly recognize the device because you connected the camera and
your computer with the cable for multi-use terminal (DSC-S90/S80/S60) or Cyber-shot Station (DSC-ST80) before you installed the "USB Driver" from the supplied CD-ROM. Delete the erroneously recognized device from your computer, then install the USB driver (see the next item).
The Removable disk icon does not appear on...
Operating Instructions - Page 98
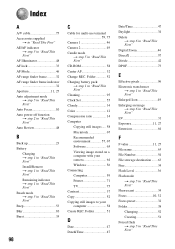
...-ROM 58 Center AF 32 Change REC. Folder 52 Charging battery pack t step 1 in "Read This First" Cleaning 95 Clock Set 55 Cloudy 34 Color 12 Compression ratio 14 Computer Copying still images ..... 58 Macintosh 67 Recommended environment 57, 67 Software 65 Viewing image stored on a computer with your camera 64 Windows 56 Connecting Computer 59 Printer 71 TV 75 Contrast 37 Copy...
Operating Instructions - Page 100
... Backlight 53 Self-diagnosis display...........88 Self-timer t step 5 in "Read This First" Sepia 36 Setting the clock t step 2 in "Read This First" Setup 37, 44, 45 Camera 1 46 Camera 2 49 Internal Memory Tool ...50 Memory Stick Tool .......51 Setup 1 53 Setup 2 54 Setup 1 53 Setup 2 54 Sharpness 37 Shooting Movie t step 5 in "Read This First"
100
Still image t step 5 in "Read...
User Guide / Troubleshooting - Page 56
...
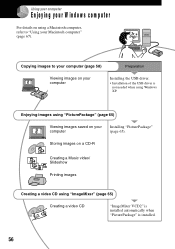
Enjoying your W indow s com puter
For details on using a Macintosh computer, refer to "Using your Macintosh computer" (page 67).
Copying images to your computer (page 58)
Preparation
Viewing images on your computer
Installing the USB driver.
• Installation of the USB driver is not needed when using Windows XP.
Enjoying images using "PicturePackage" (page 65)
Viewing images saved on...
User Guide / Troubleshooting - Page 57
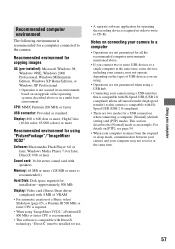
... for using "PicturePackage"/"ImageMixer VCD2"
Software: Macromedia Flash Player 6.0 or later, Windows Media Player 7.0 or later, DirectX 9.0b or later
Sound card: 16-bit stereo sound card with speakers
Memory: 64 MB or more (128 MB or more is recommended.)
Hard Disk: Disk space required for installation-approximately 500 MB
Display: Video card (Direct Draw driver compliant) with 4 MB of VRAM...
User Guide / Troubleshooting - Page 58

... the "Memory Stick" from the camera and insert the "Memory Stick" into the "Memory Stick" slot of the computer, then copy the images.
For a computer without a "Memory Stick" slot
Follow Stages 1 through 5 on pages 58 to 62 to copy images.
• Screens when copying images on a "Memory Stick" to a computer are used as examples.
Stage 1: Installing the USB Driver
• A driver is software that...
User Guide / Troubleshooting - Page 65

... yet installed the USB driver
(page 58), do not connect the camera to the computer before you install the "PicturePackage" software (except for Windows XP). • In Windows 2000/XP, log on as Administrator. • When "PicturePackage" is installed, the USB driver is installed automatically.
1 Turn on your computer, and insert
the CD-ROM (supplied) into the CD-ROM drive.
The installation menu...
User Guide / Troubleshooting - Page 67

...-installed): Mac OS 9.1, 9.2, or Mac OS X (v10.0-v10.3)
USB connector: Provided as standard
Recommended computer environment for using "ImageMixer VCD2"
OS (pre-installed): Mac OS X (v10.1.5 or later)
CPU: iMac, eMac, iBook, PowerBook, Power Mac G3/G4 series
Memory: 128 MB or more (256 MB or more is recommended.)
Hard Disk: Disk space required for installation - approximately 250 MB
Display: 1024...
User Guide / Troubleshooting - Page 82

... camera. • Turn on the camera (t step 2 in "Read This First"). • When the battery level is low, install the charged batteries, replace the batteries with new ones (t step 1 in "Read This First"), or use the AC Adaptor (not supplied) (page 15). • Use the cable for multi-use terminal (DSC-S90/S80/S60) or Cyber-shot Station (DSC...
User Guide / Troubleshooting - Page 83
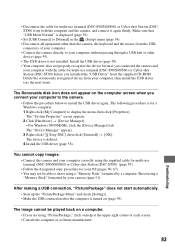
... does not properly recognize the device because you connected the camera and
your computer with the cable for multi-use terminal (DSC-S90/S80/S60) or Cyber-shot Station (DSC-ST80) before you installed the "USB Driver" from the supplied CD-ROM. Delete the erroneously recognized device from your computer, then install the USB driver (see the next item).
The Removable disk icon does not appear on...
User Guide / Troubleshooting - Page 98
...-ROM 58 Center AF 32 Change REC. Folder 52 Charging battery pack t step 1 in "Read This First" Cleaning 95 Clock Set 55 Cloudy 34 Color 12 Compression ratio 14 Computer Copying still images ..... 58 Macintosh 67 Recommended environment 57, 67 Software 65 Viewing image stored on a computer with your camera 64 Windows 56 Connecting Computer 59 Printer 71 TV 75 Contrast 37 Copy...
User Guide / Troubleshooting - Page 100

... Backlight 53 Self-diagnosis display...........88 Self-timer t step 5 in "Read This First" Sepia 36 Setting the clock t step 2 in "Read This First" Setup 37, 44, 45 Camera 1 46 Camera 2 49 Internal Memory Tool ...50 Memory Stick Tool .......51 Setup 1 53 Setup 2 54 Setup 1 53 Setup 2 54 Sharpness 37 Shooting Movie t step 5 in "Read This First"
100
Still image t step 5 in "Read...